This post was translated from the original with AI assistance. Read the original
What is the CLR? What is metadata? What is the JIT? How does the CLR work?
This post takes a fairly deep dive into the first three chapters of CLR via C#.
Preface#
I’ve read CLR via C# cover to cover two or three times, but there’s still a lot in it that I haven’t really dug into and explored.
Why read this book, and why read it more than once? At first I wasn’t so sure myself. Later on I figured it out.
The reason Unity can go cross-platform has to do with Mono or IL2CPP. And Mono is closely tied to the .NET Framework: Mono is a cross-platform .NET platform, while the .NET Framework only serves Windows. The CLR is part of Mono or the .NET Framework, and it plays a crucial role. I’ll talk about the principles behind Unity’s cross-platform support another time.
There aren’t many books about the CLR out there, and the only one that covers both C# and the CLR is CLR via C#. Unity uses C# as its scripting language, and the script compilation workflow is closely tied to the CLR, so we should read CLR via C#, a must-read for Unity programmers. If we learn Unity programming without understanding how the CLR works or the concepts around IL code, we’ll only ever write inefficient, low-performance, low-quality code.
Starting this time, I’ve decided not just to read the book, but also to get hands-on, look up more material online, and compare some existing concepts to deepen my understanding of the CLR. So this post will have not only a theory part but also a practical part.
The CLR’s execution model#
Before talking about the CLR, let’s talk about Java and the Java Virtual Machine. Java became hugely popular across platforms thanks to being cross-platform, and that’s down to the Java Virtual Machine. The javac compiler compiles Java source code into bytecode, which is a binary file that can be executed on the Java Virtual Machine.
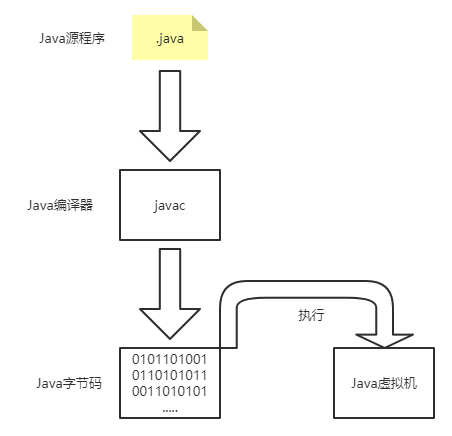
As long as a computer has the Java runtime installed, it can run Java programs through it. A quick recap of compiling and running Java from the command line: first javac ***.java produces a ***.class bytecode file (you can open it in a text editor and it’s all 0s and 1s), then java *** runs that bytecode file.
Microsoft wanted to build a runtime similar to the Java Virtual Machine, so that programs could run on any machine with that virtual machine (or runtime) installed, but without being limited to the Java language the way the JVM is. So Microsoft released the .NET Framework.
The .NET Framework has two parts: the .NET Framework class library and the CLR. You can think of the CLR as Microsoft’s version of the Java Virtual Machine. The features the CLR was designed to support include: multi-language support, assembly loading, garbage collection, type safety, exception handling, thread synchronization and so on. Simply put, the CLR is there for convenience, for safety, and to simplify the coding process. The CLR is more powerful than the JVM because it’s backed by the .NET Framework class library from the start. The CLR isn’t tied to one programming language; it supports many. That makes developing CLR-targeted programs easy for programmers familiar with different languages, and you can use each language’s particular strengths for specific jobs, which boosts productivity. But the .NET Framework isn’t cross-platform; it only serves Windows.
What’s truly cross-platform is Mono, from Xamarin. The Mono project runs not only on Windows but also on Linux, FreeBSD, Unix, Mac OS and Solaris, and even on some gaming platforms such as PlayStation 3/4, Wii U/Switch and Xbox 360/Xbox One. Like the .NET Framework, it’s an implementation of the CLI (Common Language Infrastructure). Microsoft’s .NET Framework uses the .NET Framework class library as its runtime library, while Mono uses the Mono VM as its runtime library. The Unity engine chose Mono as its cross-platform solution from the very beginning, which I think really was a wise choice at the time (later it adopted IL2CPP, of course, but that’s for another day). Anyway, both Mono and the .NET Framework contain a CLR and rely on it to do the core work. After all that, what exactly is the CLR? How does it work?
What is the CLR#
CLR stands for Common Language Runtime. It can be used by many programming languages, as long as the language targets the CLR. Thanks to this, we can pick different languages for work in different domains and get the most efficient result. For example: APL for mathematical or financial applications, Iron Python for some scripting work, and so on… which saves a lot of time. Any computer with the .NET Framework installed can run CLR-targeted programs.
Compiling source code into managed modules#
Analogous to the bytecode Java produces, the CLR has something similar to bytecode, but it’s quite different. The compilers of the various CLR-targeted languages compile their source code into managed modules.
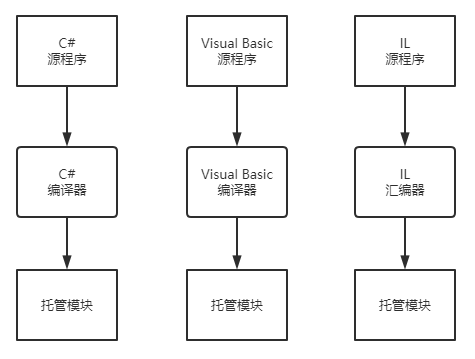
A managed module isn’t binary bytecode. A managed module usually contains several parts:
- A PE32 or PE32+ header
- A CLR header
- Metadata
- IL code
The PE32/PE32+ header is the standard Windows PE header. It identifies which versions of Windows the file can run on: 32 means it can run on 32-bit or 64-bit, and 32+ means 64-bit only. It also identifies the file type (GUI, CUI, DLL, etc.) and contains a timestamp (when the file was built). If the managed module contains only IL code, most of the information in the PE header is ignored. If the module contains native CPU code, the PE header also contains information about that native CPU code.
The CLR header contains the information that makes a module a managed module. For example, the required CLR version, some flags, the MethodDef metadata token of the managed module’s entry method (the Main method), and the locations or sizes of the module’s metadata, resources, strong name, some flags and other less important data items.
Metadata is really a block of data made up of several kinds of tables, a collection of data tables. There are three kinds of tables: definition tables, reference tables and manifest tables. (The book says there are mainly two kinds; there are actually three.) Definition tables describe the types and members defined in the source code; reference tables describe the types and members the source code references; manifest tables mainly contain the names of the files that make up the assembly, and also describe the assembly’s version, culture, publisher, publicly exported types and all the files that constitute the assembly. Of course, we’ll go into metadata in more detail later.
IL code, Intermediate Language code, is the code the compiler produces when compiling the source code. As the name suggests, IL is an intermediate language, meaning IL code can be further compiled into native CPU code. At runtime, the CLR compiles IL code into native CPU code. Because the CLR manages its execution, it’s also called managed code.
Metadata#
Metadata is a collection of data tables, including definition tables, reference tables and manifest tables; see the concepts above for what each kind does. Metadata is always associated with the file containing the IL code: it’s always embedded in the same EXE/DLL as the IL code, making the two inseparable. The compiler produces the metadata and the IL code at the same time, binds them together and embeds them in the resulting managed module, so metadata and the IL code it describes can never get out of sync.
Some uses of metadata:
- It removes the need for native C/C++ header and library files at compile time, because the IL code already contains all the information about the referenced types/members. The compiler reads metadata directly from the managed module to get information about referenced types/members, instead of relying on C/C++ header files.
- IntelliSense makes use of metadata. It parses the metadata to find out which methods, properties, events, fields etc. a type offers. For methods, it can also get the parameters, the number of overloads and so on. That’s the code completion we rely on every day when writing code.
- The CLR uses metadata to verify the code’s safety, ensuring the code only performs type-safe operations.
- It supports serializing/deserializing an object’s field information.
- It lets the garbage collector track object lifetimes. The garbage collector uses metadata to determine which other objects are referenced by the fields of any object’s type.
We’ll come back to concrete applications of metadata later.
C++ and the CLR#
By default, C++ produces EXE/DLL modules containing unmanaged code, which work with unmanaged data (native memory) at runtime. C++ can also produce modules containing managed code; you just turn on the /CLR switch, but for that code to run, the user must have the CLR environment (i.e. the .NET Framework installed). C++ can contain both managed and unmanaged code, built into the same module. It also lets you use native C/C++ code in managed code first and then use managed types later when needed.
Combining managed modules into assemblies#
Assemblies#
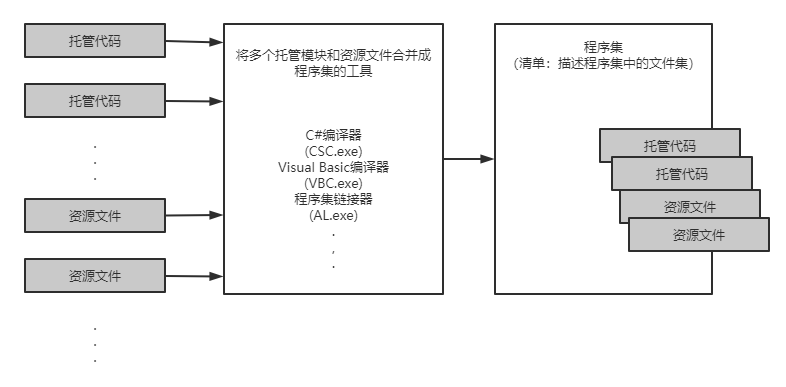
At this point you might think the CLR works directly with managed modules, but it doesn’t. The CLR works directly with assemblies, and an assembly contains multiple modules and resource files, so the CLR manages managed modules indirectly. An assembly is a logical grouping of one or more modules/resource files, and it’s the smallest unit of reuse, security and versioning. You can produce a single-file assembly or a multifile assembly, depending on the compiler or tool you choose. In the CLR world, an assembly is the equivalent of a “component”.
Put simply, an assembly is a collection, a manifest, which contains one or more managed modules or resource files (.jpeg, .gif, .html, .xml, .json and so on and so forth).
An assembly is a reusable, securable, versionable “component”, and it separates its logical representation from its physical representation.
An assembly contains information about the assemblies it references, which makes it self-describing. The CLR can determine the program’s immediate dependencies needed to execute the code in the assembly, without storing extra information in the registry or in Active Directory Domain Services (ADDS), which makes it easier to deploy than unmanaged components.
The combining process#
After the compiler produces the managed modules, it also combines them with any resource files to produce an assembly. If an assembly has only one managed module and no resource files, then the assembly is the managed module, and no extra steps are needed.
Loading the Common Language Runtime#
Checking whether the CLR is installed#
An assembly can be built as an .EXE (an executable application) or a .DLL (a dynamic-link library for use by other executables). To run or use an assembly, the CLR has to be loaded first, so the computer must have the CLR environment installed (the .NET Framework on Windows). Windows 10 ships with the .NET Framework out of the box; on Windows 7/8 you may need to download and install it manually.
To check whether your Windows machine has the .NET Framework installed, just go to the %SystemRoot%\System32 folder and see if there’s a MSCorEE.dll file.
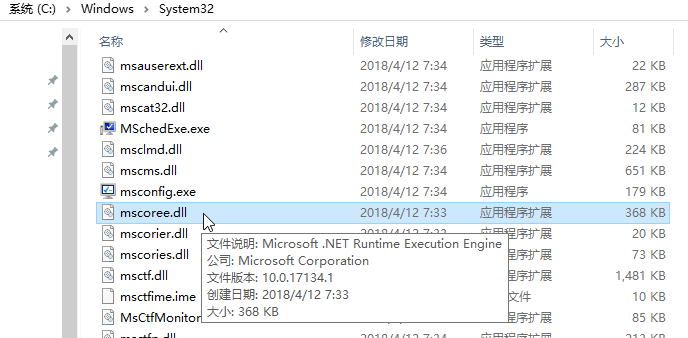
If there is, the .NET Framework is installed.
Of course, a computer may have several different versions of the .NET Framework installed. Check %SystemRoot%\Microsoft.NET\Framework and %SystemRoot%\Microsoft.NET\Framework64.
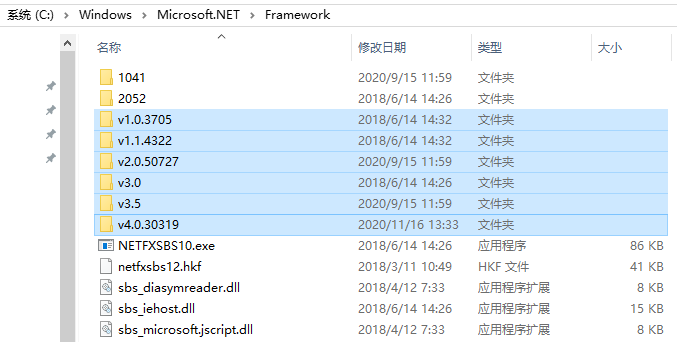
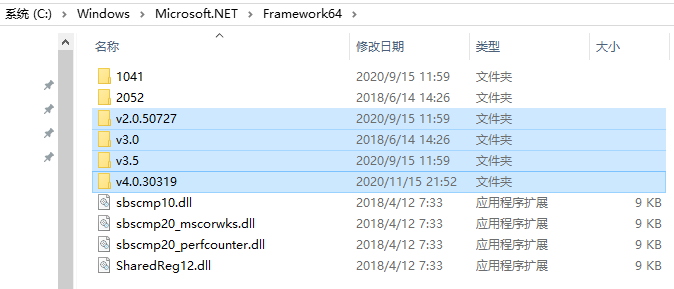
Checking the CLR version#
The .NET Framework SDK also provides a program called CLRVer.exe, which lists all the CLR versions installed on the machine, and can also list the CLR version used by processes currently running on the machine.
First I used Everything to find where clrver.exe is:
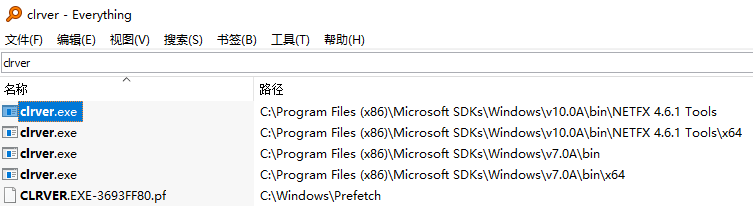
Then I opened cmder in that directory:
clrver.exe -all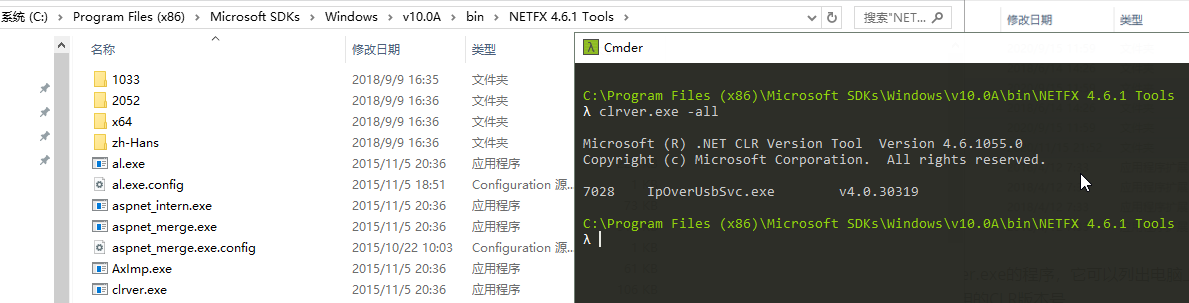
You can see there are different versions.
Then I ran some random client-server game demo, looked up their PIDs (process IDs) in Task Manager, and then:
clrver.exe <PID>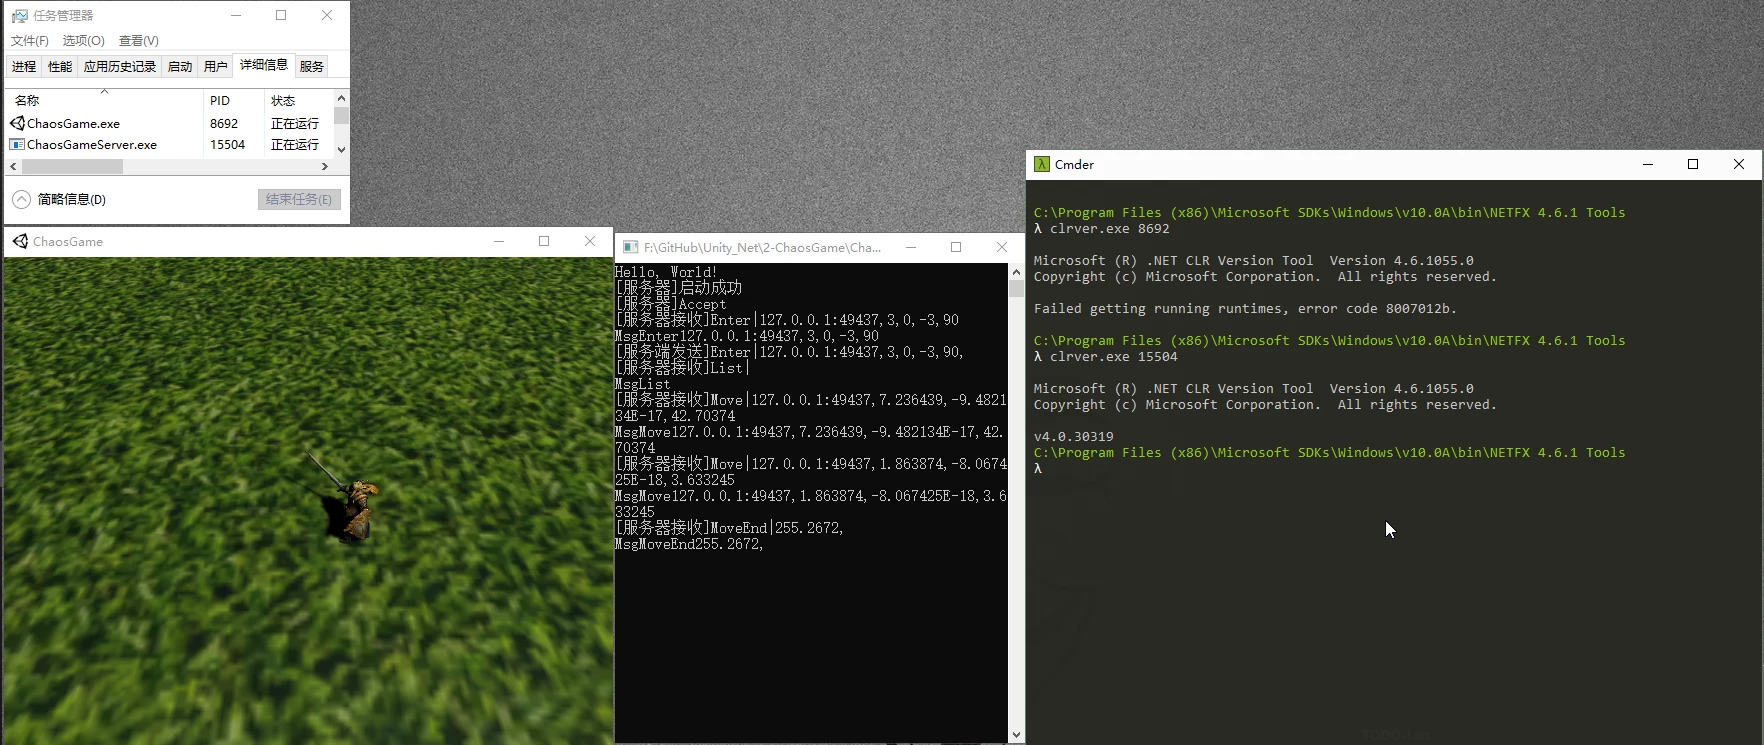
You can also see which CLR version each of them uses.
Building platform-specific assemblies#
If an assembly file contains only type-safe managed code, the code works fine on both 32-bit and 64-bit Windows, whether you’re on Windows 10 or Windows RT, 32-bit or 64-bit.
But in some cases, developers want their code to run only on a specific version and architecture of Windows. For that you use C#’s /platform command-line switch.
The C# compiler provides the /platform command-line switch, which offers several options with different effects:
| /platform switch | Resulting managed module | x86 Windows | x64 Windows | ARM Windows RT |
|---|---|---|---|---|
| anycpu (default) | PE32/any CPU architecture | Runs as a 32-bit application | Runs as a 64-bit application | Runs as a 32-bit application |
| anycpu32bitpreferred | PE32/any CPU architecture | Runs as a 32-bit application | Runs as a WoW64 application | Runs as a 32-bit application |
| x86 | PE32/x86 | Runs as a 32-bit application | Runs as a WoW64 application | Doesn’t run |
| x64 | PE32+/x64 | Doesn’t run | Runs as a 64-bit application | Doesn’t run |
| ARM | PE32/ARM | Doesn’t run | Doesn’t run | Runs as a 32-bit application |
WoW64 (Windows on Windows64) is a technology for running 32-bit applications on 64-bit Windows.
Microsoft ships the SDK command-line utilities DumpBin.exe and CorFlags.exe, which you can use to inspect the information embedded in the managed modules a compiler produces. I’ll try out the specific steps in the practical part of this post.
How the CLR is loaded#
When an executable runs, Windows examines the file header to determine whether it needs a 32-bit or 64-bit address space. A PE32 file can run in either a 32-bit or 64-bit address space, while a PE32+ file can only run in a 64-bit address space. Windows also checks the CPU architecture information embedded in the header to make sure the current machine’s CPU meets the requirements. Finally, 64-bit versions of Windows run 32-bit Windows applications via WoW64.
After Windows examines the EXE header and decides whether to create a 32-bit or 64-bit process, it loads the x86, x64 or ARM version of MSCorEE.dll into the process’s address space. On x86 or ARM versions of Windows, the x86 version of MSCoreEE.dll is in the %SystemRoot%\System32 directory. On x64 versions of Windows, the x86 version of MSCoreEE.dll is in the %SystemRoot%\SysWow64 directory and the x64 version is in %SystemRoot%\System32 (for backward compatibility). Then the process’s primary thread calls a method defined in MSCorEE.dll, which initializes the CLR, loads the EXE assembly, and calls its entry method (Main). At that point the managed application is up and running.
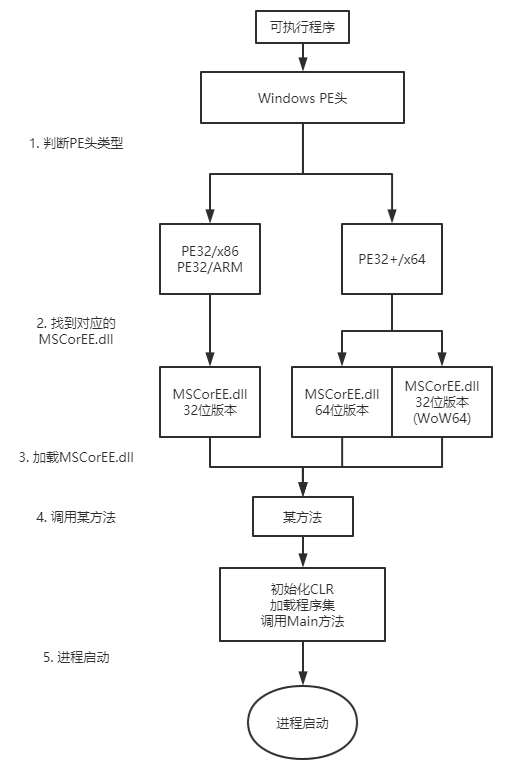
If an unmanaged application loads a managed assembly with LoadLibrary, Windows automatically loads and initializes the CLR. A 64-bit process can’t fully load a managed assembly compiled with the /platform:x86 switch, but an executable compiled with /platform:x86 can be loaded on 64-bit Windows using WoW64.
Executing an assembly’s code#
A first look at IL#
An assembly’s code really means its IL. IL is CPU-independent code, a language that’s higher-level than most CPU machine languages. It can access and manipulate object types, and it provides instructions to create and initialize objects, call virtual methods on objects and manipulate array elements directly. It even provides instructions for throwing and catching exceptions to implement exception handling. That’s right, it looks a lot like the object-oriented programming languages we know; you can think of it as an object-oriented machine language.
When writing CLR-targeted programs in high-level languages like C# or VB, the C# or VB compiler produces IL. Of course, you can also write IL in assembly language. Microsoft provides an IL assembler, ILAsm.exe, and an IL disassembler, ILDasm.exe; I’ll cover how to use them in the practical part.
High-level languages usually expose only a subset of everything the CLR can do. But IL can access all of the CLR’s features. If the language you’ve chosen hides a CLR feature, you may need to write that part of the code in IL.
How a method is executed#
The first time a method is executed, the CLR uses the JIT (just-in-time) compiler to convert the method’s IL into native CPU instructions.
For example, say there’s a managed EXE whose source has a Main method like this:
static void Main()
{
    Console.WriteLine("Hello");
    Console.WriteLine("Goodbye");
}
Before executing Main, the CLR first detects all the types referenced in Main. The CLR allocates an internal data structure to manage access to the referenced types. The code above references the Console type, so the internal data structure holds entries for the Console type’s methods, each entry containing the address of a method, through which the method’s actual implementation can be found. When this structure is initialized, the CLR sets each entry to point to a JITCompiler function, which handles the rest.
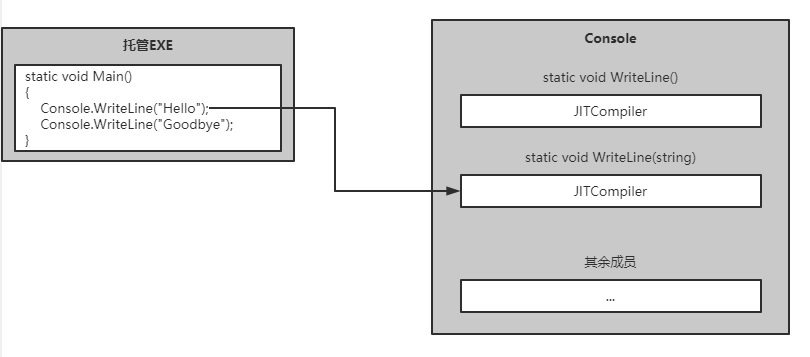
The first time Main calls WriteLine(string), the JITCompiler function is called. The JITCompiler function does the following:
- Looks up the called method (WriteLine(string) in the example above) in the metadata of the assembly that implements the type (the Console type in the example above)
- Gets the method’s IL from the metadata
- Allocates a block of memory
- Compiles the IL into native CPU instructions and stores the native code in the memory allocated in step 3
- Modifies the method’s entry in the Type table so it points to the memory block allocated in step 3
- Jumps to the native code in the memory block
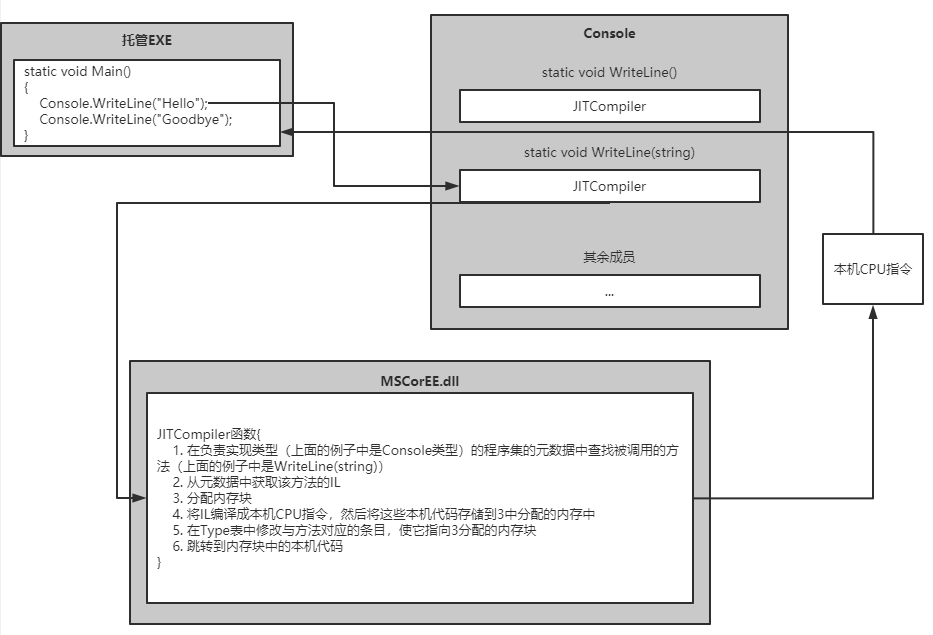
The point of all this is to store the compiled native CPU code in a memory block the first time, so that the next time the same method is called, execution jumps straight to that memory block and runs the native CPU code, without compiling the IL into native CPU code again.
So when Console.WriteLine("Goodbye"); is called, the JITCompiler function isn’t called again; execution jumps straight to the previously allocated memory block and runs the already-generated native CPU instructions.
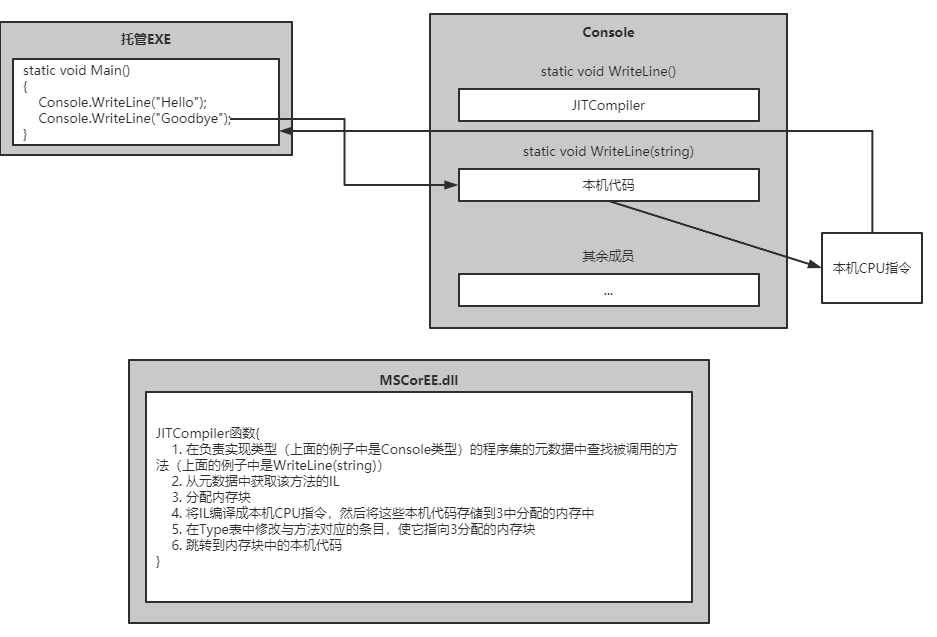
This way, there’s some performance hit the first time a method is called, but all later calls to that method run at full speed (executing native CPU instructions).
The JIT compiler stores the native CPU instructions it generates in dynamic memory, which means the compiled code is discarded when the application terminates. If you run the application again (or run two different instances of it at the same time), the JIT compiler has to compile the IL into native CPU code all over again. By comparison, a native application’s read-only code pages can be shared by all running instances of the application.
Code optimization#
By default, the JIT compiler optimizes the native code. Producing optimized code may take more time, but the optimized code performs better.
The C# compiler switches /optimize and /debug affect code optimization.
| Compiler switch settings | C# IL code quality | JIT native code quality |
|---|---|---|
| /optimize- /debug- (default) | Unoptimized | Optimized |
| /optimize- /debug(+/full/pdbonly) | Unoptimized | Unoptimized |
| /optimize+ /debug(-/+/full/pdbonly) | Optimized | Optimized |
The /optimize switch controls whether the IL is optimized, and the /debug switch controls whether the JIT native code is optimized.
If you choose /optimize-, the unoptimized IL code produced by the C# compiler contains many NOP (no-operation) instructions and also contains many branch instructions that jump to the next line of code. Visual Studio uses these instructions to provide edit-and-continue during debugging. They also let you set breakpoints on control-flow blocks like if, else, for, while, try, catch and finally, making the code easier to debug. But if optimized IL is produced, the C# compiler removes these extra NOP and branch instructions, making single-stepping harder. While debugging, some function evaluations may also not work. On the other hand, optimized IL code is smaller and easier to read, and the resulting EXE/DLL is smaller too.
Only when you specify /debug(+/full/pdbonly) does the compiler produce a PDB (Program Database) file.
The PDB file helps the debugger find local variables and map IL instructions to source code.
Specifying /debug:full makes the JIT record the native code generated for each IL instruction, for just-in-time debugging; without it, the mapping between IL and native code isn’t recorded, so the JIT compiles faster and uses less memory. If you start the process with the VS debugger, the JIT is forced to record the mapping between IL and native code regardless of the /debug setting (unless the “Suppress JIT optimization on module load (Managed only)” option is turned off in VS).
In the VS project configuration settings:
Debug specifies the /optimize- and /debug:full switches.
Release specifies the /optimize+ and /debug:pdbonly switches.
Advantages of managed code over unmanaged code#
- The JIT compiler can tell whether the application is running on a specific CPU (e.g. a Pentium 4) and take advantage of that CPU’s special instructions to improve performance, whereas unmanaged apps are compiled for the CPU with the lowest common feature set and can’t use performance-boosting special instructions.
- The JIT compiler can determine whether a particular test always fails on the machine it’s running on. If the JIT decides an if condition is never satisfied, it simply won’t compile that if. The code is smaller and runs faster.
- While the application runs, the CLR can profile the code’s execution.
If you still find JIT performance not good enough, you can try the NGen.exe tool provided by the .NET Framework SDK. NGen has pros and cons, which we’ll get to later. You can also use the System.Runtime.ProfileOptimization class.
IL and verification#
IL is stack-based. Its instructions push operands onto an execution stack and pop results off the stack. IL has no instructions for manipulating registers, which makes it easy to create new languages and compilers that produce CLR-targeted code (the way I understand it: IL abstracts away the underlying CPU, is CPU-independent, and doesn’t need to think about CPU registers, so it’s easy to create new languages and compilers).
IL instructions are typeless. Take the add instruction: there aren’t separate 32-bit and 64-bit versions for its operands; it determines the operand types automatically and does the appropriate thing.
Verification means: the CLR performs safety checks on the high-level IL code. (It checks that methods are called with the correct number and types of parameters, that return values are used correctly, that every method has a return statement, and so on.) Verifying managed code ensures the code doesn’t access memory improperly and doesn’t interfere with another application’s code.
The CLR lets a single process run multiple managed applications. Each managed application runs in an AppDomain. By default, each managed EXE runs in its own separate address space with just one AppDomain. But a CLR hosting process can run multiple AppDomains in a single process.
Unsafe code#
Unsafe code is allowed to work directly with memory addresses and manipulate the bytes at those addresses. You generally only do this when interoperating with unmanaged code or to improve efficiency and performance.
If C# code wants to use unsafe code, you need the /unsafe switch. When the JIT compiles unsafe code, it checks the SecurityPermission permission and its SkipVerification flag. If the permission isn’t granted or the flag isn’t set, it throws an InvalidProgramException or VerificationException, preventing the method from executing; the program may terminate right there to prevent any damage.
Microsoft provides a tool called PEVeify.exe that can examine all the code in an assembly and report any methods that contain unsafe code.
The native code generator NGen.exe#
NGen.exe: compiles IL into native code when the application is installed.
What NGen.exe does#
- Improves application startup time, because native code runs directly without JIT compilation.
- Reduces the application’s working set (the part of physical memory that’s mapped and directly accessible by the CPU). NGen.exe compiles IL into native code and saves it to a separate file, which can be mapped into multiple process address spaces simultaneously via memory mapping, so the code is shared. This shrinks the working set (each process doesn’t need to map its own separate physical memory).
Drawbacks of NGen.exe#
- The files NGen produces can get out of sync (due to CLR version issues, CPU type issues, Windows version issues and so on).
- Inferior execution-time performance. NGen can’t make assumptions about the environment, so the code it produces is worse, and it can’t use CPU-specific instructions, etc.
The Framework Class Library (FCL)#
The Framework Class Library, Frameworkd Class Library, or FCL, is the collective name for a set of DLL assemblies.
With the FCL you can build:
- Web services (with ASP.NET or WCF)
- GUI programs (Windows Store, WPF, WinForm, etc.)
- Windows console applications
- Windows services
- Database stored procedures
- Component libraries
The Common Type System (CTS)#
The Common Type System (CTS) uses a set of common types so that code written in one programming language can talk to code written in another.
The CTS specifies that a type contains zero or more members, and a member can be:
- Field
- Method
- Property
- Event
The CTS specifies the rules for type visibility and for access to type members:
- private: the member can only be accessed by other members of the same type.
- family: the member can be accessed by derived types. C# uses protected for this.
- family and assembly: the member can be accessed by derived types, but only if the derived type is defined in the same assembly. C# doesn’t offer this kind of access control.
- assembly: the member can be accessed by any code in the same assembly. C# uses internal for this.
- family or assembly: the member can be accessed by derived types in any assembly, and by any type in the same assembly. C# uses protected internal for this.
- public: the member can be accessed by any code in any assembly.
The CTS allows only single inheritance.
The CTS requires all types to inherit from System.Object.
System.Object does the following:
- Compares two instances for equality (Equals)
- Gets an instance’s hash code (GetHashCode)
- Queries an instance’s true type (GetType)
- Performs a shallow copy of an instance (MemberwiseClone)
- Gets a string representation of the instance’s current state (ToString)
We’ll come back to this later in the type fundamentals part.
The Common Language Specification (CLS)#
The Common Language Specification, Common Language Specification, or CLS, is a minimum set of features. Only if a compiler supports this feature set will the types it produces be compatible with components produced by other CLS-compliant, CLR-targeted languages.
Use the [assembly: CLSCompliant(true)] attribute to check whether there are any types that don’t comply with the CTS.
You can use the disassembler (ILDasm.exe) to view a type’s fields and methods from the metadata.
Interoperability with unmanaged code#
- Managed code can call unmanaged functions in DLLs
- Managed code can use existing COM components (servers)
- Unmanaged code can use managed types (servers)
COM: The Component Object Model. COM objects are executable binary code written according to the COM specification and distributed as Win32 dynamic-link libraries (DLLs) or executables (EXEs), able to meet all the requirements of a component architecture.
Building, packaging, deploying and administering applications and types#
Goals of .NET Framework deployment#
Because of problems like DLL hell, complicated installation and insufficient security, the .NET Framework had to figure out how to solve them.
DLL hell: DLL conflicts, where installing new software brings in new DLLs that break existing software.
Complicated installation: on install, files get scattered across many directories, plus registry entries, desktop shortcuts, Start menu entries and so on. And uninstalling never cleans everything up.
Insufficient security: some code can silently delete or send out files, and users are afraid of software like that.
The .NET Framework largely solves the complicated installation problem. Unlike COM, types no longer need registry settings, and files aren’t strewn all over the place. There are still application shortcuts, though.
For security, the .NET Framework includes a security model called Code Access Security. Code access security lets the host set permissions that control what a component can do, unlike traditional Windows security, where once the software is granted the user’s permissions, all of its functionality has the user’s permissions and is fully trusted. The .NET Framework lets users control which components can be installed and which can run, which is very flexible.
As for DLL hell, let’s get straight to it.
Building types into a module#
The simplest command-line compile#
For a simple C# source file like this, Program.cs:
//Program.cs
public sealed class Program
{
    public static void Main()
    {
        System.Console.WriteLine("Hi");
    }
}
System.Console is defined in MSCorLib.dll, provided by Microsoft. To compile the code above into an executable console application, by the strict rules you’d need to specify the reference:
csc.exe /out:Program.exe /t:exe /r:MSCorLib.dll Program.cs/out:Program.exe means the output file is named Program.exe.
/t is short for /target and specifies the output file type. /t:exe means an executable console application (there’s also /t:winexe for GUI programs and /t:appcontainerexe for Windows Store apps), plus /t:library, /t:winmdobj and /t:module.
/r is short for /reference and specifies the name of a referenced assembly. /r:MSCorLib.dll means we reference MSCorLib.dll, provided by Microsoft.
The last argument is the path to the source. Here it’s a relative path, so it’s just the source file name with its extension, Program.cs.
MSCorLib.dll contains all the core types: Byte, Char, String, Int32 and so on. Because MSCorLib.dll is referenced so often, the C# compiler actually references the MSCorLib.dll assembly automatically.
So the command line above can be simplified:
csc.exe /out:Program.exe /t:exe Program.csAnd since /out:Program.exe and /t:exe are the C# compiler’s defaults, it can be simplified even further:
csc.exe Program.csThat gives you an executable console application, Program.exe.
If you don’t want MSCorLib.dll referenced by default, you can use the /nostdlib switch. Of course, if you compile the code above with /nostdlib, you’ll get a compile error, because the System.Console type is defined in MSCorLib.dll.
Hands-on: open the directory where the .NET Framework lives, and you’ll find csc.exe and MSCorLib.dll are both in that same directory (which is why the command lines above work, using relative paths).
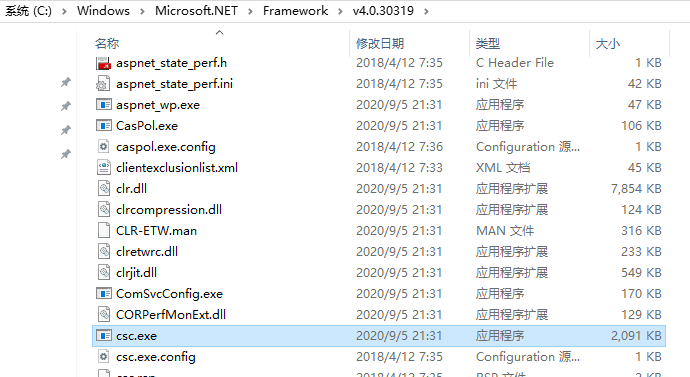
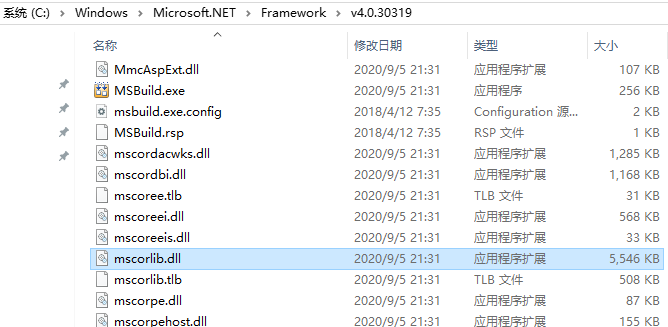
To keep things distinct from the book’s examples, let’s first add the .NET Framework path to the PATH environment variable. Of course, it may already be configured there; check for yourself:
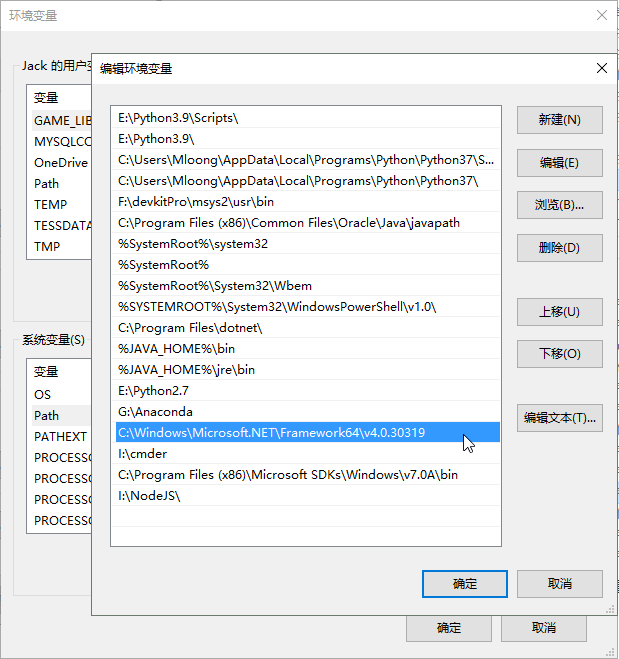
Now we can use csc.exe from any path and reference mscorlib.dll and all the other assemblies Microsoft provides.
I created a folder TestCSC on drive D, and a file Hello.cs inside the TestCSC folder:
//Hello.cs
public sealed class Program
{
    public static void Main()
    {
        System.Console.WriteLine("Hello, World!");
    }
}
Then I opened cmder in the TestCSC directory:
csc.exe /out:Hello.exe Hello.cs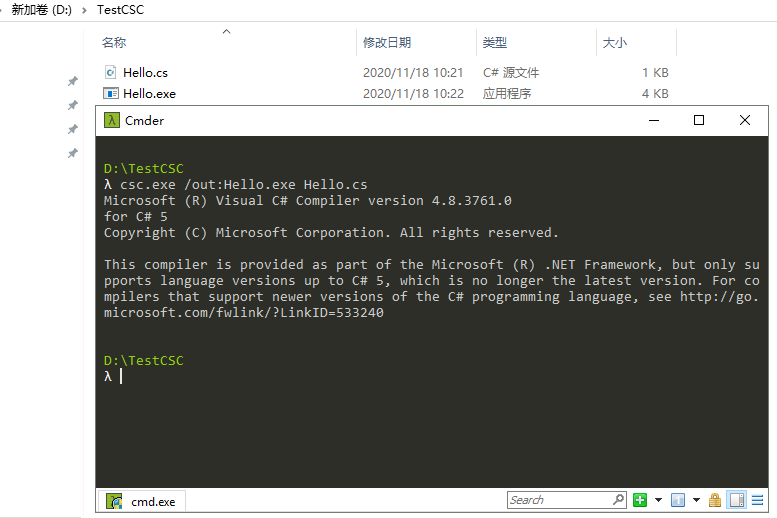
That gives us Hello.exe. Finally, run Hello.exe in cmder:
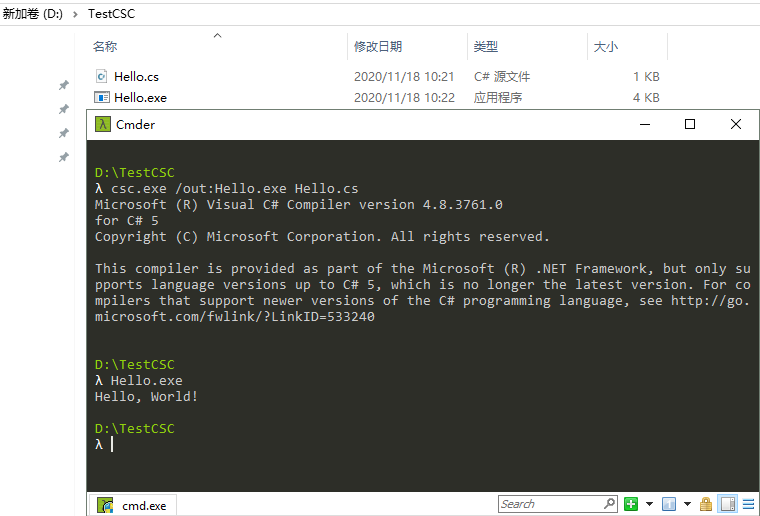
As you can see, it runs successfully.
If we add the /nostdlib switch:
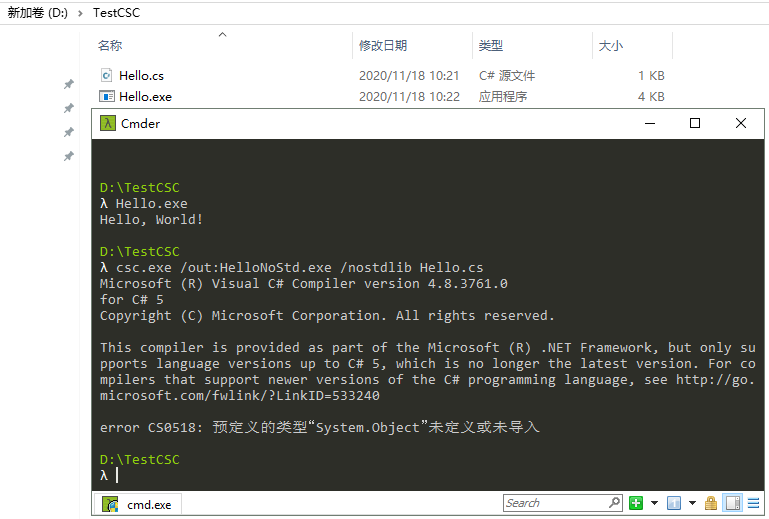
Sure enough, it errors out. The error says System.Object isn’t defined or imported. Probably because System.Console inherits from System.Object: the compiler can tell from System.Console’s declaration that it inherits from System.Object, but System.Object is declared and defined in mscorlib.dll, so with /nostdlib it can’t get System.Object’s definition.
Using response files#
A response file is really just a list of arguments. For example, /t, /r and /out above can all go in a response file, which shortens the command line and makes things easier for users to configure.
For example, put the arguments above in a response file called TestRsp.rsp:
/out:HelloRsp.exe
/t:exe
Then in cmder:
csc.exe @TestRsp.rsp Hello.cs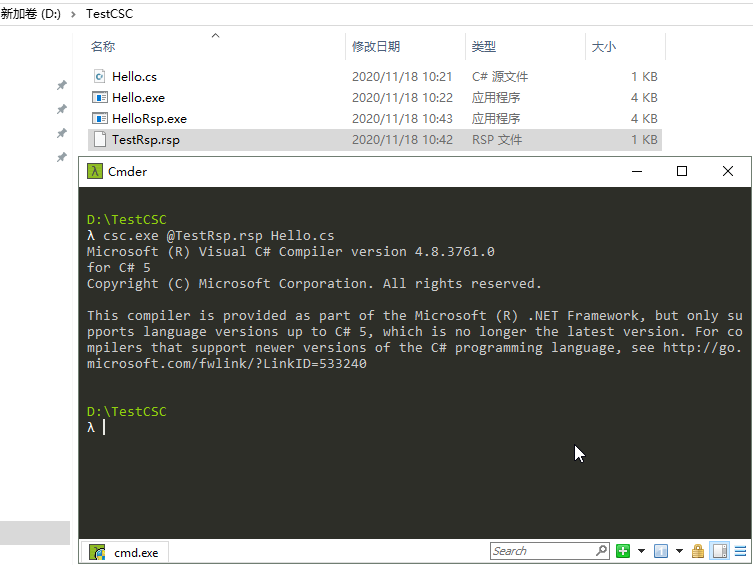
We get HelloRsp.exe. Naturally it runs exactly the same as Hello.exe.
The command line uses a global response file, CSC.rsp, by default. It’s in the .NET Framework’s root directory:
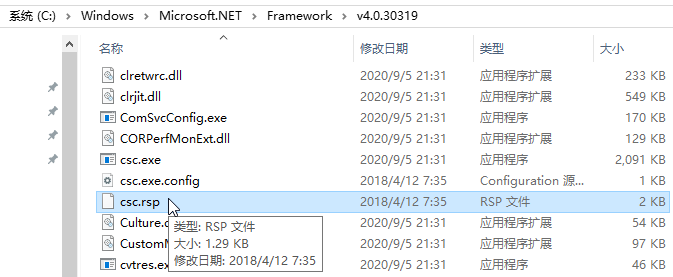
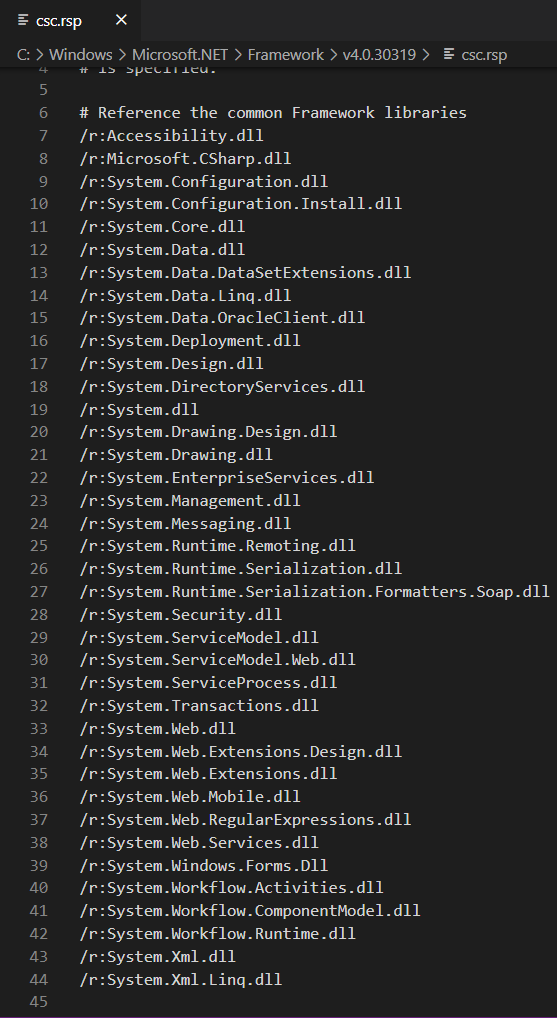
Of course, even though csc.rsp is specified, if none of the assemblies in it are actually referenced, it doesn’t affect the final assembly file or the program’s runtime performance.
If you don’t want csc.rsp applied, add the /noconfig switch, which ignores the csc.rsp file.
Metadata revisited, and using ILDasm.exe#
A quick recap: a managed PE file consists of a PE32(+) header, a CLR header, metadata and IL.
Metadata consists of three kinds of tables: definition tables, reference tables and manifest tables.
Common definition tables are: ModuleDef (module definition table), TypeDef (type definition table), MethodDef (method definition table), FieldDef (field definition table), ParamDef (parameter definition table), PropertyDef (property definition table) and EventDef (event definition table).
Common reference tables are: AssemblyRef (assembly reference table), ModuleRef (module reference table), TypeRef (type reference table) and MemberRef (member reference table).
Common manifest tables are: AssemblyDef (assembly definition table), FileDef (file definition table), ManifestResourceDef (manifest resource definition table) and ExportedTypesDef (exported types definition table).
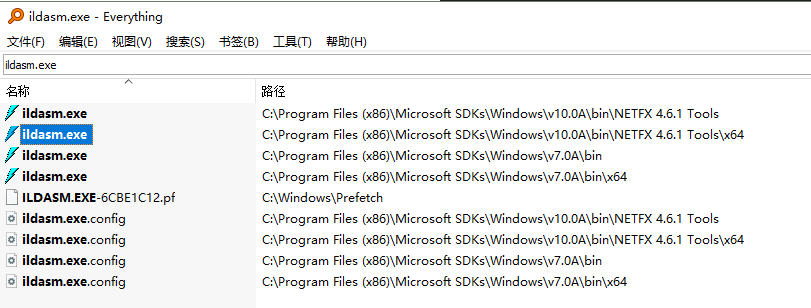
You can view metadata with ILDasm.exe; use Everything to find exactly where ILDasm.exe is.
Open the Hello.exe we wrote earlier with ildasm.exe:
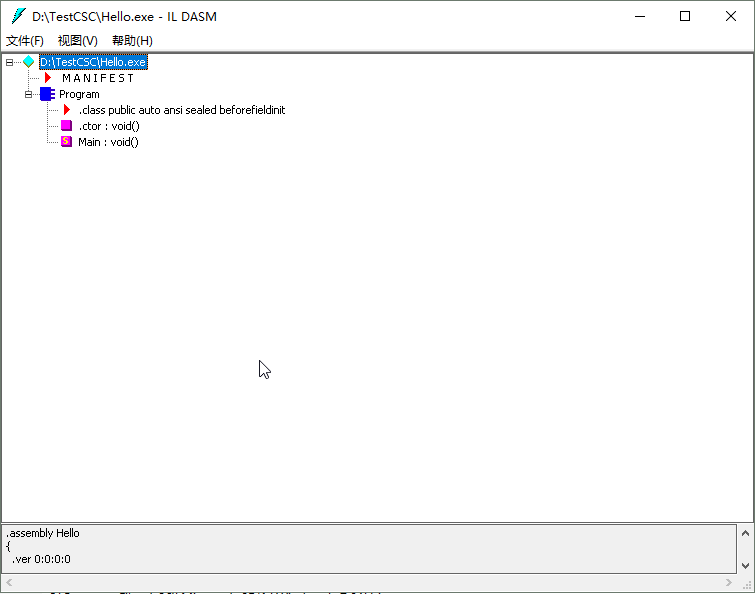
You can see a structure like this:
|– D:\TestCSC\Hello.exe
| – M A N I F E S T
| – Program
| – .class public auto ansi sealed beforefieldinit
| – .ctor : void()
| – Main : void()
MANIFEST is the manifest:
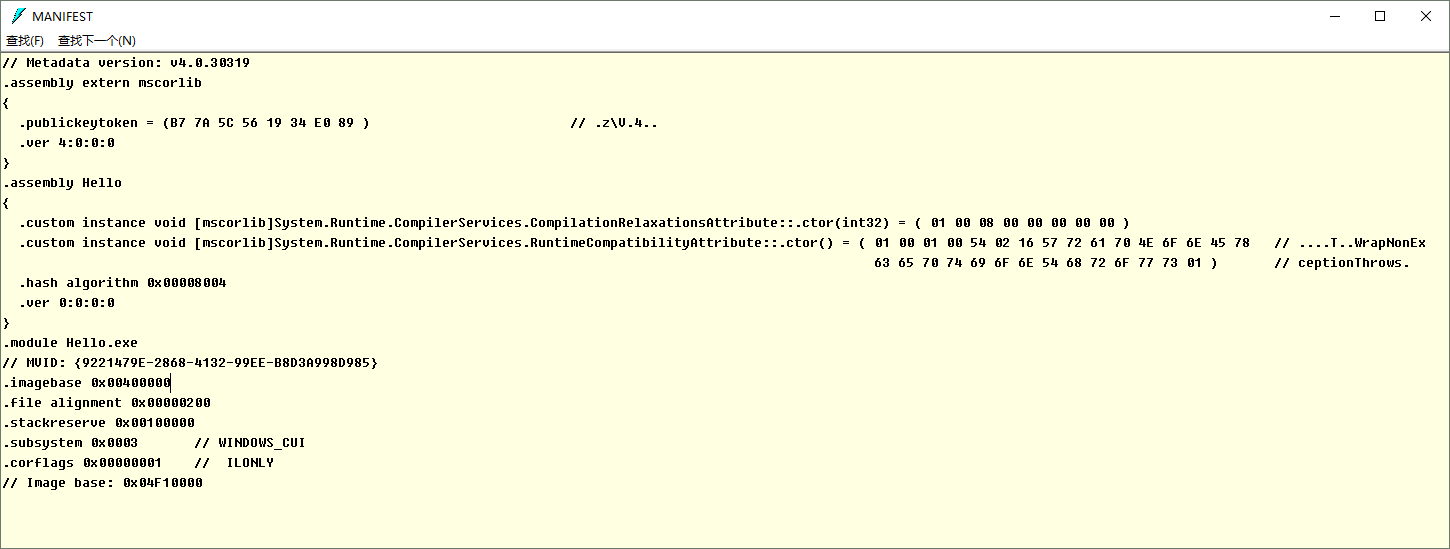
Roughly, we can tell that the Hello assembly references the mscorlib assembly and states mscorlib’s public key and version number, and it states some of the Hello assembly’s attributes, its hash algorithm and its version number.
We can also see that the Hello assembly has just one module, Hello.exe, i.e. itself, which matches what we said earlier.
There are some other markers too: subsystem is WINDOWS_CUI, which tells us it’s a CUI program, i.e. a console application. I’m not sure about the other markers yet.
Program is the class, and there are three elements under it. The first is the Program class’s type definition, the IL representation of the three C# keywords public sealed class:
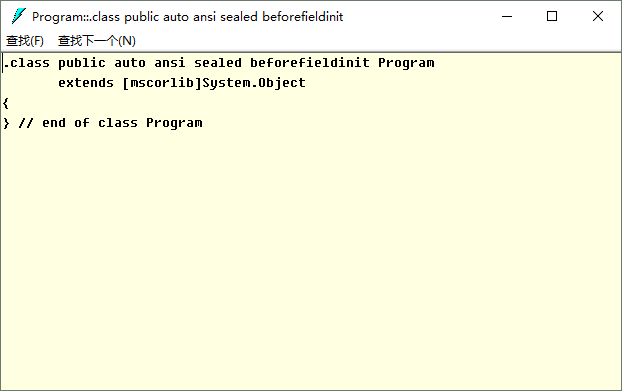
We can see the Program class is a public sealed class that inherits from the System.Object class defined in mscorlib.dll.
.ctor : void() is the parameterless instance constructor with a void return type.
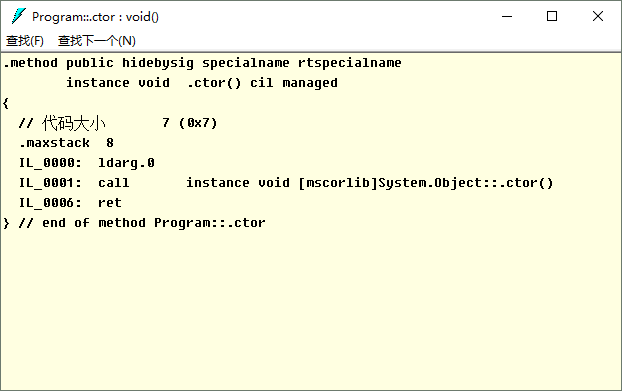
Roughly, from instance and .ctor we can tell it’s an instance constructor, and from cil managed we can tell the method’s body is CIL managed code.
.ctor calls System.Object’s instance constructor, which makes sense: since the Program class inherits from the Object class, its instance constructor calls the parent class’s instance constructor by default, even though Object’s instance constructor does nothing at all.
Main : void() is the parameterless entry method Main with a void return type.
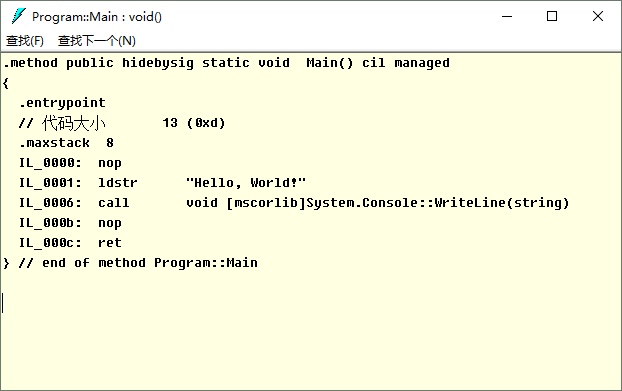
.entrypoint means this method is the entry method. The nop instruction is a no-op. The ldstr instruction allocates memory for a string and stores it; here it defines the string “Hello, World”.
The call instruction calls the static WriteLine(string) method of the System.Console type in the mscorlib assembly.
The ret instruction naturally means the function returns.
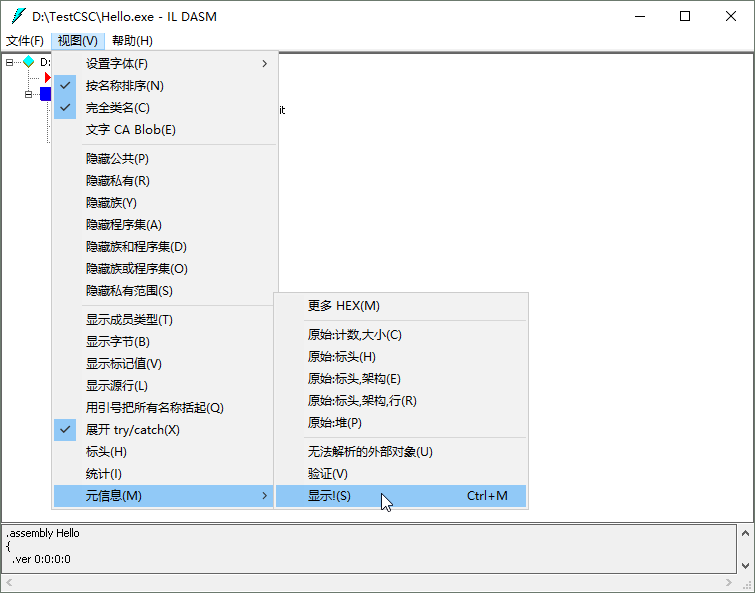
You can also view the metadata tables by clicking View -> MetaInfo -> Show!:
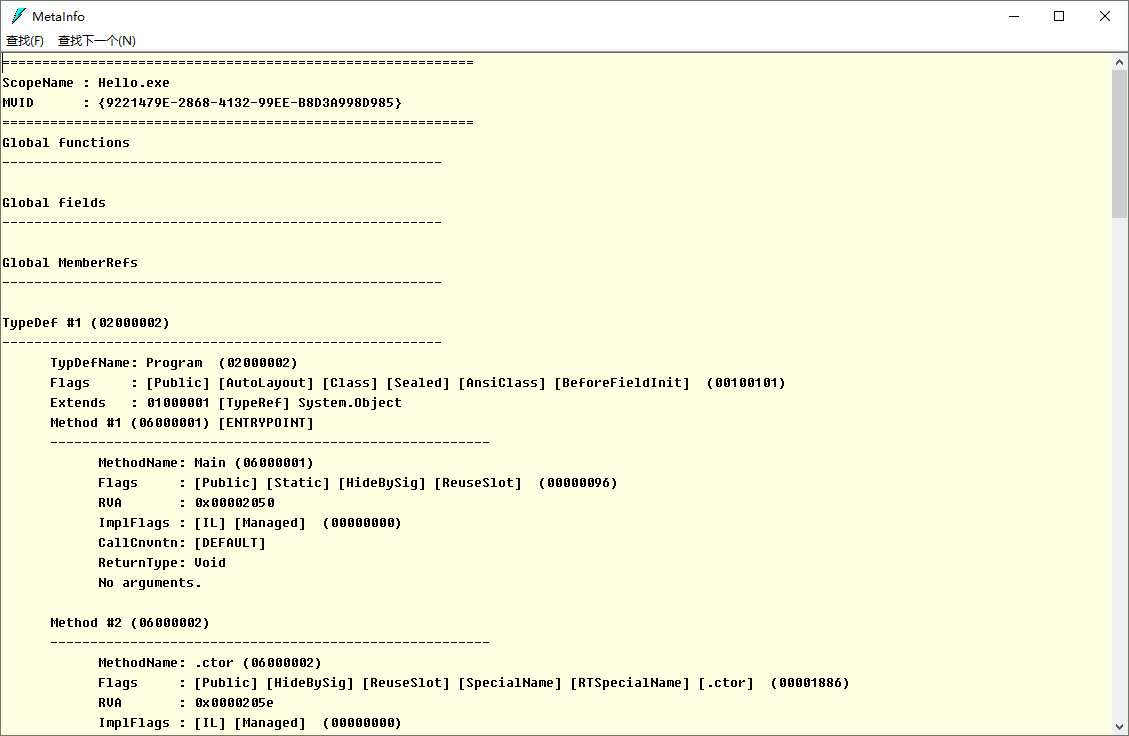
In there you can see the descriptions of the definition tables, reference tables and manifest tables.
You can also view some statistics via View -> Statistics:
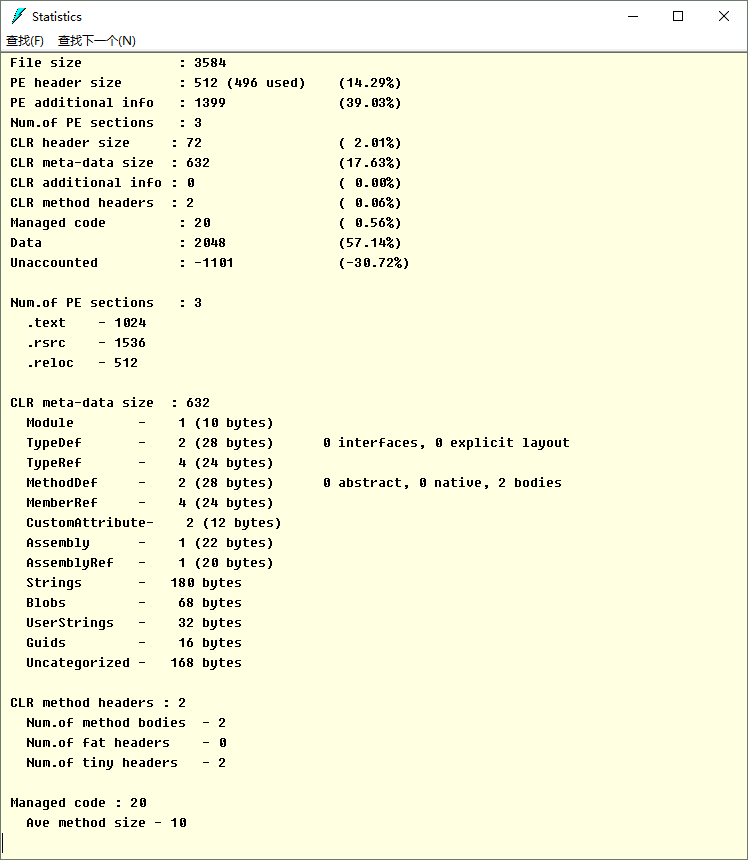
You can understand a lot of the statistics just from their names. The unit is bytes by default, unless there are parentheses: the number before the parentheses is a count, and the number inside is bytes.
Let’s verify the file size using File Size:
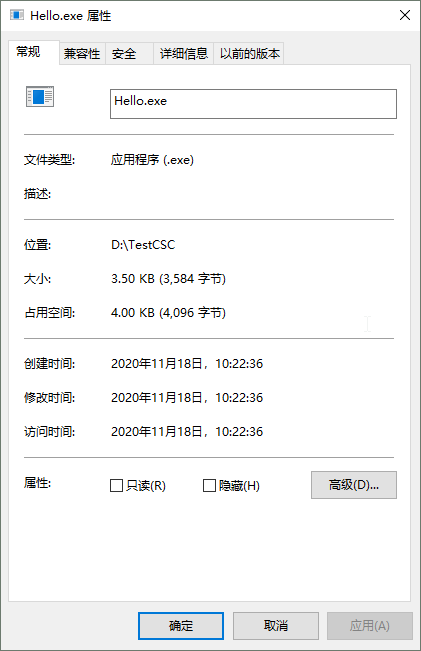
It’s indeed 3584 bytes.
Combining modules into an assembly#
This part is mostly about the methods, so I’ll get straight to the point. There are two ways to combine them:
- Combining with csc.exe (the C# compiler)
- Combining with AL.exe (the assembly linker)
Combining with csc.exe#
csc.exe can output a source file as a module; just use the /t:module switch.
For example, say I have two C# source files, A.cs and B.cs:
//A.cs
public sealed class A
{
    public static void Main()
    {
        System.Console.WriteLine("A");
    }
}
//B.cs
public sealed class B
{
public static void Main()
{
System.Console.WriteLine("B");
}
}I want A.cs compiled into a standalone module file, then B.cs compiled as the host module, with module A added to the assembly that the host module B belongs to.
First I compile A.cs into a standalone module:
csc.exe /t:module A.cs This produces the module file A.netmodule.
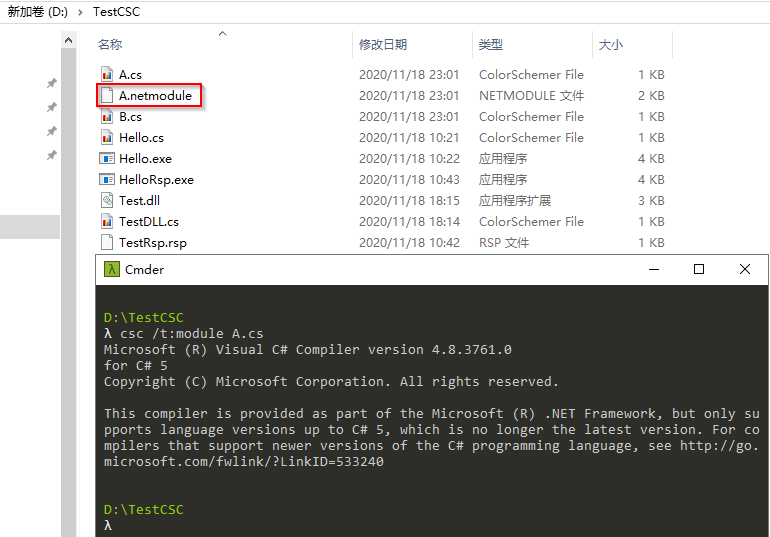
Then I compile B.cs while adding A.netmodule, producing the C.dll assembly:
csc.exe /out:C.dll /t:library /addmodule:A.netmodule B.cs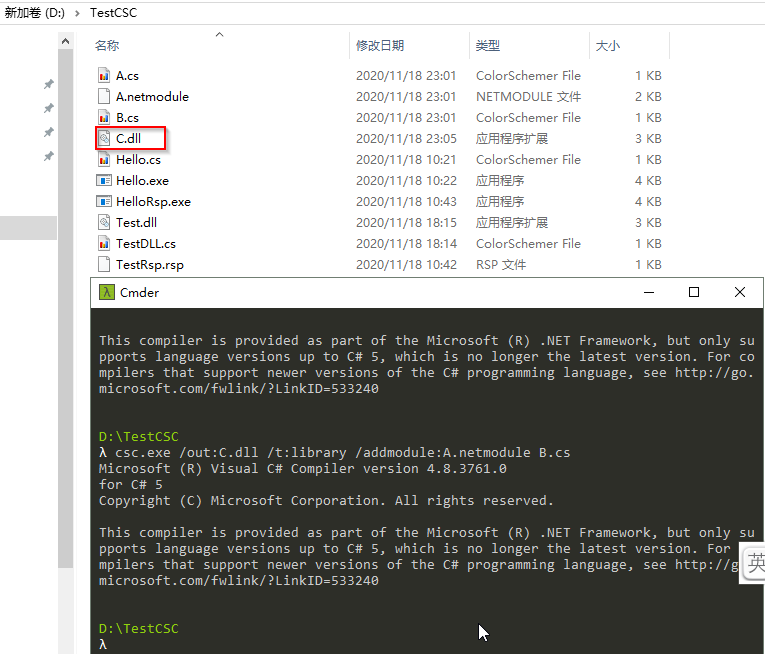
Let’s open C.dll in ILDasm.exe and look at the file structure and metadata tables:
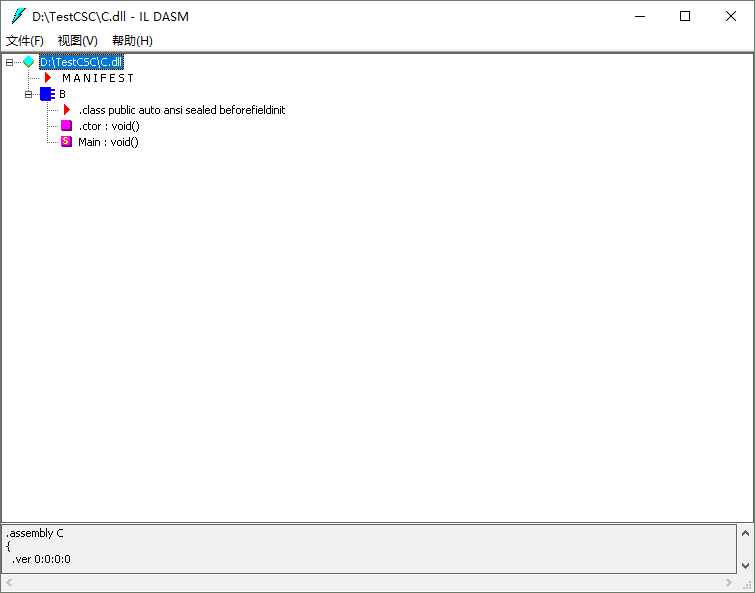
As you can see, there’s no type A in there. So where did A go? Let’s look at the metadata tables again:
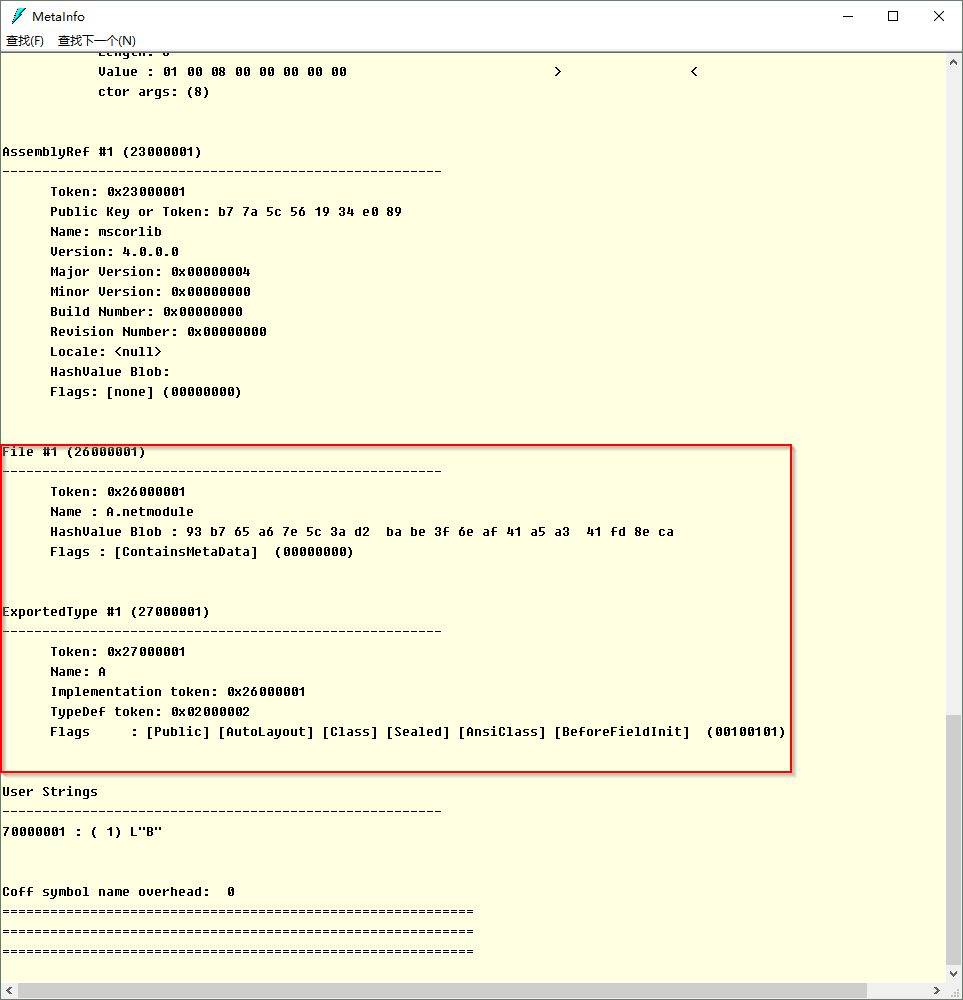
The assembly does indeed contain references to the types in the A.netmodule file.
If you delete A.netmodule before loading C.dll, you get a “The system cannot find the file specified” error.
Combining with AL.exe#
The assembly linker comes in handy if an assembly needs to contain modules produced by different compilers, if you don’t know the assembly’s packaging requirements at build time, or if you’re packaging satellite assemblies (which contain only resource files).
It can combine two .netmodules into an assembly.
Continuing from above, A.netmodule has already been produced, so now I’ll produce a B.netmodule:
csc.exe /t:module B.csThen use al.exe to combine A.netmodule and B.netmodule into the assembly C(al).dll:
al.exe /out:C(al).dll /t:library A.netmodule B.netmodule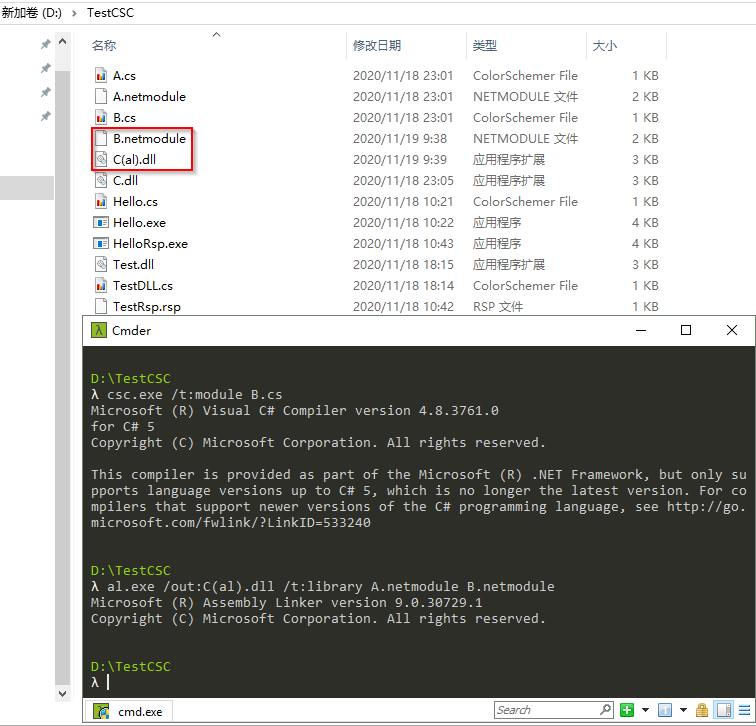
Let’s take a look with ILDasm.exe:
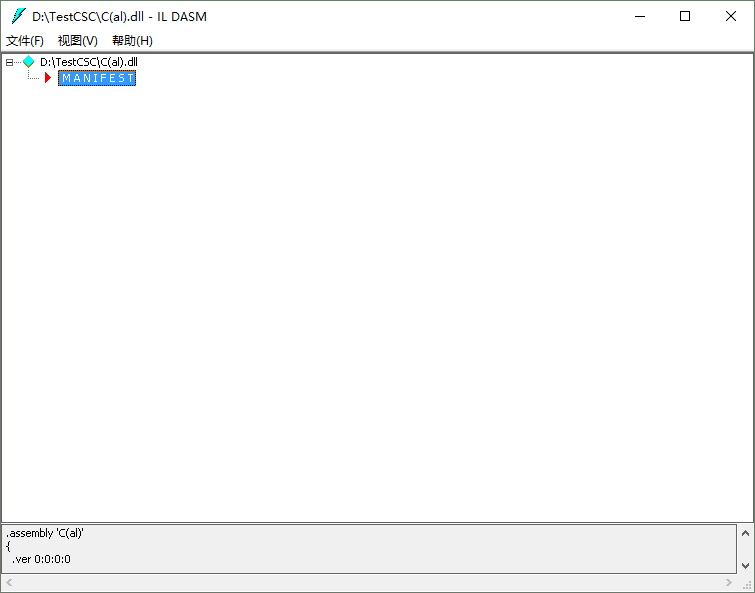
We can see there’s no IL in it, just a manifest.
Now look at the metadata tables:
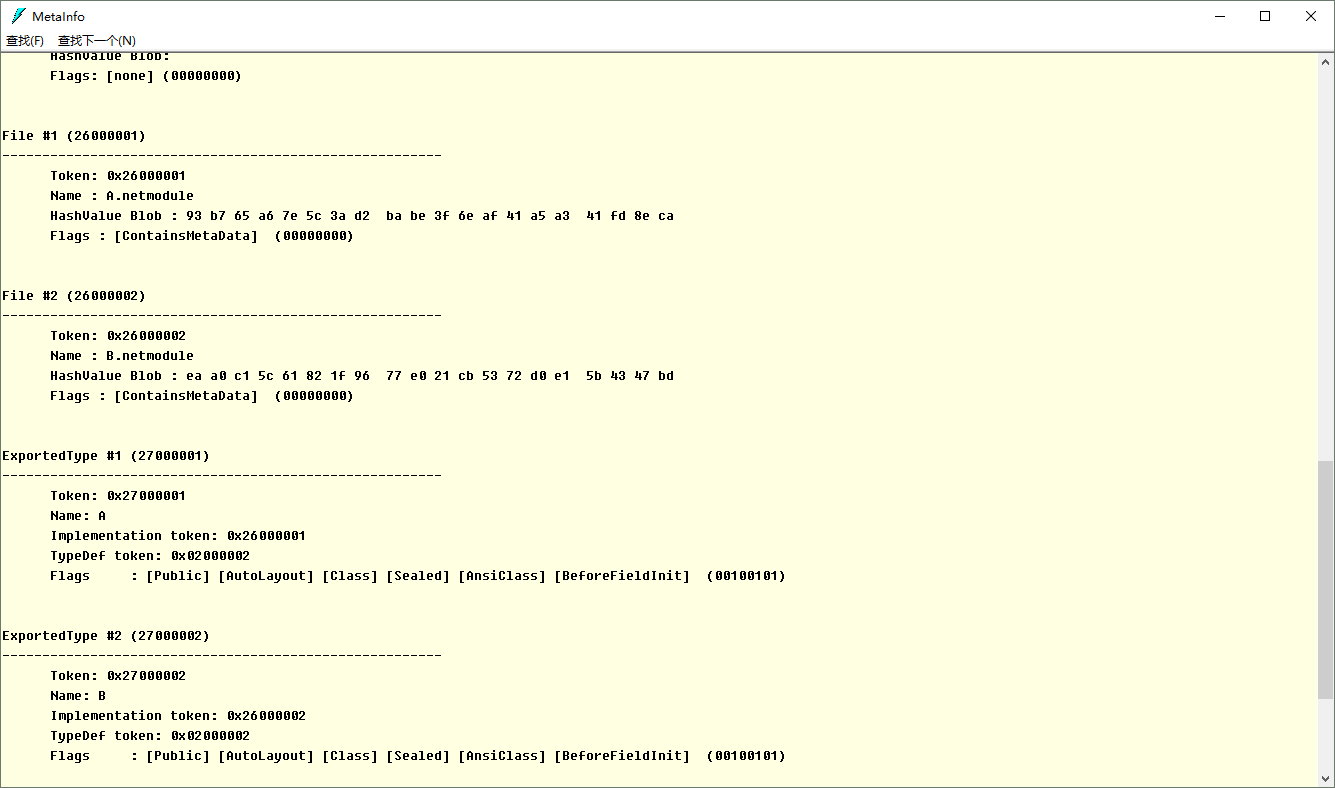
We can see this is a multifile assembly, and it does have manifest tables.
AL.exe can also use /embed[resource] to embed a resource file into the PE file, and /link[resource] to link a resource file (without embedding it in the PE file).
Likewise, csc.exe’s /resource embeds a resource file into the PE file, and /linkresource links a resource file.
AL.exe can embed a standard Win32 resource (.res) with /win32res, and specify an .ico icon file with /win32icon.
Comments