This post was translated from the original with AI assistance. Read the original
Reposted from my old CSDN blog: 开源项目——寝室助手 (written 2018-12-16); formatting tidied during migration.
As computer science students, we naturally look for ways to use the resources and skills we already have to make life more automated and smarter. The Dorm Assistant isn’t an innovative project, but it is a fairly complete, well-organized one. It’s easy to build, not too expensive, and its features can be extended a lot.
What the Dorm Assistant Can Do#
Right now the Dorm Assistant works as a private dorm server, a download box, a private cloud drive, Samba file sharing, DLNA media streaming, and lets you open the door from the LAN or remotely. (A voice assistant or surveillance feature will probably be added later.)
Let me give a quick demo of what it does.
My dorm server’s home page (port 80, /var/www/html/index.html) is resolved to the domain pi.code4world.cn (the domain has since expired) (I was too lazy to write HTML+CSS+JS/PHP, so please forgive the looks).
Aria2 and Transmission on the home page are both download tools. They can be accessed from both outside and inside the LAN, which means you can download remotely, or download files to the server while you’re in the dorm.
The cloud drive is a private cloud. The admin adds users in the backend, and you can upload, download and share files. With plugins installed, you can also edit code online, play videos online, preview documents online, extract archives online, and so on.
Jack’s Blog is my personal blog (its old domain zhangkexuan.cn is dead; this blog you are reading is its successor).
Here’s what Aria2 looks like once it’s set up:
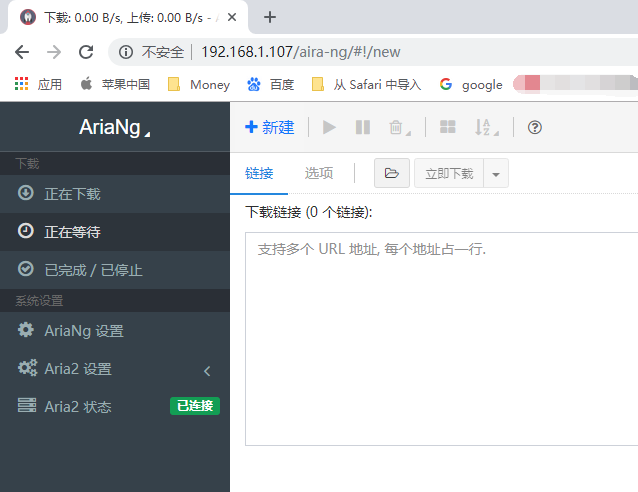
It uses the Aria-Ng Web UI and can download files to a location of your choice.
Here’s what Transmission looks like once it’s set up:
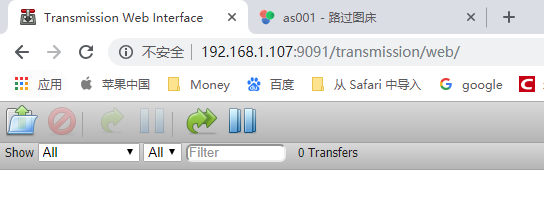
The default port is 9091. It can download BT magnet links and BT torrent files.
Here’s what the private cloud looks like once it’s set up:
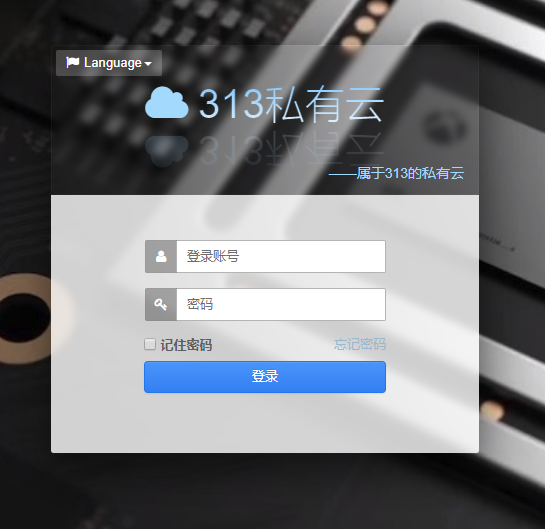
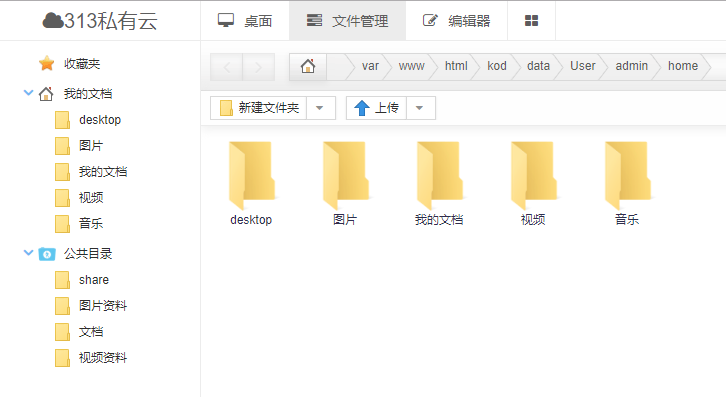
It has all the usual cloud drive features.
Here’s the Samba file sharing once it’s set up:
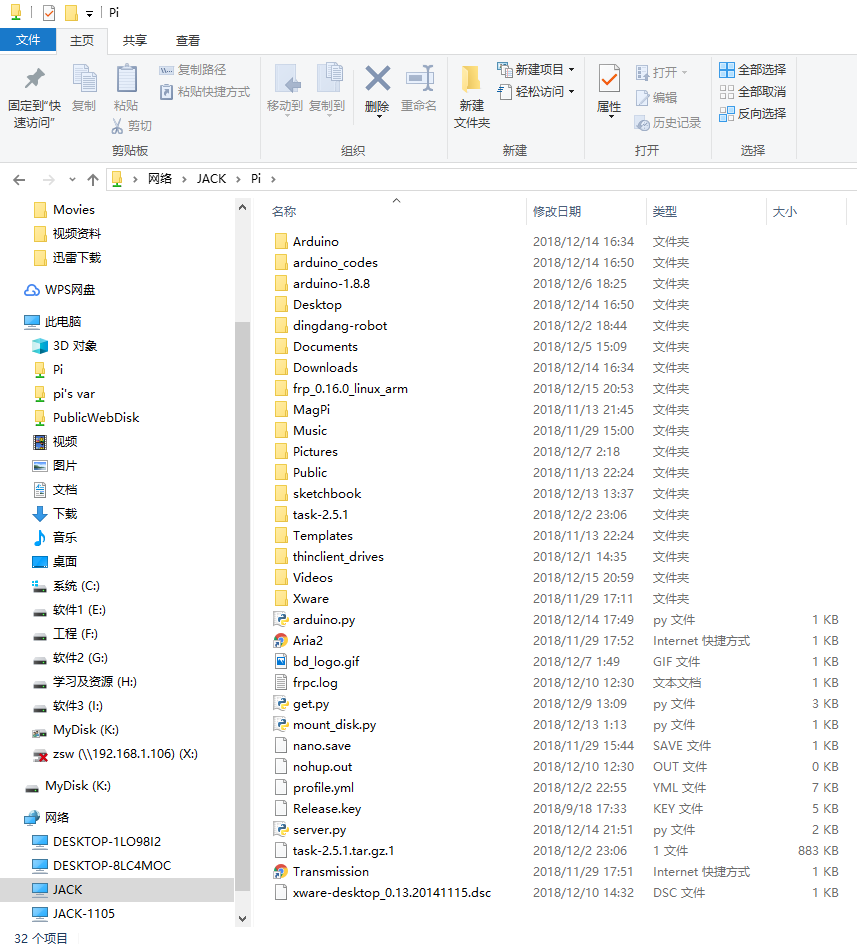
You can access the shared folders the server exposes. If the server grants read/write permissions, the computer accessing them can read and write whatever it likes.
I won’t go into DLNA here, because I find it rather CPU-hungry, so I turned it off. hhh.
Next up: opening the door from the LAN and remotely.
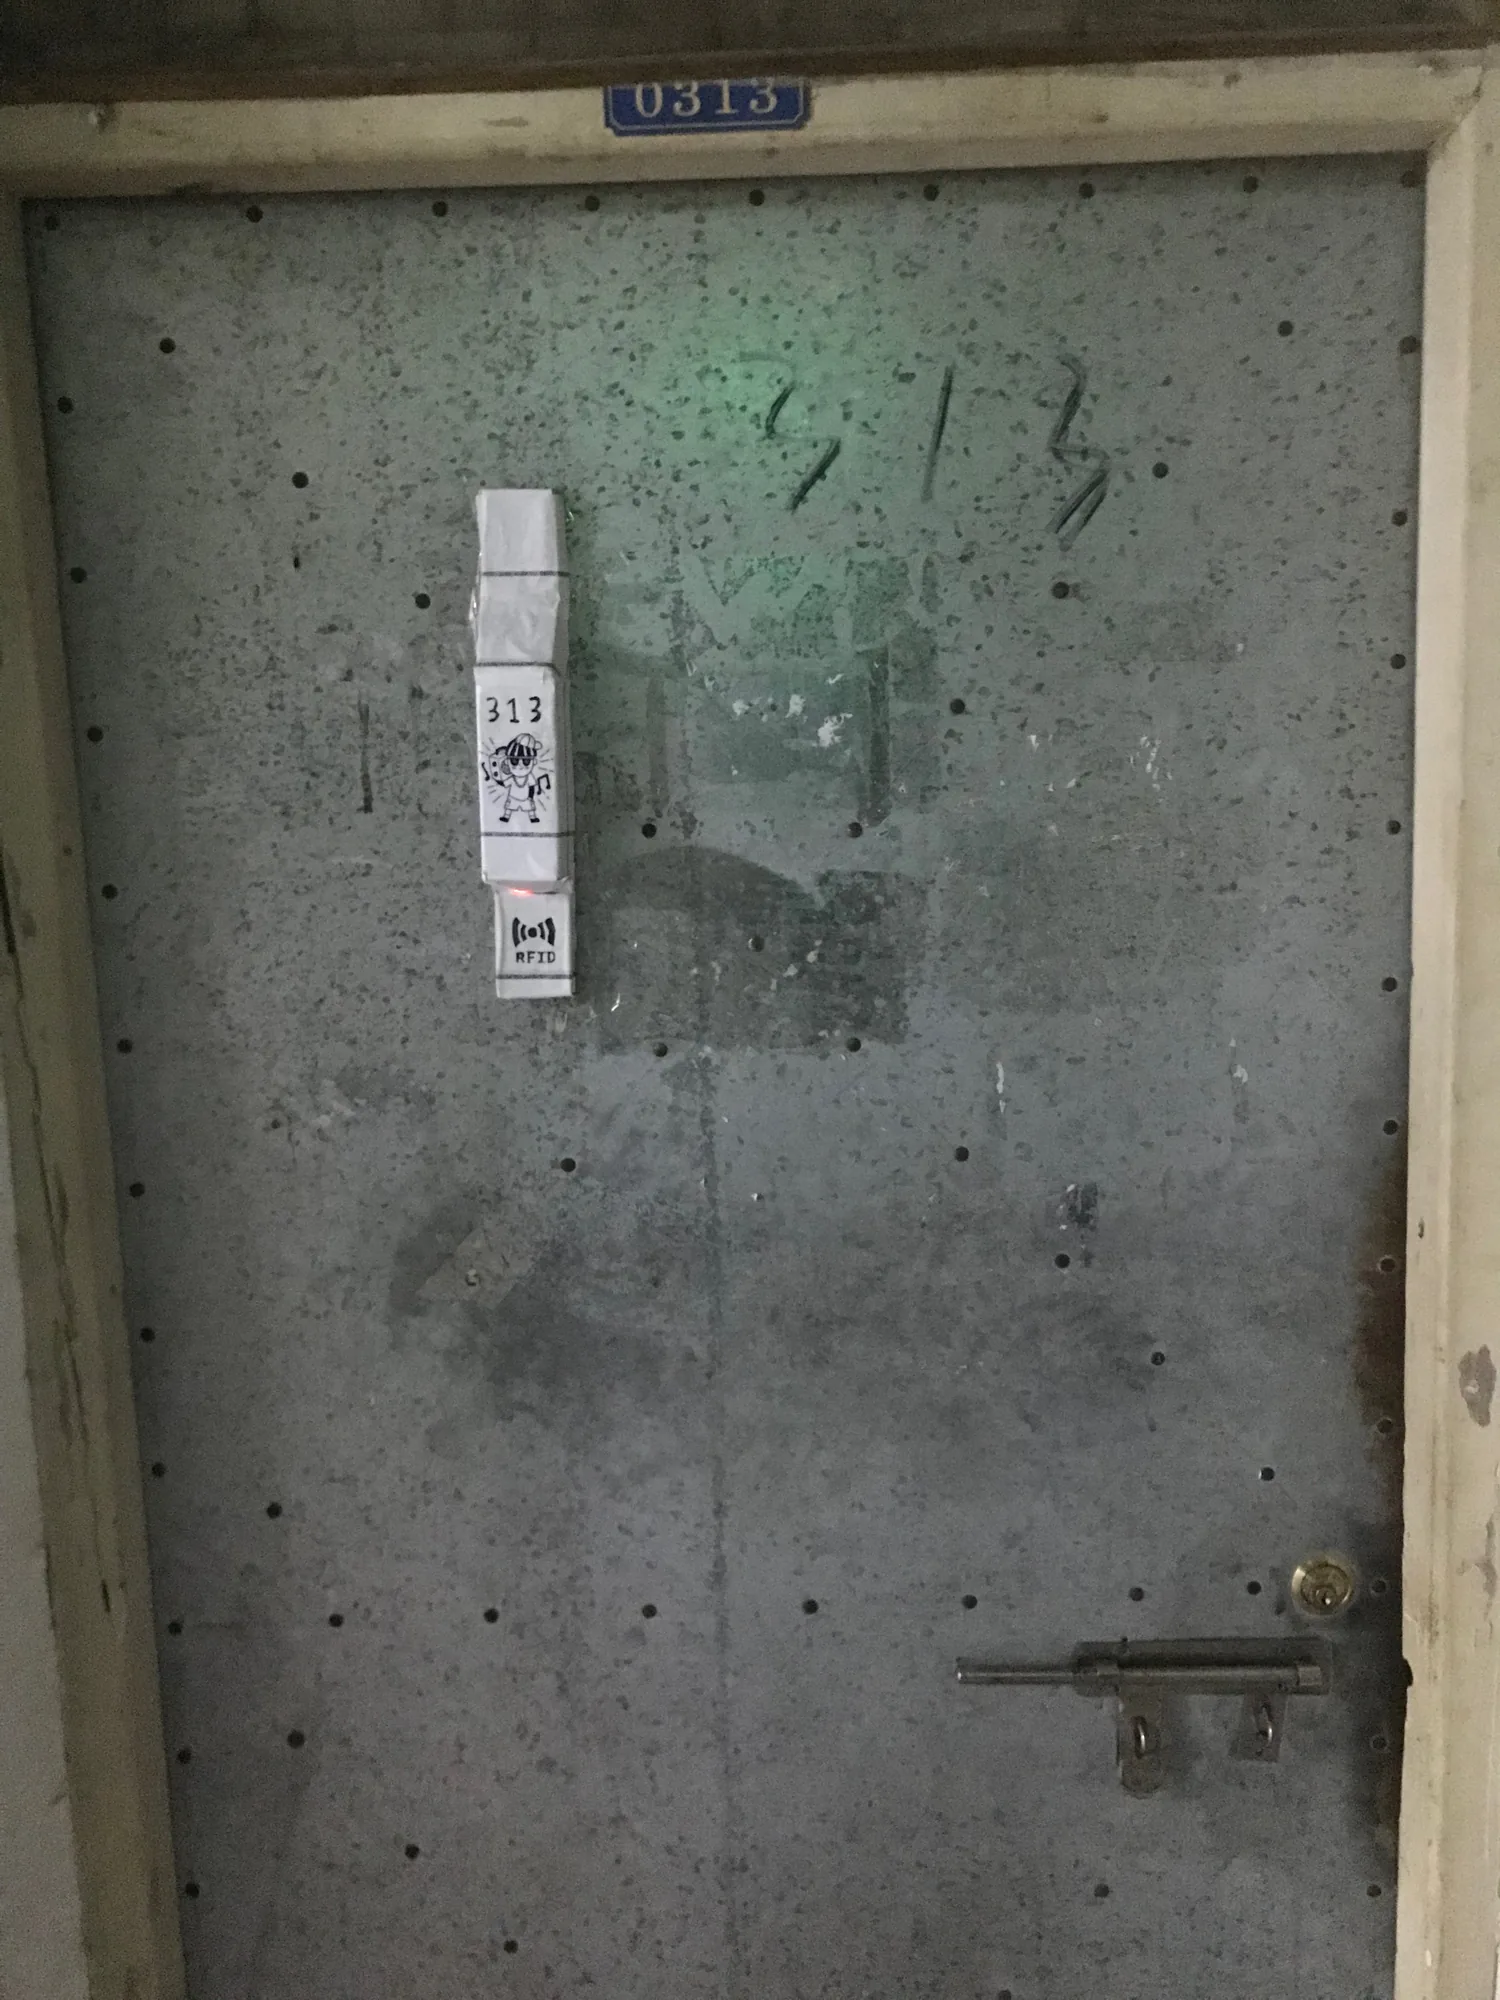
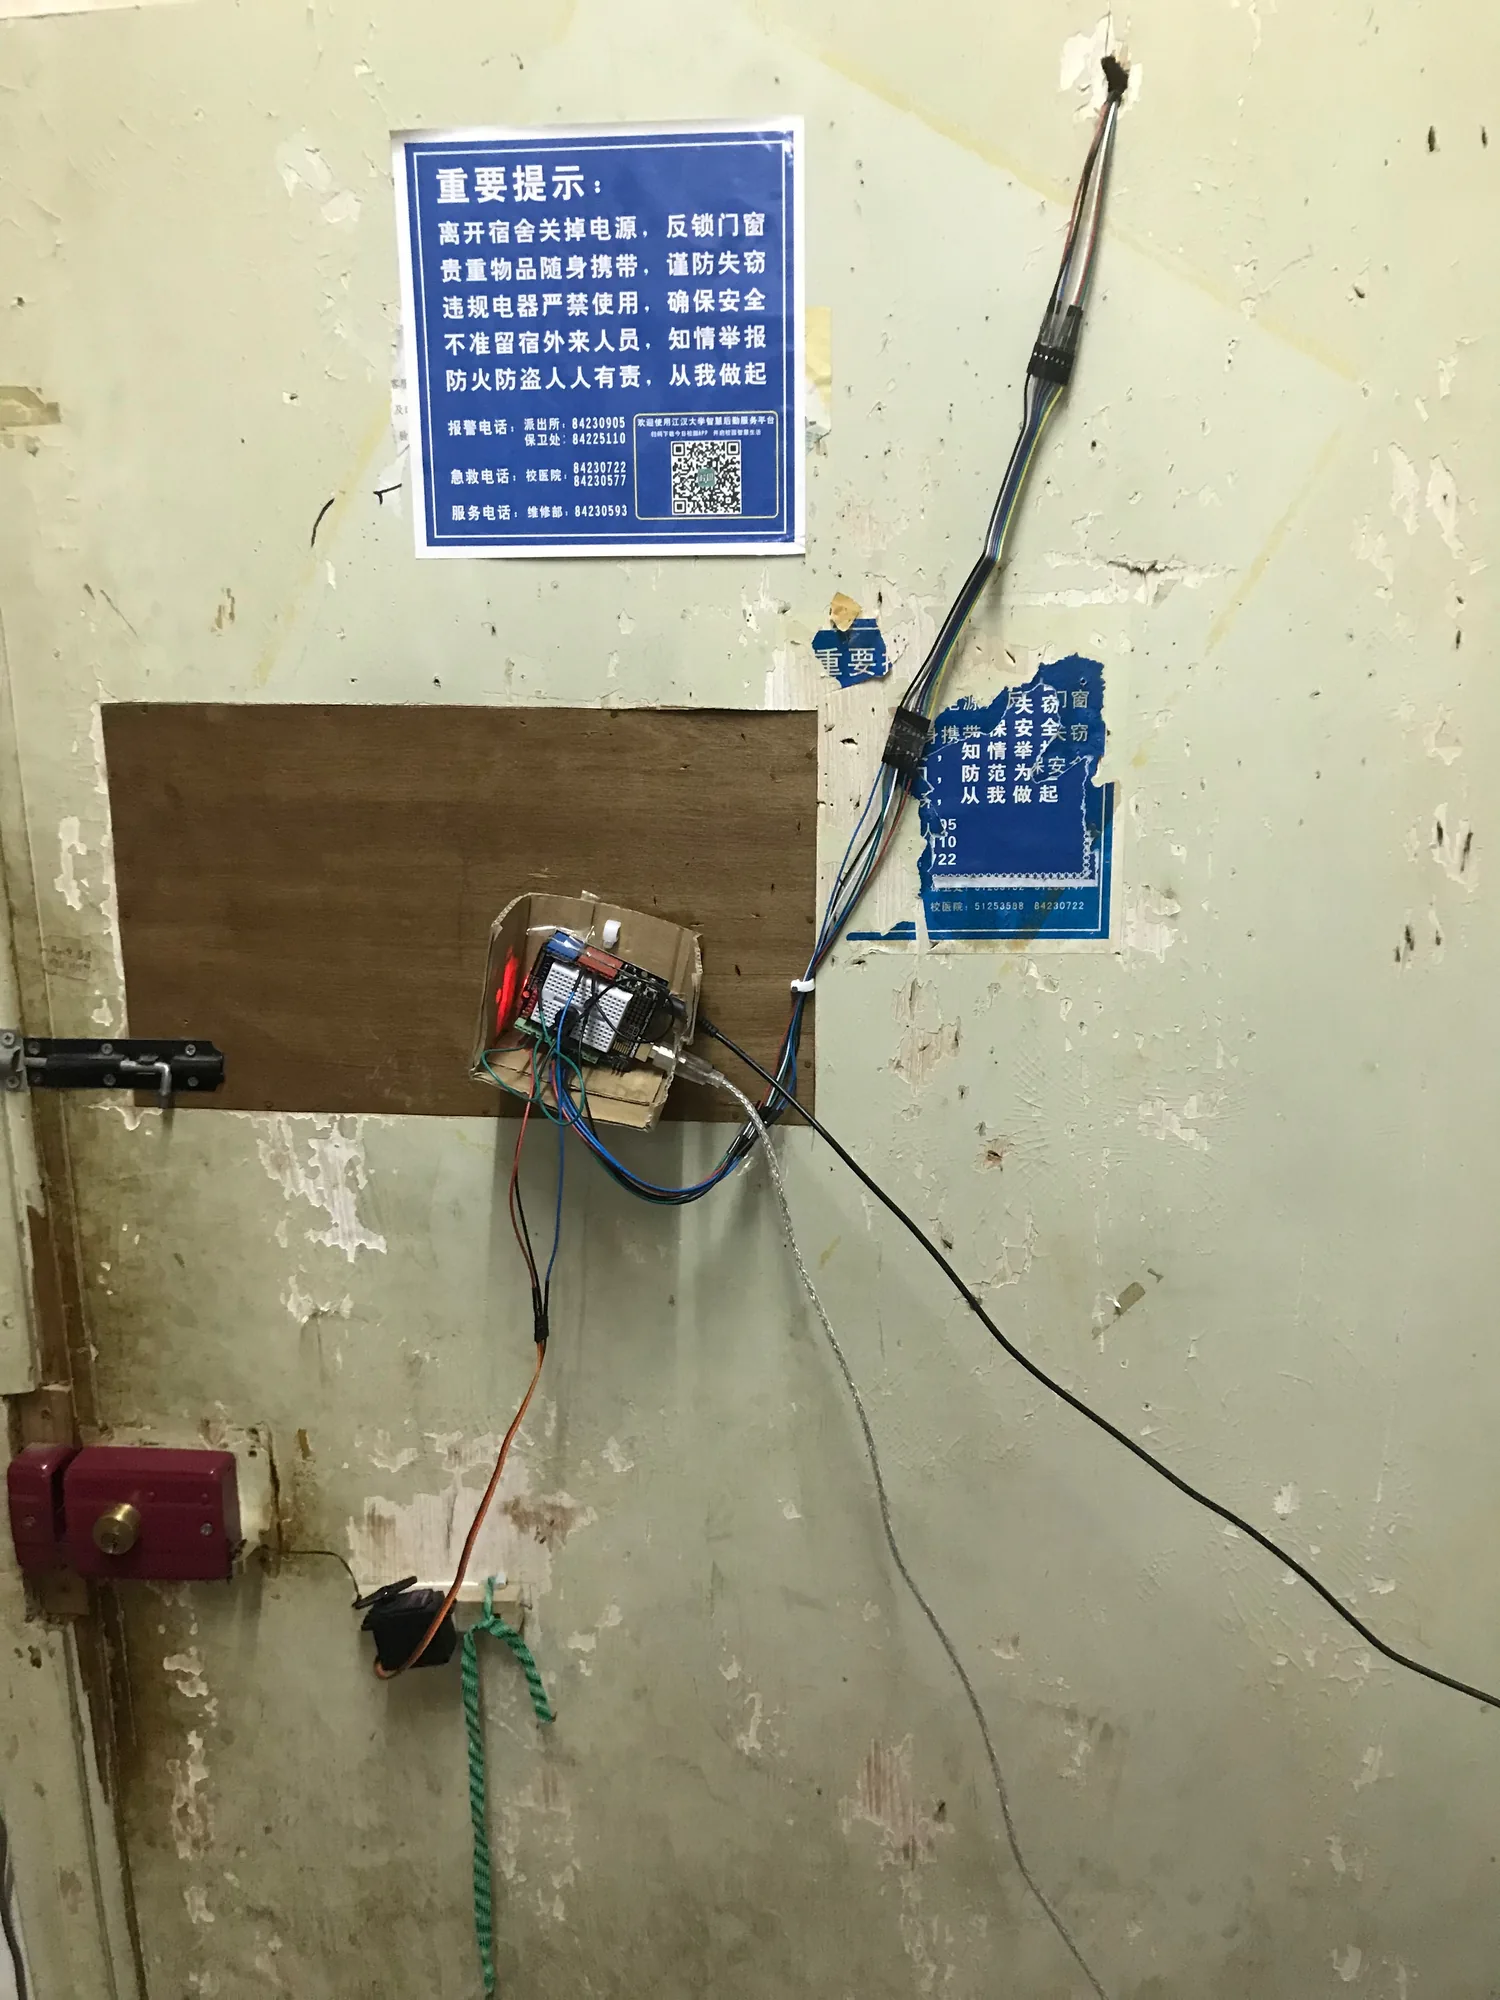
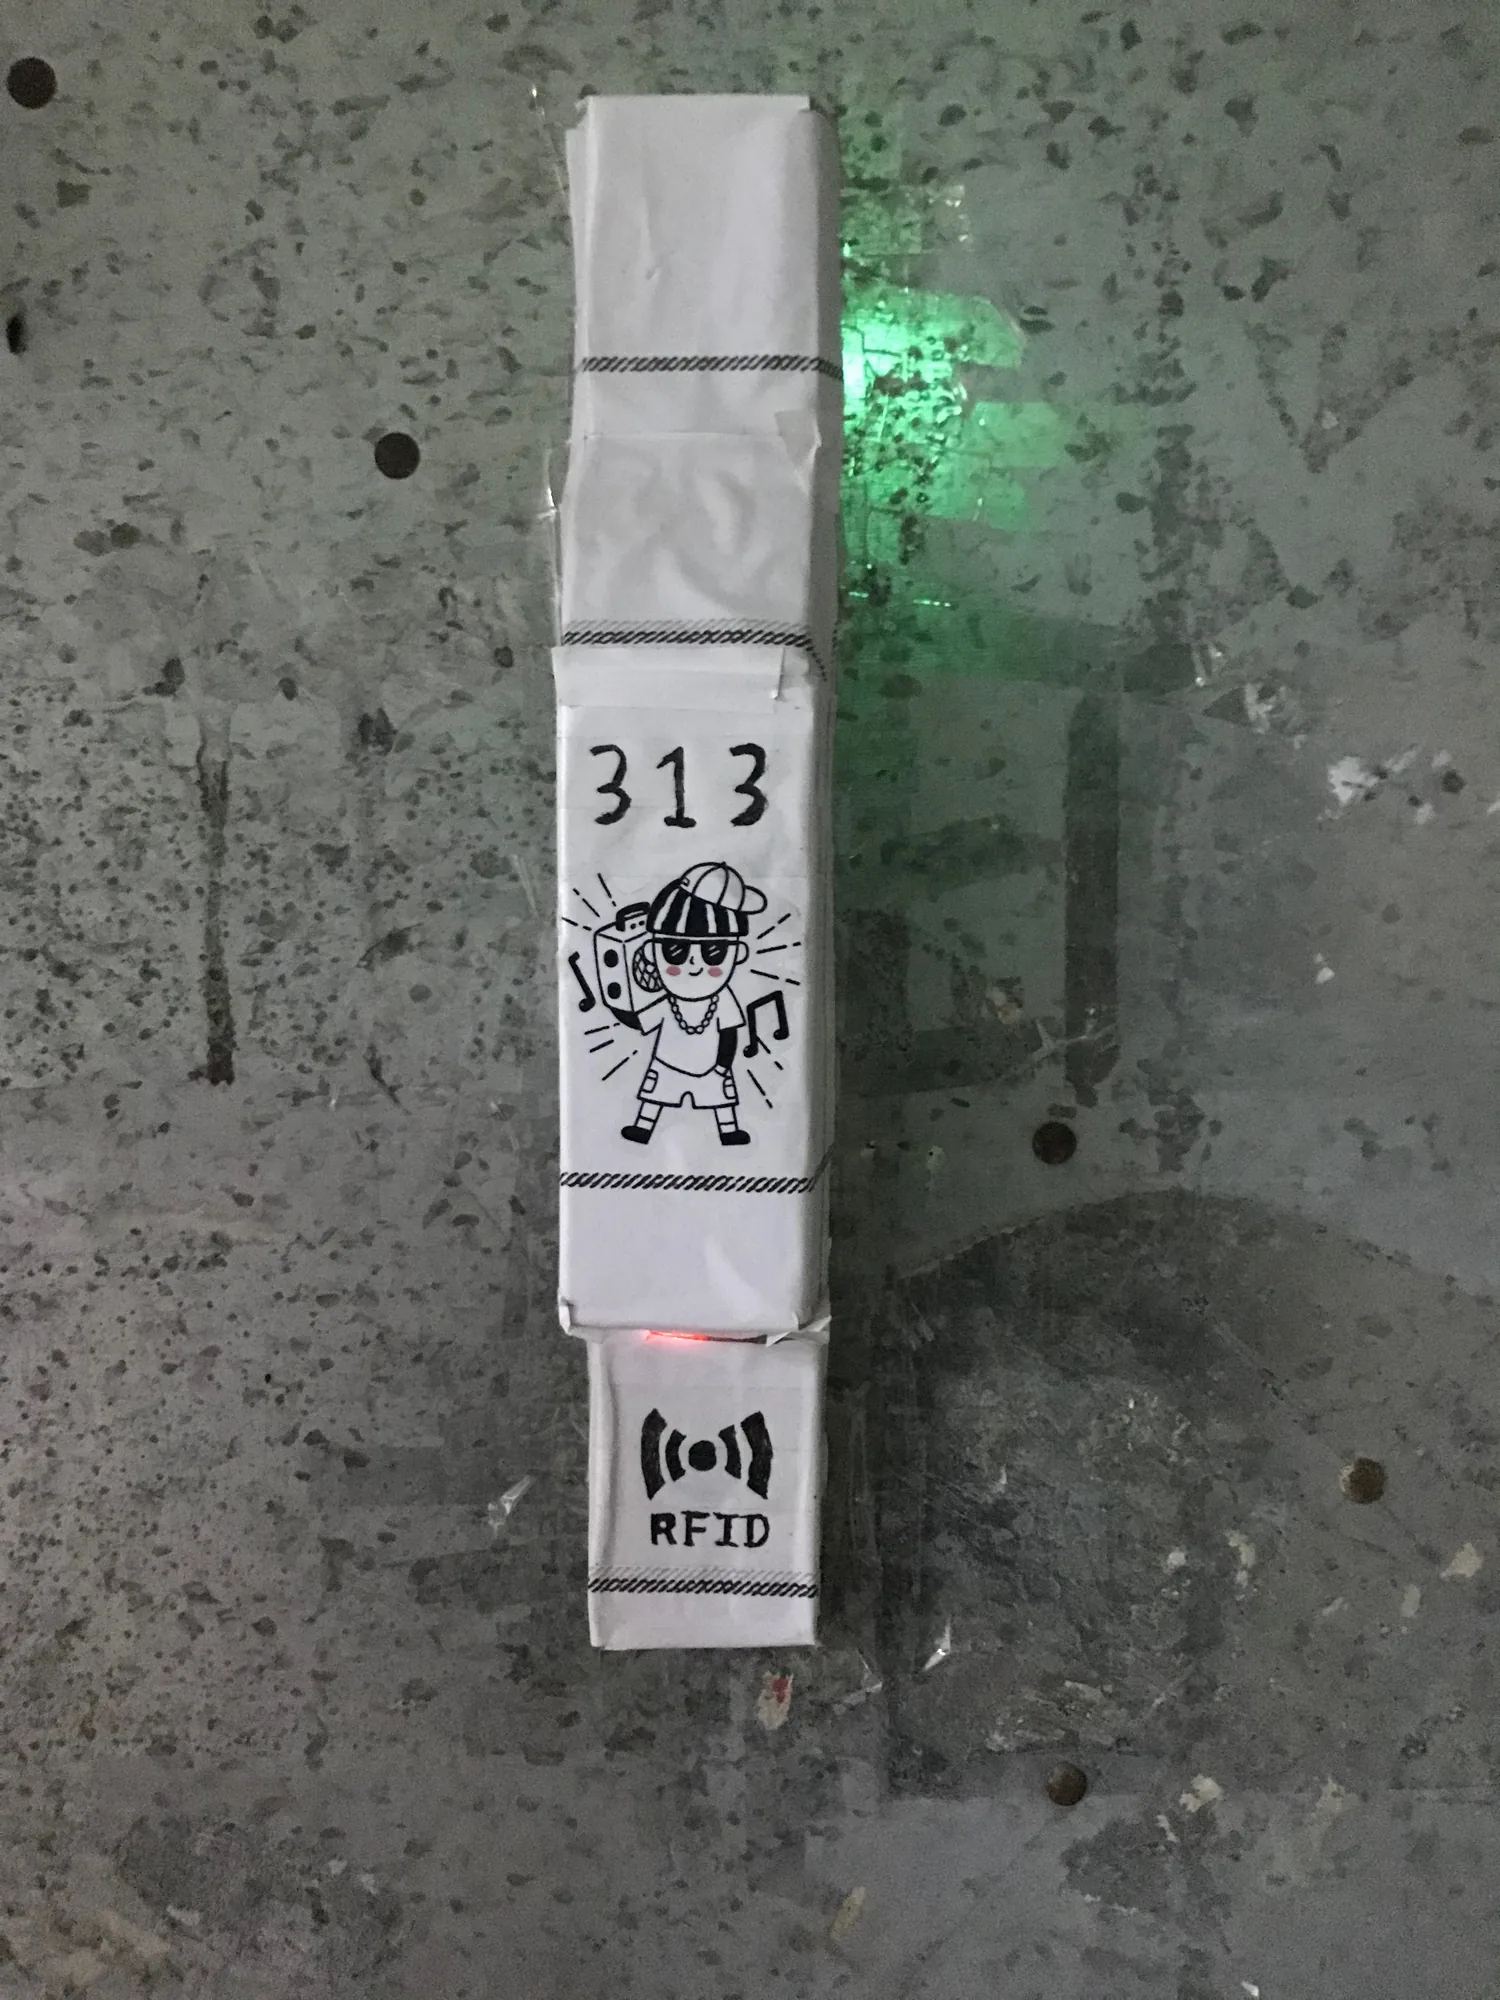
Here are some photos and videos as a demo:
Outside of the door:
Inside of the door:
Close-up of the outside:
Opening the door from the LAN with the iOS app:
Opening the door with the campus card (RFID):
There’s actually also a PC executable, a Wox plugin on PC, an Android app, and a web page for opening the door, but I won’t demo those here.
That basically covers the features.
Preparing for the Dorm Assistant#
Background knowledge:#
- Linux basics
- Circuit basics
- Python basics
- Android development (Java, Android Studio)
- iOS development (Swift, Xcode)
- Front-end basics (HTML, CSS, JavaScript, PHP)
- Computer networking basics (TCP, Socket)
Hardware:#
- Raspberry Pi 3B * 1 (3B, China edition, no accessories, 205 CNY)
- SanDisk 16G TF card * 1 (25 CNY)
- Card reader * 1 (USB 2.0, 3.9 CNY; see item 5 — if you buy the All In One drive enclosure, skip this one)
- Raspberry Pi accessory bundle * 1 (standard bundle, any color, 35.8 CNY)
- All In One drive enclosure * 1 (dark blue, 70 CNY; or an easy-drive cable USB 2.0 full set for 34 CNY + a powered USB hub for 17 CNY, 51 CNY in total)
- Second-hand 320G desktop SATA hard drive * 1 (38 CNY; if you have any drive from an old desktop or laptop, use that, no need to buy one)
- Arduino Uno R3 * 1 (genuine Italian version 150 CNY, Chinese clone 17 CNY; I recommend the genuine one, the clone is less stable and you have to install the driver yourself; both come with a serial cable)
- UPS uninterruptible power supply * 1 (12V / 9V / 5V triple output, with a 11200mAh battery, 80 CNY; in my testing it lasts the whole night)
- USB extension cable * 1 (rose gold, 3m, 3 CNY)
- DC extension cable * 1 (3m, 16.8 CNY)
- A bunch of jumper wires (about 5 CNY)
- Buzzer * 1 (0.39 CNY, free shipping)
- MG996R metal servo * 1 (360 degrees, 25 CNY)
- RC522 RF module * 1 (11 CNY, free shipping)
- Soldering iron * 1 (8.6 CNY, free shipping)
- Any MacBook or Mac * 1 (just kidding — but if you insist on an iOS door-opening app and have money to spare, go ahead and buy one)
- A computer * 1 (every CS student has one, no need to buy)
- The dorm needs broadband and a router, with a UPS behind them (if not, services will be affected when the power is cut at lights-out; an extra UPS adds another 40–115 CNY; I think the 40 CNY one is enough, since the optical modem and router don’t draw much power)
By my calculation, the minimum cost is around 400 CNY, without a UPS, working only while the dorm has power.
If you only want card-swipe door opening, without a UPS and powered by a spare power bank, about 70 CNY will do.
The standard cost should be around 500 CNY, with a UPS and a drive enclosure.
Software:#
First boot of the Raspberry Pi#
Getting your Raspberry Pi from Taobao is an exciting moment. You’ll definitely be itching to use it.
For now you need the Raspberry Pi, its power supply, the TF card, the card reader and a computer — that’s all. Of course you also need WiFi in your dorm, and you need to remember the dorm WiFi name and password (a joke, but also true).
First insert the TF card into the card reader, making sure it goes in the right way. Then plug the card reader into a USB port on your computer. If the computer recognizes it, you’re good.
Go to the Raspberry Pi website and download the official image:
https://www.raspberrypi.org/downloads/raspbian/
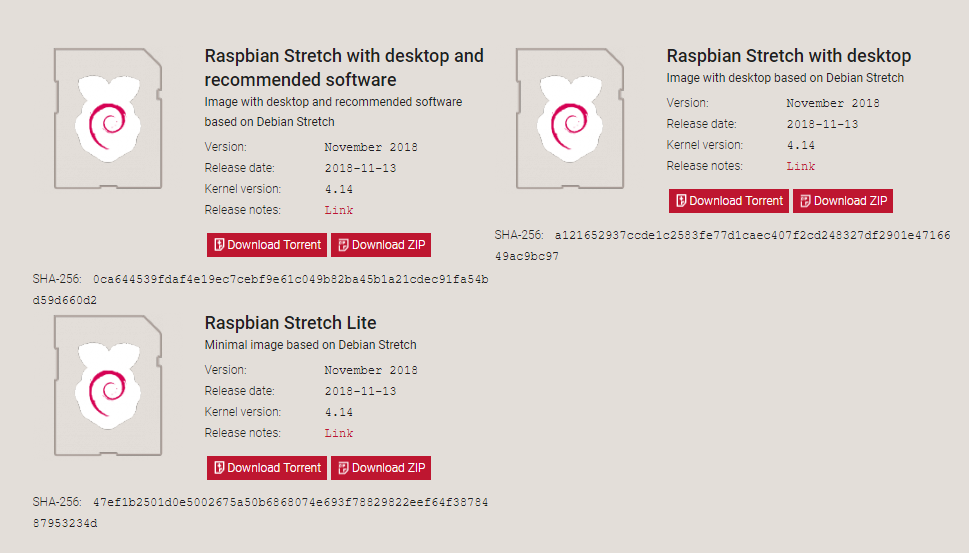
To avoid having to download a bunch of packages and common software later, I recommend downloading the first image.
Next, how do we flash the image for the Raspberry Pi?
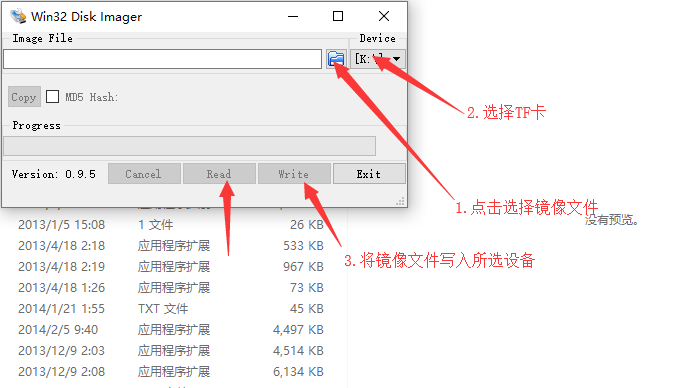
I recommend Win32DiskImager; click Download to get it.
Run it and follow these steps in order:
Tip: if you want to back up a system image instead:
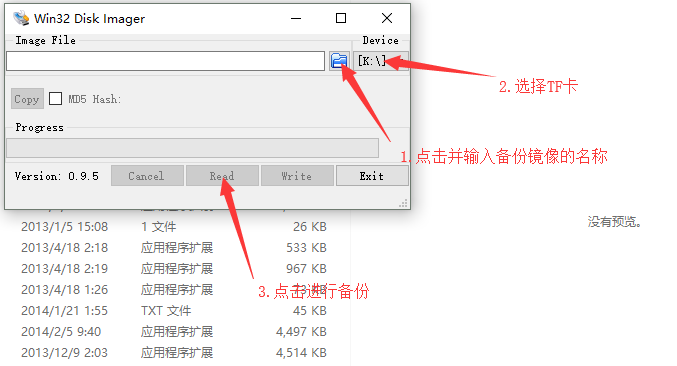
When the progress hits 100, the system has been written, and a device called boot shows up on your computer.
Next, let’s configure the WiFi the Raspberry Pi should connect to before it boots (if you have an Ethernet cable that’s long enough, you can just plug it in hhh).
Since we don’t have a monitor, mouse or keyboard at this point, how do we get the Raspberry Pi onto WiFi on its very first boot?
Open the boot device and create a wpa_supplicant.conf file:
country=CN
ctrl_interface=DIR=/var/run/wpa_supplicant GROUP=netdev
update_config=1

network={
ssid="你的WiFi名"
psk="你的WiFi密码" #如果没有密码,此行不要
key_mgmt=WPA-PSK  #如果没有密码或者密码为WEP,则为 key_mgmt=NONE
priority=1
}
Change the parameters in the file above to suit your setup (ssid is your WiFi name and psk is your WiFi password; if there’s no password, drop the psk line, and if there’s no password or the password is WEP, use key_mgmt=NONE), and delete the comments to avoid bugs.
Important: create an empty file named ssh, with no extension, on boot. Only then is ssh enabled by default. Don’t skip this step!
Then eject the card reader, pull out the TF card, and insert it into the Raspberry Pi the right way round.
Connect the power to the Raspberry Pi and switch it on. When the indicator lights come on, it has booted.
That completes the first boot.
Connecting to the Raspberry Pi terminal over SSH#
First, we need the Raspberry Pi’s LAN IP:
The simplest way is of course to go into the router admin page:
It’s usually 192.168.1.1 or 192.168.0.1; the broadband technician will definitely know which.
Type it into your browser to open the router admin page. For example, mine is 192.168.1.1, and my router is a TP-Link:
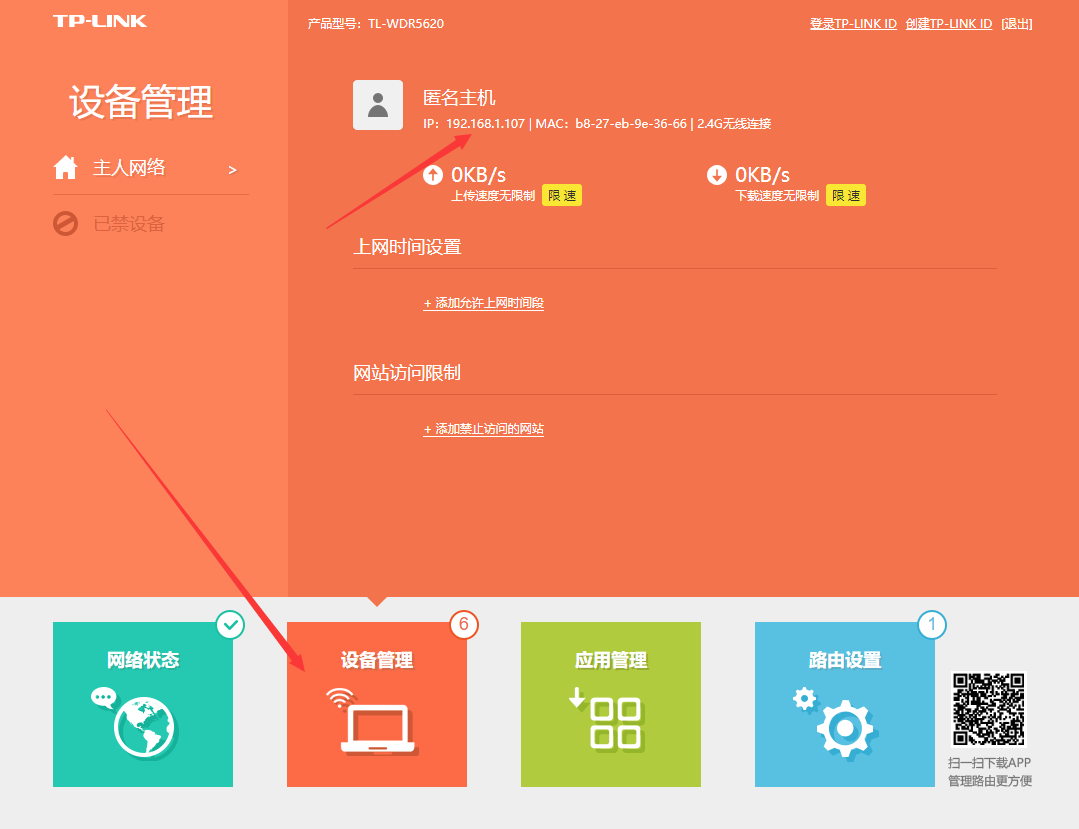
The anonymous host, or the host called pi, is the one we’re looking for.
So my Raspberry Pi’s IP is, for now, 192.168.1.107. Every 191.168.1.107 below should be replaced with your own Raspberry Pi’s LAN IP. Why “for now”? Because we haven’t set a static IP yet; we’ll do that in a bit.
On macOS or Linux, just open Terminal and type ssh pi@192.168.1.107
Enter the default password raspberry and press Enter, and you’re in the Raspberry Pi’s terminal.
On Windows, you can use putty to connect to the Raspberry Pi’s terminal:
Select SSH,
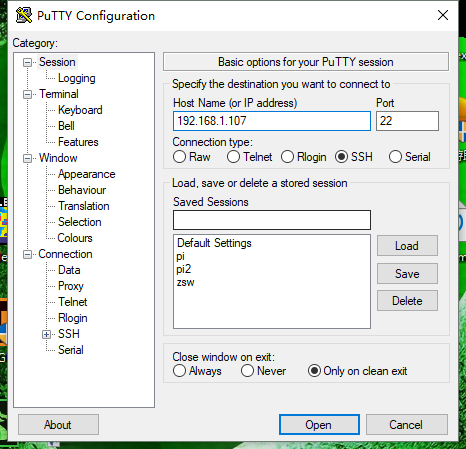
Enter the Raspberry Pi’s LAN IP in the Host Name(or IP address) field; the port defaults to 22. Click Open to get to the ssh window:
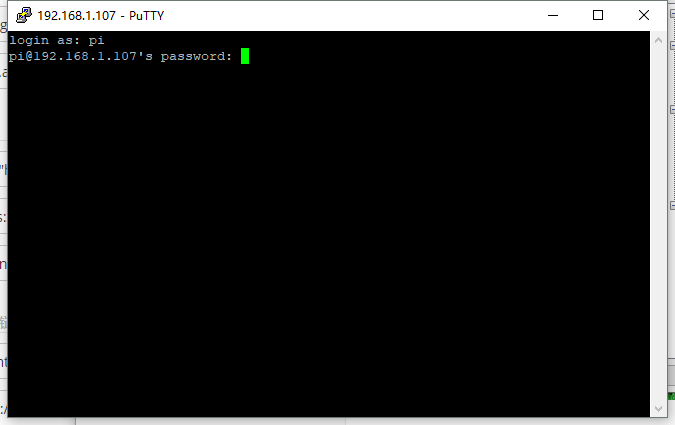
At login as: enter pi, since pi is the default username.
Then enter the password raspberry and press Enter to get into the Raspberry Pi terminal:
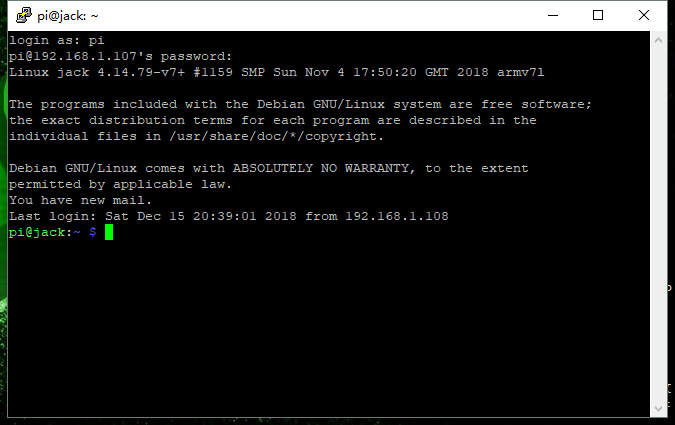
At this point the ssh connection to the Raspberry Pi is ready.
Some necessary settings#
Switch to a domestic mirror#
sudo nano /etc/apt/sources.listComment out all the existing content with #, and add the following two lines:
deb http://mirrors.tuna.tsinghua.edu.cn/raspbian/raspbian/ stretch main contrib non-free rpi
deb-src http://mirrors.tuna.tsinghua.edu.cn/raspbian/raspbian/ stretch main contrib non-free rpi
Ctrl-O to save, Ctrl-X to exit; same below. (In Putty on Windows, right-click is both copy and paste.)
This switches to the Tsinghua mirror. Next, update the source list:
sudo apt-get updateThen
sudo nano /etc/apt/sources.list.d/raspi.listComment out all the existing content with #, and add the following two lines:
deb http://mirror.tuna.tsinghua.edu.cn/raspberrypi/ stretch main ui
deb-src http://mirror.tuna.tsinghua.edu.cn/raspberrypi/ stretch main ui
Update the source list again:
sudo apt-get updateThen compare against the index and update the dependencies:
sudo apt-get upgrade -ySet up Chinese#
Install a Chinese font:
sudo apt-get -y install ttf-wqy-zenheiConfigure the Chinese locale:
sudo raspi-configYou’re now in the Raspberry Pi’s system configuration screen:
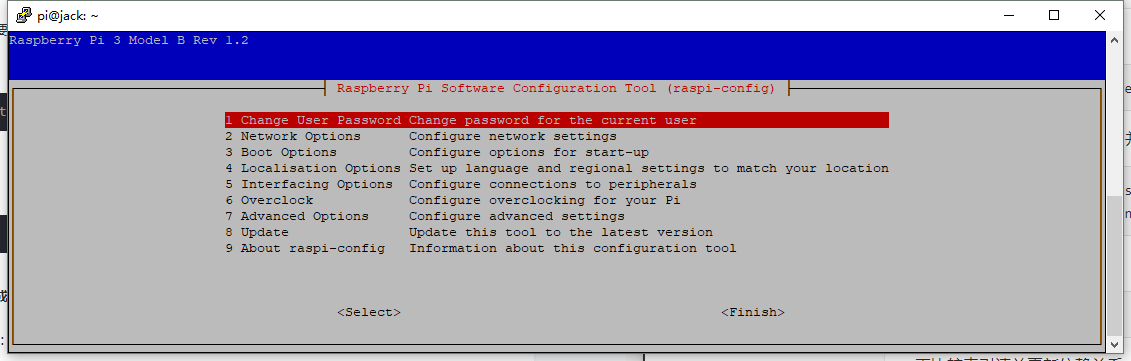
Use the up/down keys to go to 4 Localisation Options and press Enter, then select I1 Change Locale.
Uncheck en_GB.UTF-8 UTF-8, and check en_US.UTF-8 UTF-8, zh_CN.UTF-8 UTF-8 and zh_CN.GBK GBK. On the next screen, choose zh_CN.UTF-8 as the default language.
There are other related settings too, which I’ll mention later. Use Tab or the left/right keys to move to Finish and press Enter. It prompts you to reboot right away, and the changes take effect after the reboot.
Change the password, enable VNC, change the default resolution#
Choose the first option to change the password.
Choose the fifth option to go into the interface settings:
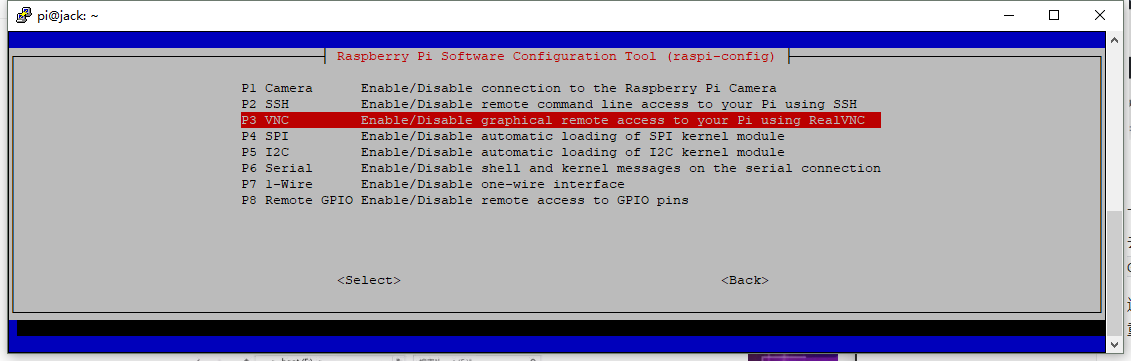
Select VNC and set it to Enabled. Once it tells you VNC is enabled, VNC is on.
Likewise, you can turn on other interfaces as needed.
Choose the seventh option, then A5 Resolution:
Pick a resolution that suits you; I recommend 1920x1080 HD.
Connecting to the Raspberry Pi with VNC Viewer#
VNC Viewer is available on the official website, in versions for every platform.
Once VNC is enabled on the Raspberry Pi, you can connect to it with VNC Viewer to control it and send messages and files.
The Raspberry Pi’s VNC port defaults to 5900. You don’t need to type 5900 when connecting; just enter the LAN IP.
For example, my Raspberry Pi’s LAN IP is 192.168.1.107:
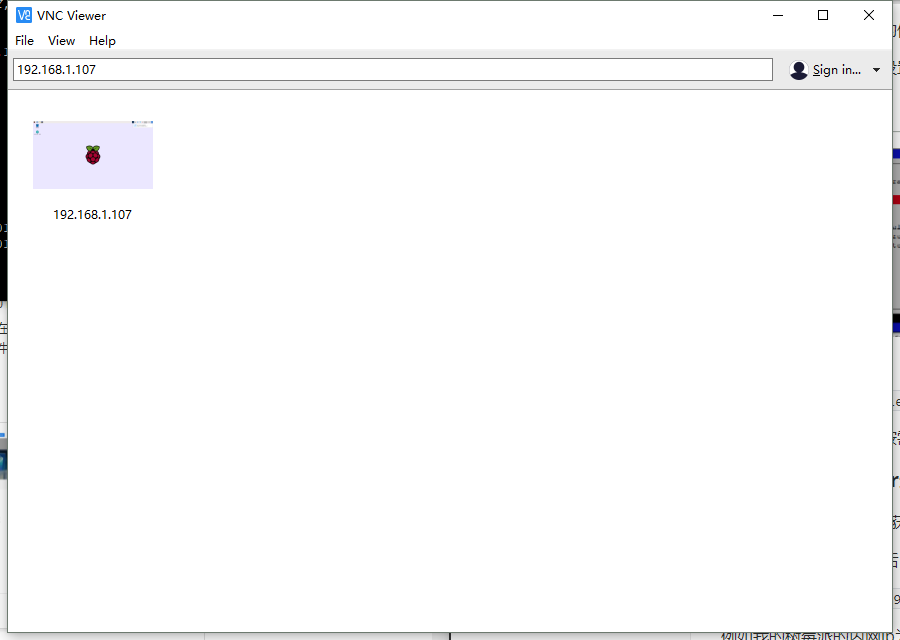
Press Enter, enter the username and password, and you’re in the Raspberry Pi’s desktop and can operate it.
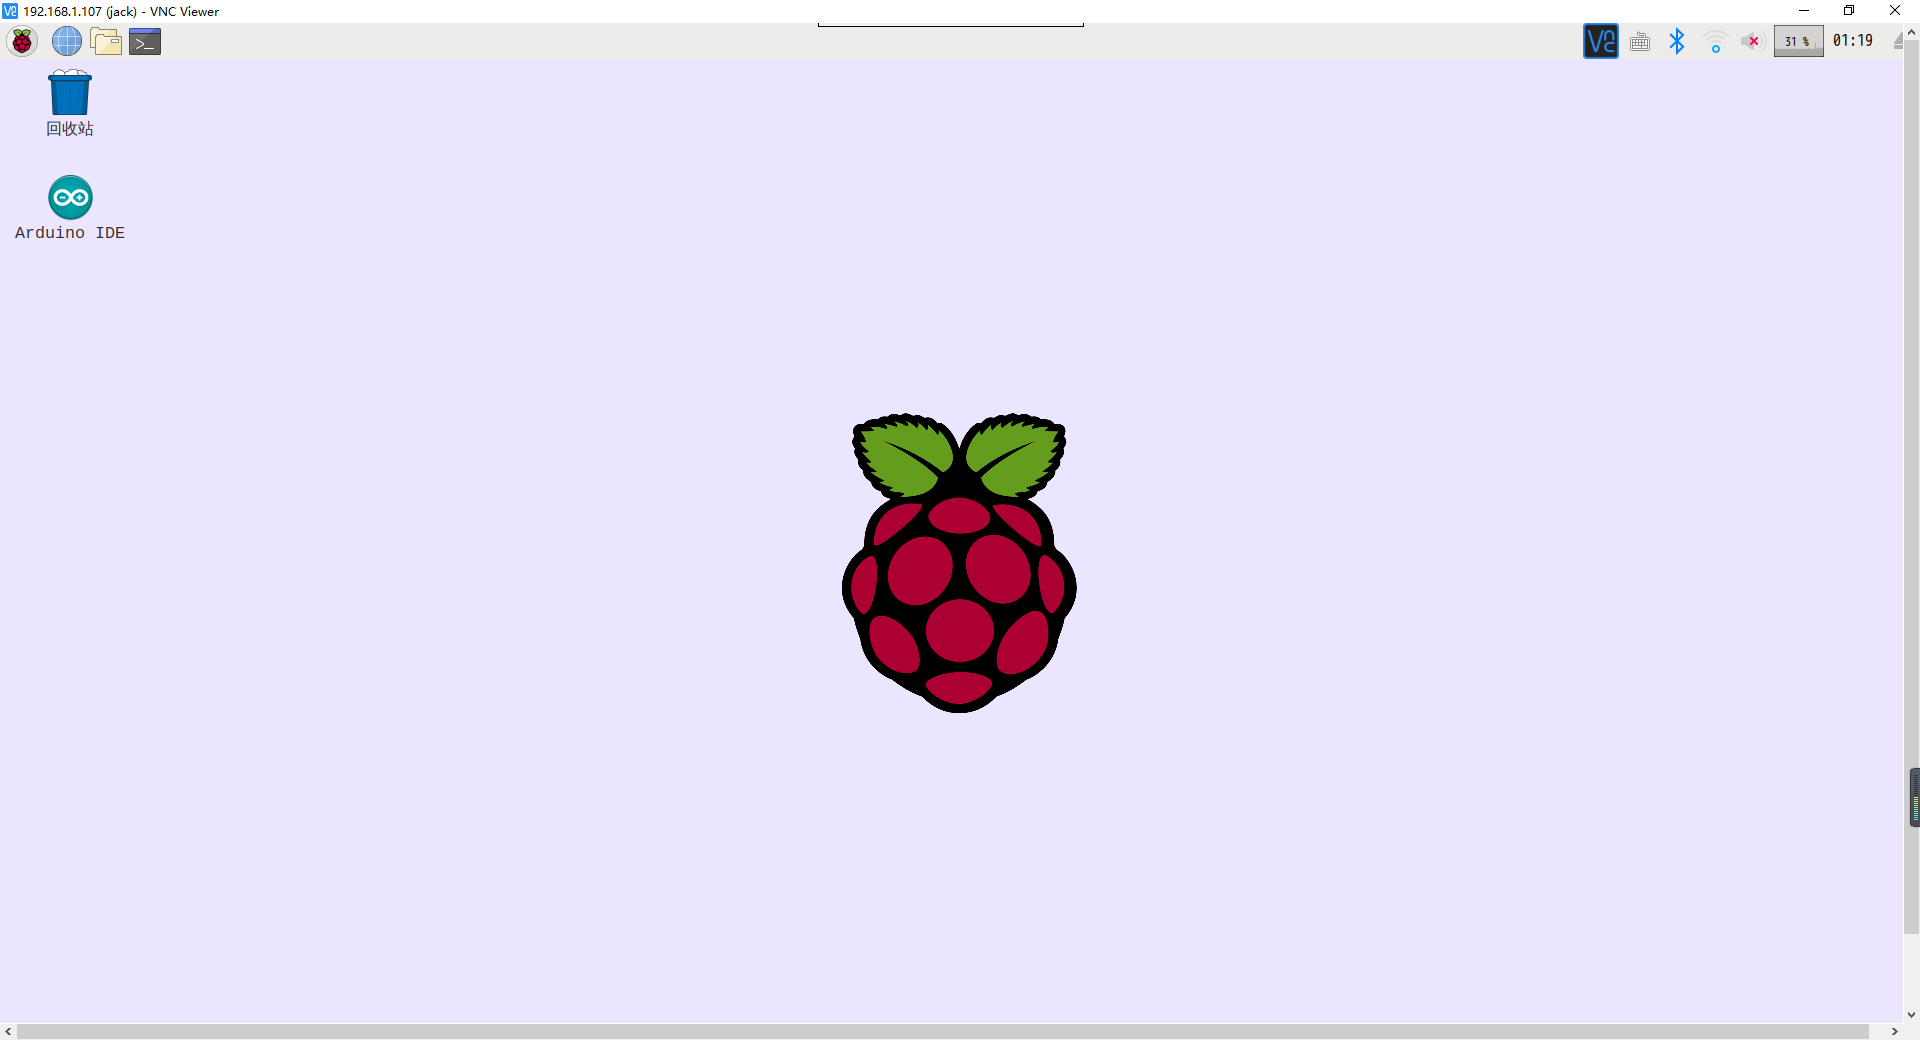
Now, with SSH and VNC on your computer, you have full control of the Raspberry Pi — no need to spend money on a monitor, mouse and keyboard. Of course, if you have the budget, configuring the Raspberry Pi is a lot simpler.
On mobile, for iOS I recommend 树莓派助手(pi helper). It connects to the Raspberry Pi and can monitor it, and also gives you terminal access, SFTP file access and custom commands, for free.
On Android, any terminal app that can ssh will do.
VNC Viewer also has iOS and Android versions, so you can control the Raspberry Pi graphically from your phone too.
Setting a static IP for the Raspberry Pi#
Why not set the static IP from the terminal? Because the GUI is easier!
Right-click the WiFi icon:
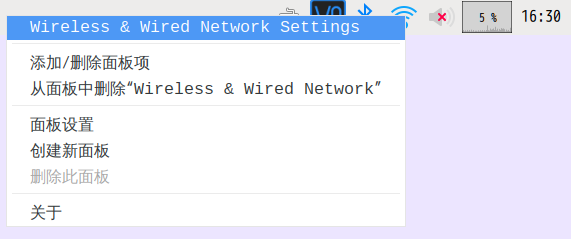
Select interface->wlan0; if you’re using an Ethernet cable, select interface->eth0.
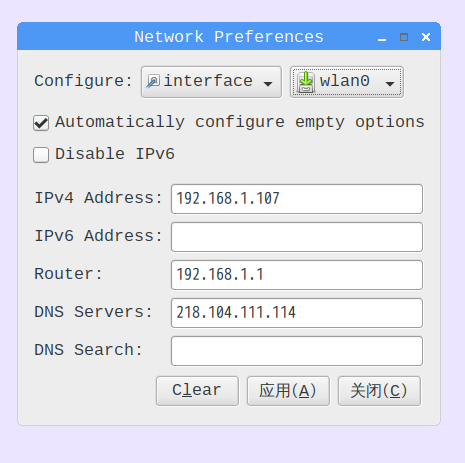
Fill it in according to your own Raspberry Pi’s IP. If you have IPv6, you can fill that in as well.
Router is the gateway, i.e. the router’s address; mine is 192.168.1.1.
You can find the DNS address on the router admin page:
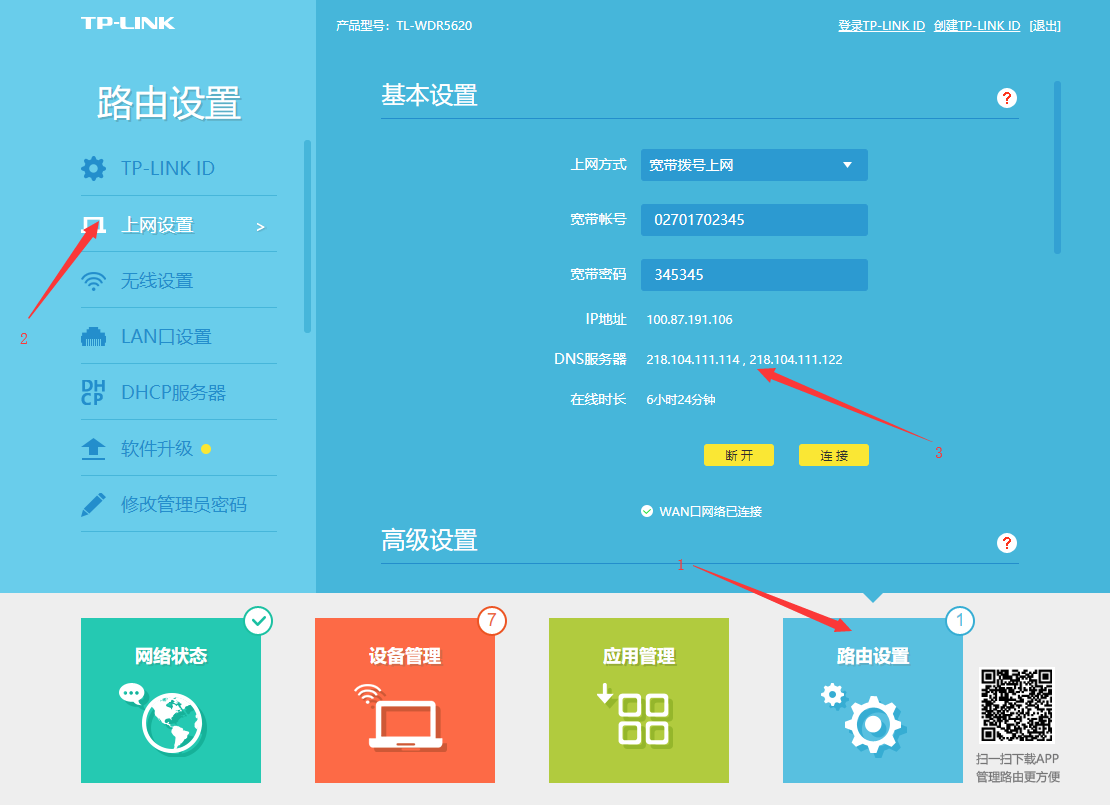
When you’re done, click 应用 (Apply). My Raspberry Pi now has the static IP 192.168.1.107.
Only with a static IP set will the Raspberry Pi avoid being assigned a dynamic IP address every time it reboots.
Installing the Arduino IDE#
Word of advice: don’t install it with sudo apt-get install arduino — that’s a very old version.
The download page is at https://www.arduino.cc/en/Main/Software
Since the Raspberry Pi is Linux on ARM, choose the Linux ARM version and download it from the command line with wget:
If you want the latest version, visit the site above, use the link for the latest version, and install it in a similar way to below (the folder name will differ; after extracting, remember to ls first and then cd into the directory to install).
sudo wget https://www.arduino.cc/download_handler.php?f=/arduino-1.8.8-linuxarm.tar.xz
sudo tar xvJf arduino-1.8.8-linuxarm.tar.xz
cd arduino-1.8.8
./install.sh
Once it’s installed, connect the serial cable to the Arduino Uno R3 and plug the USB end into a USB port on the Raspberry Pi. (I recommend a USB hub with external power: connect the hub to the Raspberry Pi and plug the serial cable’s USB end into the hub, to avoid program errors caused by the Uno not getting enough power.)
ls /dev/tty*If you see /dev/ttyACM0 or something similar, the serial connection works.
Open the Arduino IDE and select the board type and port:
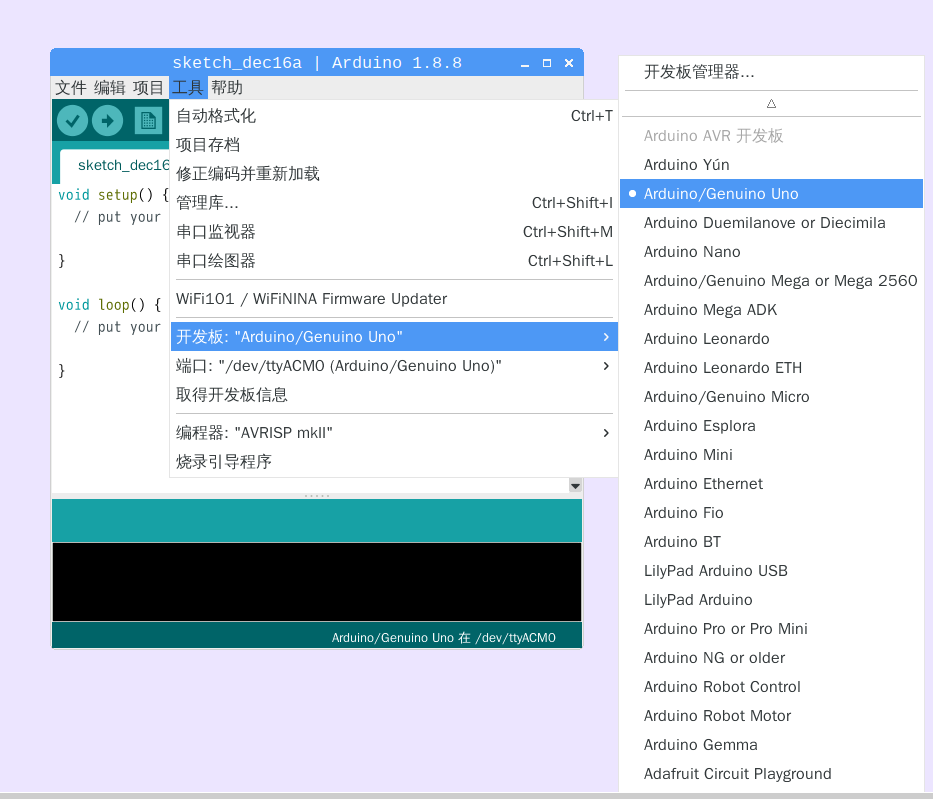
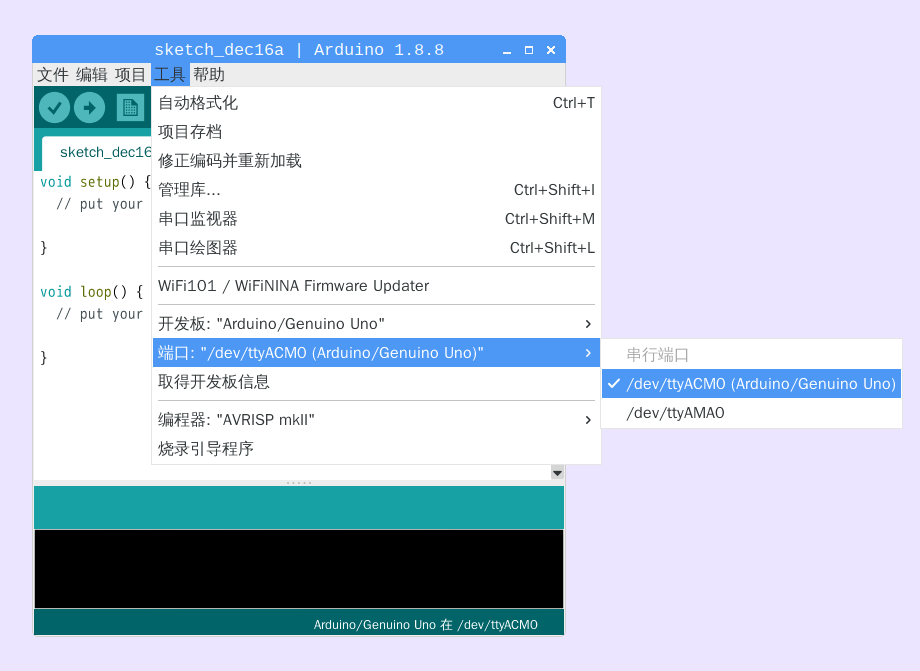
Open the example sketch Blink
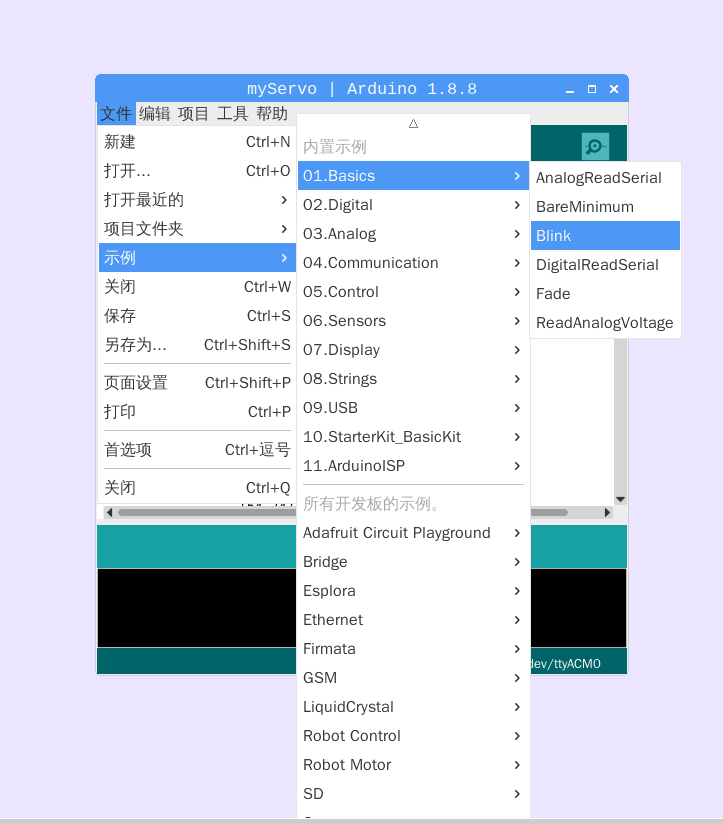
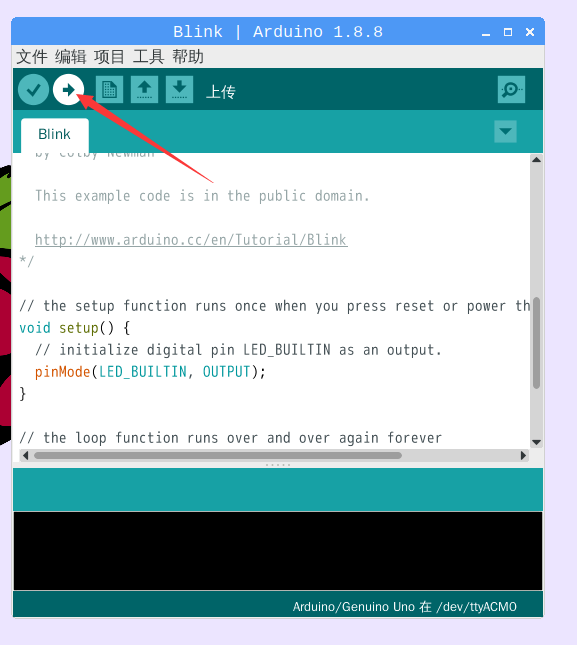
Click the right-pointing arrow to upload the code. Once the upload succeeds and the Arduino’s LED starts blinking, it’s working properly.
SFTP file access#
On Windows use WinSCP; on macOS or Linux you can use FileZilla.
All you need is the Raspberry Pi’s LAN IP, username and password to access the Raspberry Pi and manage its files. It’s simple, so I won’t go into detail here.
Buying and resolving a domain#
I use Tencent Cloud. There are many places to buy a domain, so I’ll only talk about DNS resolution.
All we need to understand is CNAME records:
For example, on Tencent Cloud — the domain I bought is code4world.cn:

Resolving it like this points pi.code4world.cn to frp.kerwin.cn, which enables frp intranet tunneling. I’ll cover frp intranet tunneling later.
Building the Dorm Assistant’s Modules#
Setting up a web server with Apache2 or Nginx#
Either Apache2 or Nginx works, and setting them up is quite similar.
Pick one of the two, don’t install both: they do the same thing and both listen on port 80 by default, so installing both is pointless and they’ll conflict.
Setting up Apache2#
Install Apache2:
sudo apt-get install apache2Now visiting http://<Raspberry Pi LAN IP> should bring up Apache2’s welcome page saying it works.
That’s because Apache2 listens on port 80 by default, the site for port 80 lives at /var/www/html by default, and the default page is /var/www/html/index.html. So once it’s installed, you’ll see it by visiting the Raspberry Pi’s LAN IP.
Next I’ll explain how to add your own listening ports and set the location of the corresponding sites.
Apache2’s main directory is /etc/apache2, and apache2.conf is its configuration file. But apache2.conf is itself configured by including modules, so the process for configuring Apache2 is to first add a listening port in ports.conf:
sudo nano /etc/apache2/ports.conf# If you just change the port or add more ports here, you will likely also
# have to change the VirtualHost statement in
# /etc/apache2/sites-enabled/000-default.conf
Listen 80
<IfModule ssl_module>
Listen 443
</IfModule>
<IfModule mod_gnutls.c>
Listen 443
</IfModule>
# vim: syntax=apache ts=4 sw=4 sts=4 sr noetAs you can see, it currently listens on port 80 by default. If you want to listen on other ports, just add a line Listen <port> below the Listen 80 line.
In fact, after Apache2 is installed it listens on port 80 by default, and where port 80 maps to is defined in /etc/apache2/sites-available/000-default.conf:
sudo nano /etc/apache2/sites-available/000-default.confIts contents:
<VirtualHost *:80>
        # The ServerName directive sets the request scheme, hostname and port that
        # the server uses to identify itself. This is used when creating
        # redirection URLs. In the context of virtual hosts, the ServerName
        # specifies what hostname must appear in the request's Host: header to
        # match this virtual host. For the default virtual host (this file) this
        # value is not decisive as it is used as a last resort host regardless.
        # However, you must set it for any further virtual host explicitly.
        #ServerName www.example.com

        ServerAdmin webmaster@localhost
        DocumentRoot /var/www/html

        # Available loglevels: trace8, ..., trace1, debug, info, notice, warn,
        # error, crit, alert, emerg.
        # It is also possible to configure the loglevel for particular
        # modules, e.g.
        #LogLevel info ssl:warn

        ErrorLog ${APACHE_LOG_DIR}/error.log
        CustomLog ${APACHE_LOG_DIR}/access.log combined

        # For most configuration files from conf-available/, which are
        # enabled or disabled at a global level, it is possible to
        # include a line for only one particular virtual host. For example the
        # following line enables the CGI configuration for this host only
        # after it has been globally disabled with "a2disconf".
        #Include conf-available/serve-cgi-bin.conf
</VirtualHost>

# vim: syntax=apache ts=4 sw=4 sts=4 sr noet
So this is the configuration for port 80. The general format is roughly:
<VirtualHost *:80> #port number is 80
        ServerName www.example.com #server domain is www.example.com; if you have no domain, don't set it, comment it out with #
        ServerAdmin webmaster@localhost #server admin email is webmaster@localhost
        DocumentRoot /var/www/html #site location is /var/www/html
</VirtualHost>
With the listening port added in ports.conf and the site configured in 000-default.conf, just restart the apache2 service:
sudo service apache2 restartCheck apache2’s status:
sudo service apache2 statusIf it’s running and active, in green, it’s working fine. For example, if you added port 81, configured its location, and that location has an entry page like index.html, visit http://<Raspberry Pi LAN IP>:81 to see the result.
If you want apache2 to support php, do the following:
sudo service apache2 stop
sudo apt-get install php7.0-fpm php7.0-cli php7.0-curl php7.0-gd php7.0-mcrypt php7.0-cgi libapache2-mod-php7.0
sudo service apache2 start
For example, I configured port 70 with the site root /var/www/html/test and the entry /var/www/html/test/index.php:
<!DOCTYPE html>
<html>
<body>
<?php echo phpinfo(); ?>
</body>
</html>
Type 192.168.1.107:70 into your browser and press Enter, and you’ll see php’s info page:
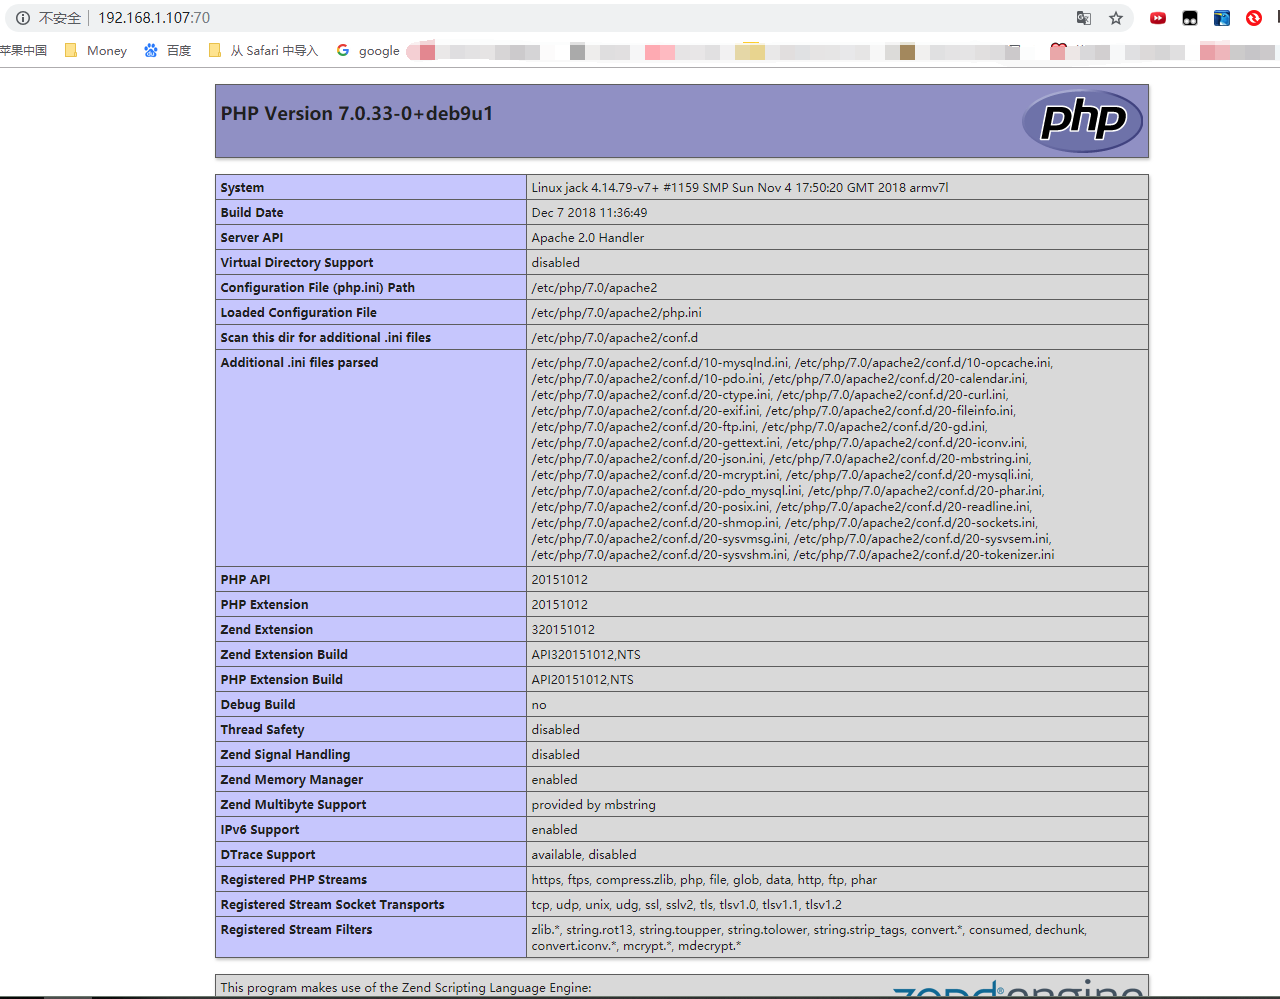
Apache2 + php is now set up.
Setting up Nginx#
If you’ve installed Apache2, don’t install Nginx too.
Install Nginx + php:
sudo apt-get update
sudo apt-get install nginx php7.0-fpm php7.0-cli php7.0-curl php7.0-gd php7.0-mcrypt php7.0-cgi
sudo service nginx start
sudo service php7.0-fpm restart
Like Apache2, Nginx listens on port 80 by default and its default root is also /var/www/html. Type http://<Raspberry Pi LAN IP> into your browser and press Enter, and you’ll see nginx’s welcome page.
Nginx’s config directory is /etc/nginx. Like Apache2, Nginx also has a folder called sites-available, which in both cases means configurations for available sites. Unlike Apache2, we only need to modify /etc/nginx/sites-available/default to finish the configuration:
sudo nano /etc/nginx/sites-available/defaultThe config format looks like this:
server {
        listen 80; #listen on port 80
        listen [::]:80; #listen on port 80

        #server_name www.example.com; #server domain

        root /var/www/html; #site root directory
        index index.php; #site index file

        location / { #add index file types
                index  index.html index.htm index.php default.html default.htm default.php;
        }

        location ~\.php$ { #php support
                fastcgi_pass unix:/run/php/php7.0-fpm.sock;
                #fastcgi_pass 127.0.0.1:9000;
                fastcgi_param SCRIPT_FILENAME $document_root$fastcgi_script_name;
                include fastcgi_params;
        }
}
Replace the default content with the above to make port 80 support php. If you need to add more ports and site directories, add them to the default file following the format above.
After editing:
sudo service nginx restartAnd the configuration is done.
Setting the site logo#
The site’s logo is the favicon.ico. It usually just goes in the site root. How do you make an ico icon?
easyicon’s online converter (the site has shut down; the link is dead)
Visit the site above, convert the png image of the logo you want into ico format, rename it favicon.ico, and put it in the site root, e.g. in /var/www/html. How do you put it there? See 7. SFTP file access above.
Tip: use sudo chmod -R 777
to give the directory read/write permissions. Same below.
Once it’s in place, clear your browser cache and refresh the page, and you’ll see the site with the logo you just added.
More#
For more, go learn at W3School…
Setting up Oray (Peanut Shell) for ssh and vnc from outside the LAN#
Go to the download page and download the Raspberry Pi version:

The current file is phddns_rapi_3.0.2.armhf.deb
Transfer the downloaded deb package to /home/pi on the Raspberry Pi:
dpkg -i phddns_rapi_3.0.2.armhf.deband Peanut Shell is installed.
Once installed, it automatically displays the Raspberry Pi’s SN code, the default password admin and the remote management URL http://b.oray.com
Visit http://b.oray.com, enter the SN code and the default password admin, press Enter, and you’re in the admin backend:
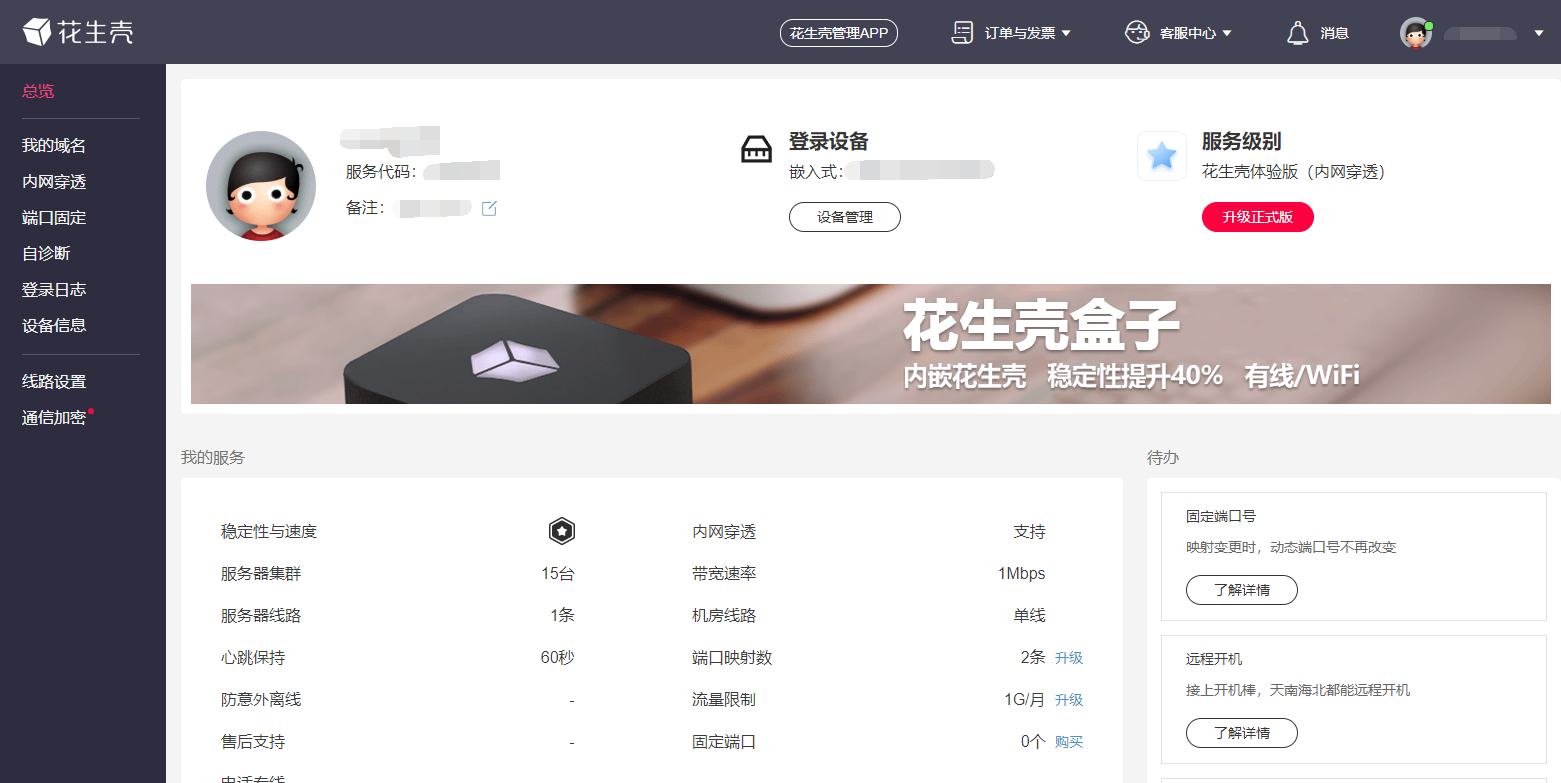
Select 内网穿透 (intranet tunneling); if it asks for 6 CNY, just pay to activate it. Here’s what mine looks like after configuration:

Click 添加映射 (Add mapping):
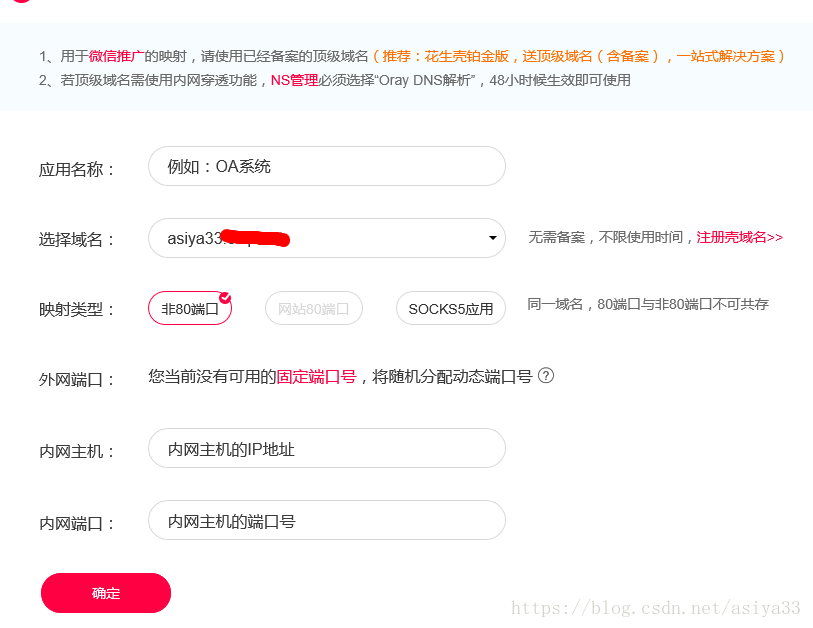
First mapping: app name 远程ssh (remote ssh). For the domain you can pick the free one it provides. Choose 非80端口 (non-80 port), no fixed port number needed. Set the internal host to the Raspberry Pi’s LAN IP and the internal port to 22, since ssh uses port 22.
Second mapping: app name 远程vnc (remote vnc). For the domain you can pick the free one it provides. Choose 非80端口 (non-80 port), no fixed port number needed. Set the internal host to the Raspberry Pi’s LAN IP and the internal port to 5900, since vnc uses port 5900.
After mapping, test it:
On macOS or Linux: ssh -oPort=<external port> pi@<domain>
In Putty, put the domain in Host Name(or IP Address), the external port in Port, and click Open.
If it prompts for a username or password, it worked.
Test vnc:
Enter <domain>:<external port>. If you can see the desktop after entering the username and password, the configuration worked.
To make the external ports easier to remember, you can download the Peanut Shell app on your phone.
Setting up frp for more intranet tunneling#
First download it
wget https://github.com/fatedier/frp/releases/download/v0.16.0/frp_0.16.0_linux_arm.tar.gzExtract it
tar -xzvf frp_0.16.0_linux_arm.tar.gzGo into the directory
cd frp_0.16.0_linux_arm
ls
You’ll find the executable frpc and the config file frpc.ini in the directory.
Next, configure frpc.ini:
sudo nano frpc.iniReplace the [common] section with the following:
[common]
server_addr = frp.kerwin.cn
privilege_token = kerwin.cn
server_port = 7000
log_file = frpc.log
log_level = info
log_max_days = 7
login_fail_exit = false
This uses a free frp service, at frp.kerwin.cn (the service has shut down; the link is dead)
The reason for using free frp is that we don’t need to spend money on a VPS.
Next is a config template; modify it to your needs and add it to frpc.ini:
[jack] #config name is jack
type = http #type is http
custom_domains = pi.code4world.cn #domain is pi.code4world.cn
local_ip = 192.168.1.107 #Raspberry Pi LAN ip is 192.168.1.107
local_port = 80          #port to tunnel is 80, i.e. the page served from the default /var/www/html
privilege_mode = true
authentication_timeout = 0
use_encryption = true
use_gzip = true
Once it’s configured, save the file. How do you make it take effect?
You have to run frpc -c frpc.ini for it to work, but that doesn’t run in the background, and you have to Ctrl-C to quit.
Put $ after the command to make it run in the background:
./frpc -c frpc.ini &To have this run automatically in the background every time the Raspberry Pi reboots, edit the /etc/rc.local file:
sudo nano /etc/rc.localAdd a line above return 0:
nohup /home/pi/frp_0.16.0_linux_arm/frpc -c /home/pi/frp_0.16.0_linux_arm/frpc.ini&Change the paths to match your own file paths.
Likewise, other startup commands can generally be done the same way.
Now visiting http://pi.code4world.cn (the domain has since expired) is equivalent to visiting http://192.168.1.107:80, i.e. http://192.168.1.107 — but the latter only works on the LAN, while the former works from anywhere.
Mounting the hard drive#
First, open the VNC desktop.
To make sure your drive reads reliably, connect it via the easy-drive cable to the externally powered USB hub, or put it in the externally powered drive enclosure, then connect that to the Raspberry Pi and see whether it mounts properly.
To mount ntfs you first need
sudo apt-get install fuse-utils ntfs-3g
modprobe fuse
If it mounts, OK, you can move on.
So, how do we get the drive to mount automatically?
First turn off the options for auto-mounting media inserted after boot and mounting at boot, because in my testing this is necessary.
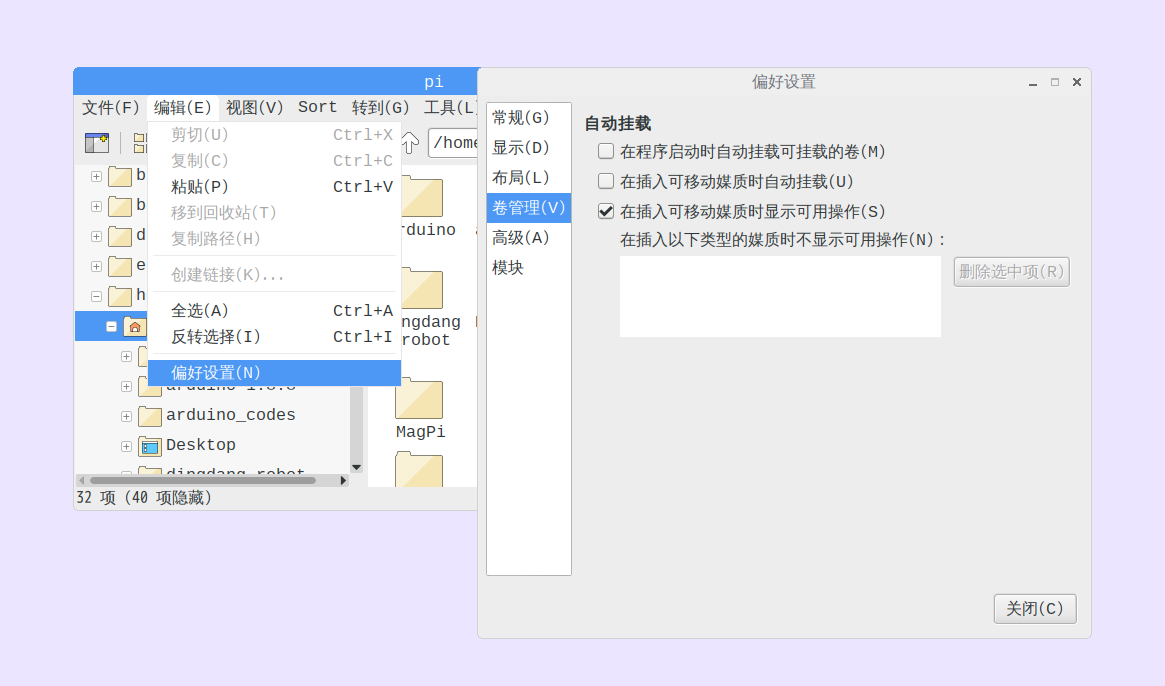
Click on the file manager, go to 偏好设置 (Preferences) -> 卷管理 (Volume Management), and uncheck the first and second options.
Next
sudo nano /etc/fstabadd a line
/dev/sda1 /media/pi/MyDisk ntfs-3g defaults,iocharset=utf-8 0 0/media/pi/MyDisk is the mount folder. Since my drive is ntfs, I put ntfs-3g; for the rest, just fill in the same as me. See the parameter rules of the fstab file for details.
sudo rebootAfter rebooting, the drive is automatically mounted at /media/pi/MyDisk. Success.
For the download box later on, create a download directory
sudo mkdir /media/pi/MyDisk/DownloadsChange the read/write permissions
sudo chmod -R 777 /media/pi/MyDiskSetting up Aria2 and Transmission as a download box#
Aria2 and the Aria-Ng Web UI#
Install aria2
sudo apt-get install -y aria2Create a folder
mkdir -p ~/.config/aria2/Add a config file
sudo nano ~/.config/aria2/aria2.configPaste in the following, and change dir and rpc-secret :
#run in the background
daemon=true
#username
#rpc-user=user
#password
#rpc-passwd=passwd
#set the secret key
rpc-secret=secret
#allow rpc
enable-rpc=true
#allow all origins, needed for the web UI's cross-origin access
rpc-allow-origin-all=true
#whether to enable https; once enabled, set the paths of the public and private key files
#rpc-secure=true
#public key for encryption
#rpc-certificate=/home/pi/.config/aria2/example.crt
#private key for encryption
#rpc-private-key=/home/pi/.config/aria2/example.key
#allow external access; if false, only listens on the local port
rpc-listen-all=true
#RPC port, only change it if the default port is taken
#rpc-listen-port=6800
#max concurrent downloads (tasks), suggested value for routers: 3
max-concurrent-downloads=5
#resume downloads
continue=true
#connections per server
max-connection-per-server=5
#minimum split size; the max number of download threads depends on how many pieces it can be split into, important for small files
min-split-size=10M
#max threads per file, suggested value for routers: 5
split=10
#download speed limit
max-overall-download-limit=0
#per-file speed limit
max-download-limit=0
#upload speed limit
max-overall-upload-limit=0
#per-file speed limit
max-upload-limit=0
#drop connections that are too slow
#lowest-speed-limit=0
#for verification, needs a release after 1.16.1
#referer=*
#where files are saved, set here to the download directory on the hard drive
dir=/media/pi/MyDisk/Downloads
#file cache, uses the built-in file cache; use it if you don't trust the Linux kernel file cache and the disk's built-in cache, needs 1.16 or later
#disk-cache=0
#another Linux file caching method; make sure your kernel supports this option before using it, needs 1.15 or later(?)
#enable-mmap=true
#file preallocation, effectively reduces file fragmentation and improves disk performance. The downside is preallocation takes a long time
#time needed: none < falloc ? trunc << prealloc; falloc and trunc need filesystem and kernel support
file-allocation=prealloc
#skip certificate verification
check-certificate=false
#save download sessions
save-session=/home/pi/.config/aria2/aria2.session
input-file=/home/pi/.config/aria2/aria2.session
#resume after power loss
save-session-interval=60
After saving
touch /home/pi/.config/aria2/aria2.session
aria2c --conf-path=/home/pi/.config/aria2/aria2.config
This binds aria’s config file to /home/pi/.config/aria2/aria2.config
Next, set aria2 to start on boot:
sudo nano /lib/systemd/system/aria.serviceEnter the following:
[Unit]
Description=Aria2 Service
After=network.target

[Service]
User=pi
Type=forking
ExecStart=/usr/bin/aria2c --conf-path=/home/pi/.config/aria2/aria2.config

[Install]
WantedBy=multi-user.target
Reload and enable it on boot:
sudo systemctl daemon-reload
sudo systemctl enable aria
Download AriaNg
wget https://github.com/mayswind/AriaNg/releases/download/0.4.0/aria-ng-0.4.0.zip -O aria-ng.zipExtract it
unzip aria-ng.zip -d aria-ngMove aira-ng into the /var/www/html/ directory
sudo mv aria-ng /var/www/html/In your browser, visit <Raspberry Pi IP>/aria-ng
Go to 设置 (Settings), 全局 (Global), set the language to 中文 (Chinese), then change the rpc密钥 (RPC secret) to the secret you just set; the default is secret.
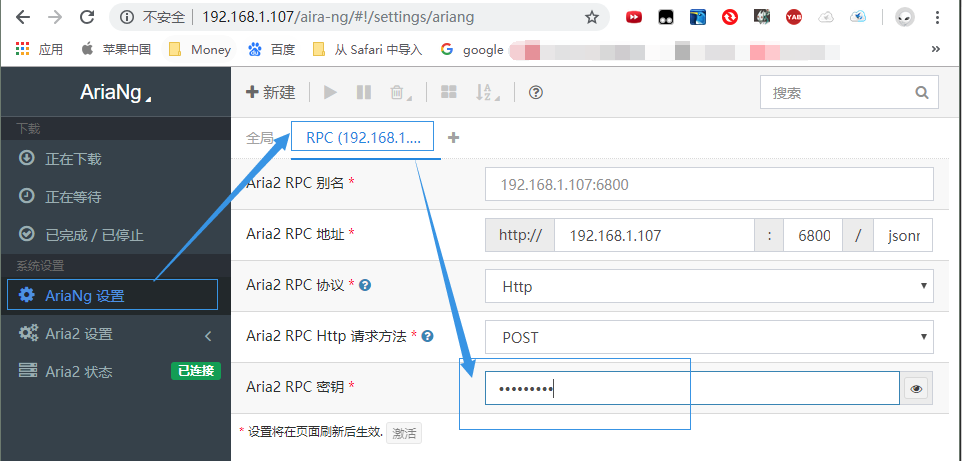
After refreshing, you can start download tasks. On the LAN visit http://<Raspberry Pi LAN IP>/aira-ng; from outside visit http://pi.code4world.cn/aira-ng (the domain has since expired), where pi.code4world.cn is 192.168.1.107:80 — adjust according to the intranet tunneling you set up yourself.
From outside, you need to set the rpc address, which means using frp again:
Add the following to frpc.ini:
[aria2]
type = http
custom_domains = aria.zhangkexuan.cn
local_ip = 192.168.1.107
local_port = 6800
privilege_mode = true
authentication_timeout = 0
use_encryption = true
use_gzip = true
Here, replace aria.zhangkexuan.cn with one of your own domains that has a CNAME to frp.kerwin.cn; leave everything else as is.
After saving, refresh the frp service.
After cd-ing to the frp path:
./frpc -c frpc.ini &In the remotely accessed aria2 web UI, under 设置 (Settings) -> Aria2 RPC 地址 (Aria2 RPC address), enter the domain you just set and 80 in the two fields.
Then fill in the secret and refresh. If it says it’s connected, you’re done.
Transmission#
Install transmission
sudo apt-get install transmission-daemonEdit the config file
sudo nano /etc/transmission-daemon/settings.jsonChange it to the following
{
    "alt-speed-down": 50,
    "alt-speed-enabled": false,
    "alt-speed-time-begin": 540,
    "alt-speed-time-day": 127,
    "alt-speed-time-enabled": false,
    "alt-speed-time-end": 1020,
    "alt-speed-up": 50,
    "bind-address-ipv4": "0.0.0.0",
    "bind-address-ipv6": "::",
    "blocklist-enabled": false,
    "blocklist-url": "http://www.example.com/blocklist",
    "cache-size-mb": 4,
    "dht-enabled": true,
    "download-dir": "/media/pi/MyDisk/Downloads",
    "download-limit": 100,
    "download-limit-enabled": 0,
    "download-queue-enabled": true,
    "download-queue-size": 5,
    "encryption": 1,
    "idle-seeding-limit": 30,
    "idle-seeding-limit-enabled": false,
    "incomplete-dir": "/media/pi/MyDisk/Downloads",
    "incomplete-dir-enabled": false,
    "lpd-enabled": false,
    "max-peers-global": 200,
    "message-level": 1,
    "peer-congestion-algorithm": "",
    "peer-id-ttl-hours": 6,
    "peer-limit-global": 200,
    "peer-limit-per-torrent": 50,
    "peer-port": 51413,
    "peer-port-random-high": 65535,
    "peer-port-random-low": 49152,
    "peer-port-random-on-start": false,
    "peer-socket-tos": "default",
    "pex-enabled": true,
    "port-forwarding-enabled": false,
    "preallocation": 1,
    "prefetch-enabled": true,
    "queue-stalled-enabled": true,
    "queue-stalled-minutes": 30,
    "ratio-limit": 2,
    "ratio-limit-enabled": false,
    "rename-partial-files": true,
    "rpc-authentication-required": true,
    "rpc-bind-address": "0.0.0.0",
    "rpc-enabled": true,
    "rpc-host-whitelist": "",
    "rpc-host-whitelist-enabled": true,
    "rpc-password": "your_password",
    "rpc-port": 9091,
    "rpc-url": "/transmission/",
    "rpc-username": "your_user_name",
    "rpc-whitelist": "*.*.*.*",
    "rpc-whitelist-enabled": false,
    "scrape-paused-torrents-enabled": true,
    "script-torrent-done-enabled": false,
    "script-torrent-done-filename": "",
    "seed-queue-enabled": false,
    "seed-queue-size": 10,
    "speed-limit-down": 100,
    "speed-limit-down-enabled": false,
    "speed-limit-up": 100,
    "speed-limit-up-enabled": false,
    "start-added-torrents": true,
    "trash-original-torrent-files": false,
    "umask": 18,
    "upload-limit": 100,
    "upload-limit-enabled": 0,
    "upload-slots-per-torrent": 14,
    "utp-enabled": true
}
Change "rpc-username" to your username and "rpc-password" to your password.
Run the following (you must reload first, otherwise the config file gets reverted):
sudo service transmission-daemon reload
sudo service transmission-daemon restart
Type <Raspberry Pi LAN IP>:9091 into your browser to access transmission. For access from outside, you also need to add the following to frpc.ini:
[transmission]
type = http
custom_domains = download.zhangkexuan.cn
local_ip = 192.168.1.107
local_port = 9091
privilege_mode = true
authentication_timeout = 0
use_encryption = true
use_gzip = true
Likewise, download.zhangkexuan.cn is a domain with a CNAME record pointing to frp.kerwin.cn.
After cd-ing to the frp path:
./frpc -c frpc.ini &Visit http://<the domain you just set> to access transmission remotely. And with that, both local and remote downloading work.
Setting up the private cloud#
We’ll use KodExplorer (可道云), which is fairly simple to configure.
The private cloud’s physical storage is on the hard drive, so first create a folder kod on the drive
cd /media/pi/MyDisk
sudo mkdir kod
sudo chmod -R 777 /media/pi/MyDisk/kod
cd kod
sudo wget http://static.kodcloud.com/update/download/kodexplorer4.37.zip
unzip kodexplorer4.37.zip
chmod -Rf 777 ./*
You’ll see the /media/pi/MyDisk/kod directory contains an index.php entry file.
Tying back to the Apache2+php or Nginx+php setup earlier: listen on a port, say 1998, set the site root to /media/pi/MyDisk/kod, use a domain with a CNAME to frp.kerwin.cn, set the frp port to 1998, refresh the frp service, and restart the apache or nginx service. Now you can access it via http://<Raspberry Pi LAN IP>:1998, or via http://<the domain you just set>.
The default admin username is admin; the first time, you log in after entering a password.
The regular user’s username is default with default password default; the guest username is guest with password guest.
You can configure a lot more in the backend; try it out yourself for the details.
Setting up Samba#
Install Samba
sudo apt-get install samba samba-common-bin
sudo apt-get install avahi-daemon
Configure Samba
sudo nano /etc/samba/smb.confAppend to the end of the file:
[public]
comment = Public Storage
path = /media/pi
read only = no
writable = yes
create mask = 0777
directory mask = 0777
guest ok = yes
browseable = yes
Here, path is the public share path; you can also set it to /media/pi to share the hard drive and other media.
Once configured, restart the samba service
smbd restartAt this point Samba may not be enabled on your computer:
控制面板 (Control Panel) -> 程序 (Programs) -> 启用或关闭Windows功能 (Turn Windows features on or off)
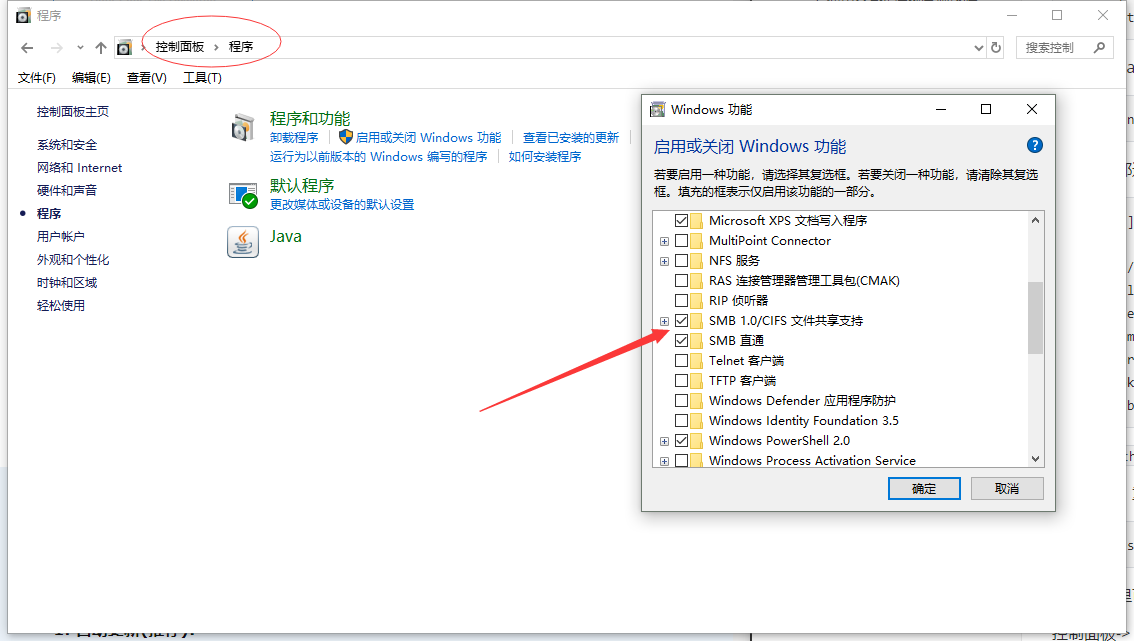
Check the two SMB options and turn on network discovery, and you’ll be able to find your Raspberry Pi under 网络 (Network) and access the public folder.
To make sure you can read and write:
sudo chmod -R 777 /media/piwhere /media/pi is the share path you just set.
Samba is now set up.
Setting up miniDLNA#
Update the package sources
sudo apt-get updateInstall minidlna
sudo apt-get install minidlnaEdit the config file
sudo nano /etc/minidlna.confAppend to the end:
media_dir=/This means: scan files in all paths.
Restart minidlna
/etc/init.d/minidlna restartminiDLNA is now set up. Any phone or computer that supports DLNA can directly play videos, view pictures, listen to music… from the Raspberry Pi.
Dorm door-opening assistant#
This module comes in two parts. One is opening the door with a standalone Arduino + buzzer + servo + RC522 (RFID) module; the other is the Raspberry Pi using Python’s serial and socket libraries to open the door via Socket from multiple devices on the LAN, and from a phone outside the LAN.
Opening the door with the campus card using Arduino + buzzer + servo + RC522#
First, the wiring diagram:
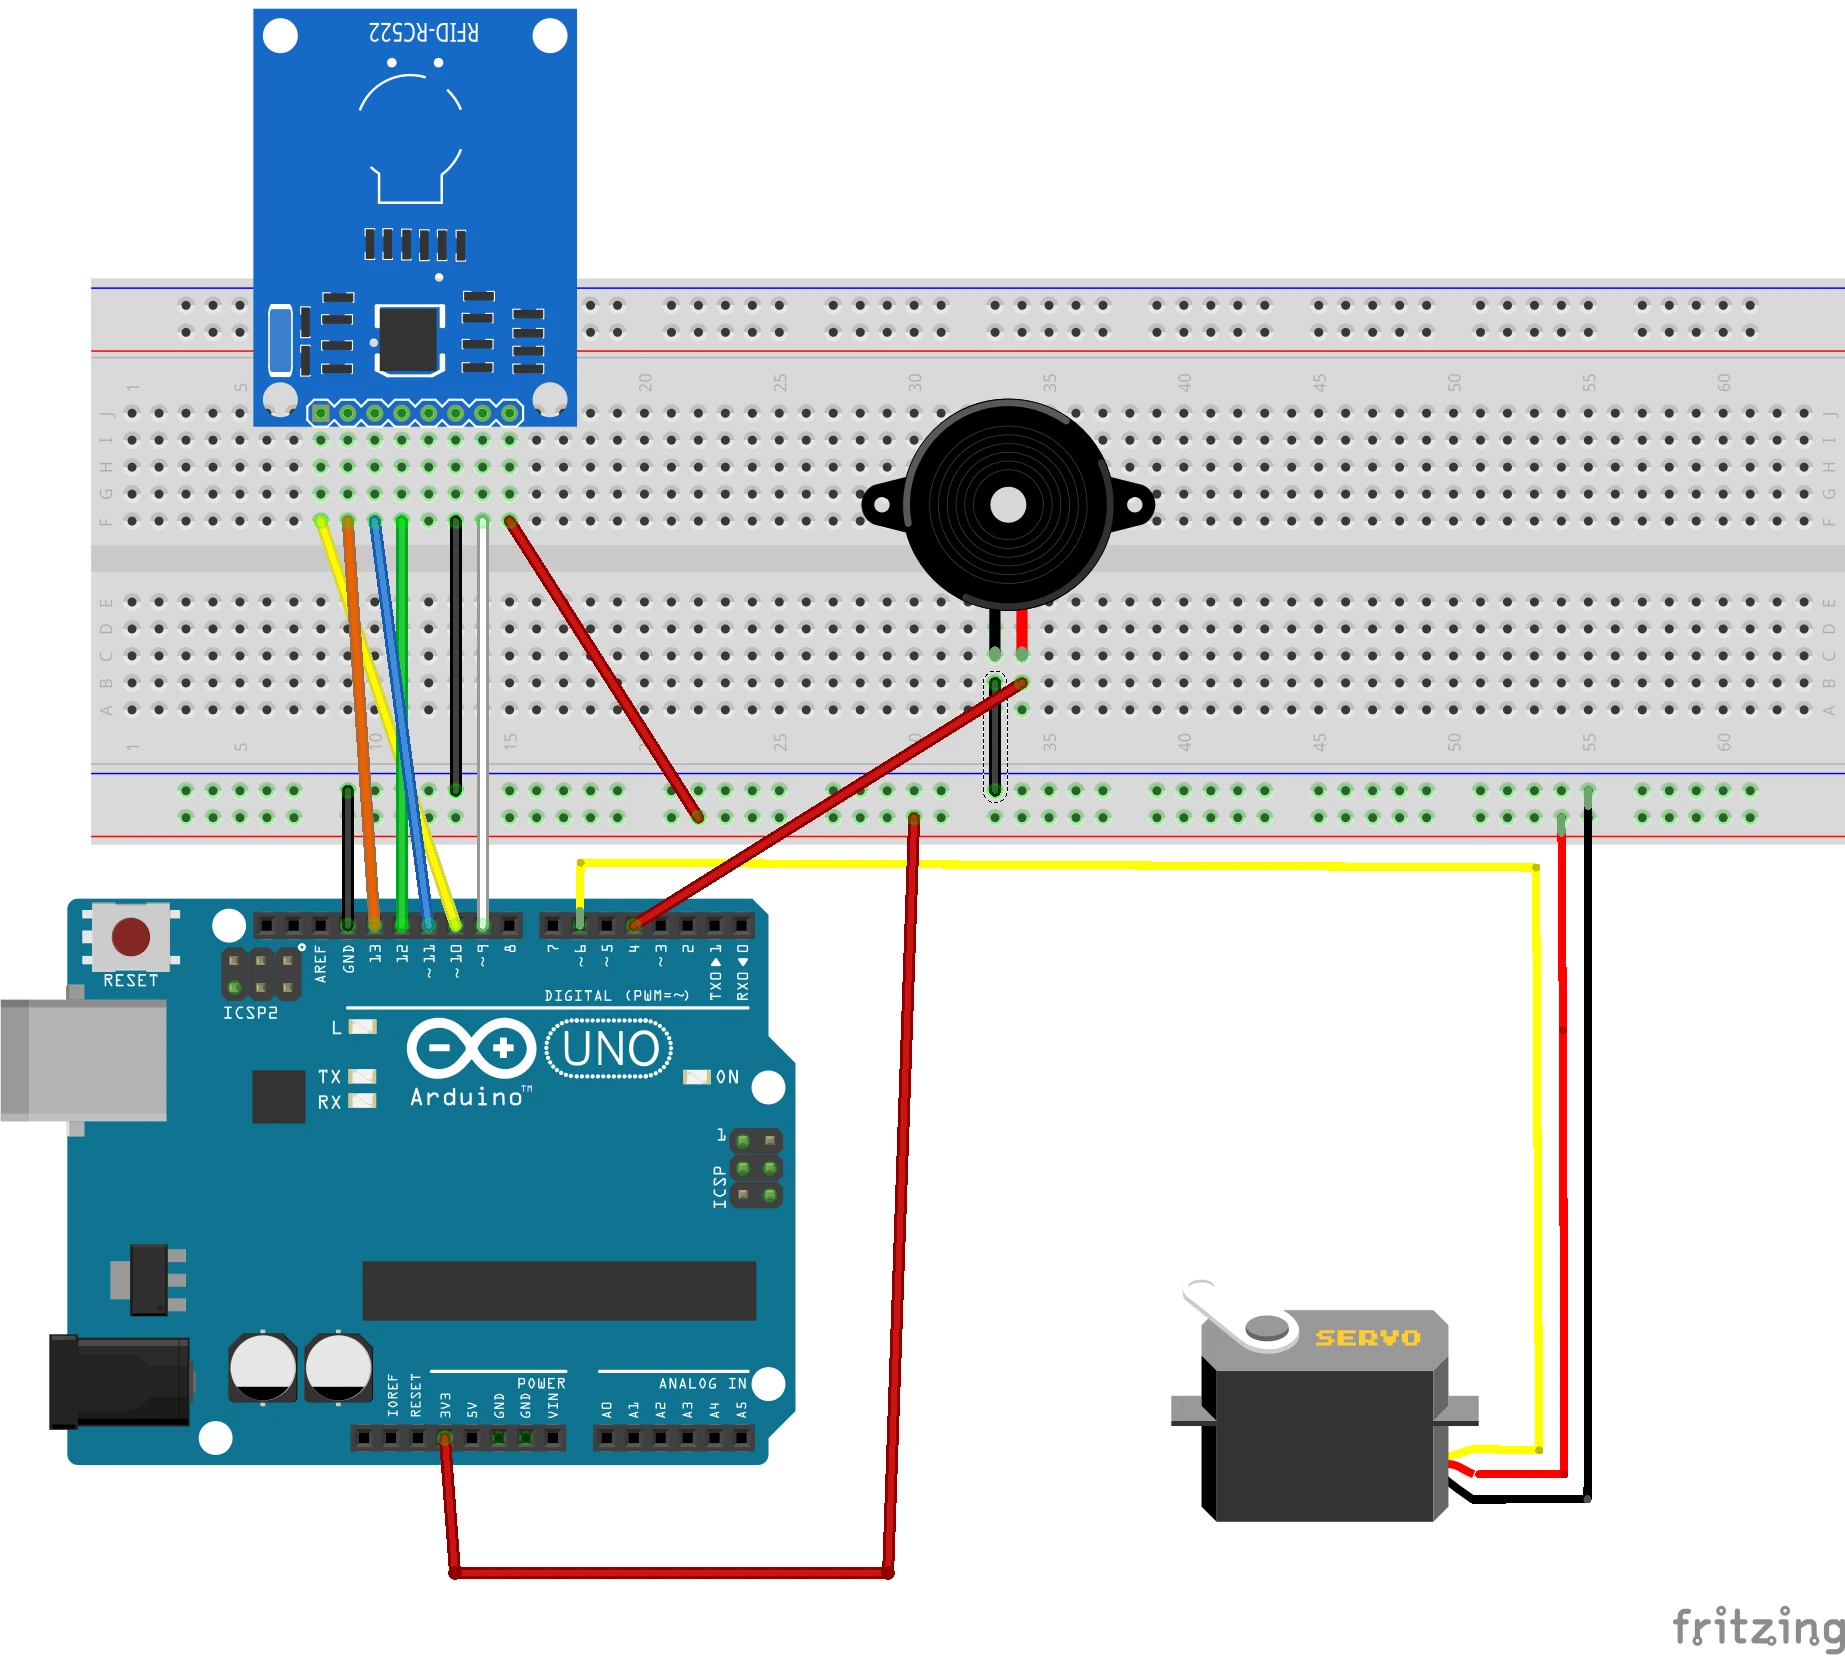
That’s how the circuit is wired; how to make it compact and route the wires is up to you to plan.
For the RFID-RC522 module:#
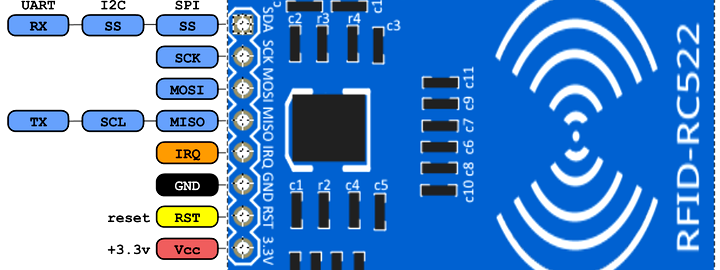
Here, Vcc goes to the Arduino’s 3.3v, RST goes to Arduino pin 9, GND — as the name Ground says — of course goes to ground, i.e. the Arduino’s GND, IRQ isn’t connected to anything, MISO goes to Arduino pin 12, MOSI goes to Arduino pin 11,
SCK goes to Arduino pin 13, and (SDA)SS goes to Arduino pin 10.
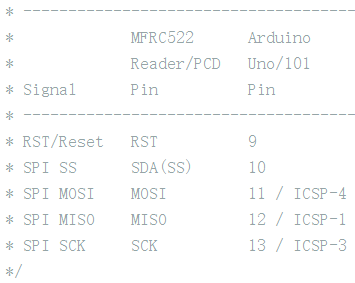
The module you buy needs its pins soldered on, so you’ll need to know how to use a soldering iron, solder wire, rosin and so on.
For the buzzer:#
The buzzer’s positive lead goes to the DC signal source, and GND goes to the Arduino’s GND.
For the metal servo:#
In my testing, the servo only works properly with its vcc connected to 3.3V.
vcc (red wire) goes to the Arduino’s 3.3v, gnd (black wire) goes to the Arduino’s GND, and j2 (yellow wire) goes to Arduino pin 6, since it needs an AC signal.
With the wiring done, you can start designing and writing the program.
The overall flow of the program should be:
- Get the card’s unique identifier
- Record the card’s unique identifier and store it in a database (or array)
- If the program reads a card whose unique identifier matches the database, make the buzzer beep and rotate the servo by a certain angle to open the door.
Side note:
I’ll write up the principles and theory behind RFID and M1 cards in detail some other time; here’s a quick overview.
Campus cards are generally M1-type IC cards. An M1 card’s EEPROM has 16 sectors, each sector has 4 blocks, and each block has 16 bytes. The 16 bytes are numbered 0 to F. Blocks are numbered 0 to 3, and block 3 is the sector trailer: of block 3’s 16 bytes, 0-5 are KEY A , 6-9 are the access bits, and A-F are KEY B. Bytes 0-F of the other blocks all store data, like meal card balance, water card balance and so on… I’m not teaching anything illegal here. I won’t go further into access control and key authentication. The UID is the data we need to read and record.
Each card has a unique UID. So to get in by swiping a card, we just need to check whether the swiped card’s UID exists in the list of matches.
The UID is bytes 0-3 of block 0 in sector 0. For example, if block 0 of sector 0 of some M1 card is
20 1A 01 A5 9E 88 04 00 00 00 00 00 00 00 00 00
then the card’s UID is 20 1A 01 A5.
So before writing the final program to the Arduino, you need to know the UIDs of the cards you want to enroll.
First, flash a program that can read the UID:
First plug the USB end of the Arduino’s serial cable into the Raspberry Pi and use VNC from your computer to work in the Arduino IDE installed on the Raspberry Pi; or download the Arduino IDE on your computer and plug the serial cable’s USB end into the computer. Either works the same; I’ll use the Raspberry Pi as an example.
Select 项目 (Sketch) -> 加载库 (Include Library) -> 管理库 (Manage Libraries):
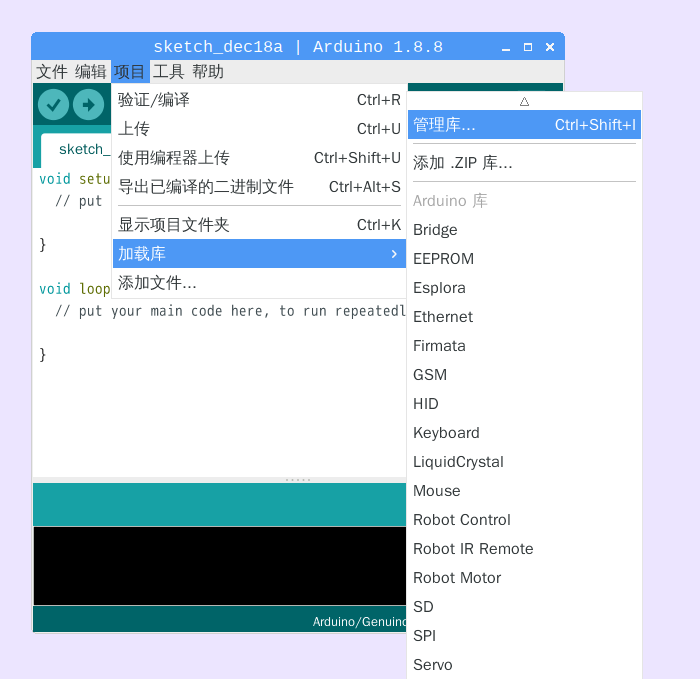
Type mfrc:
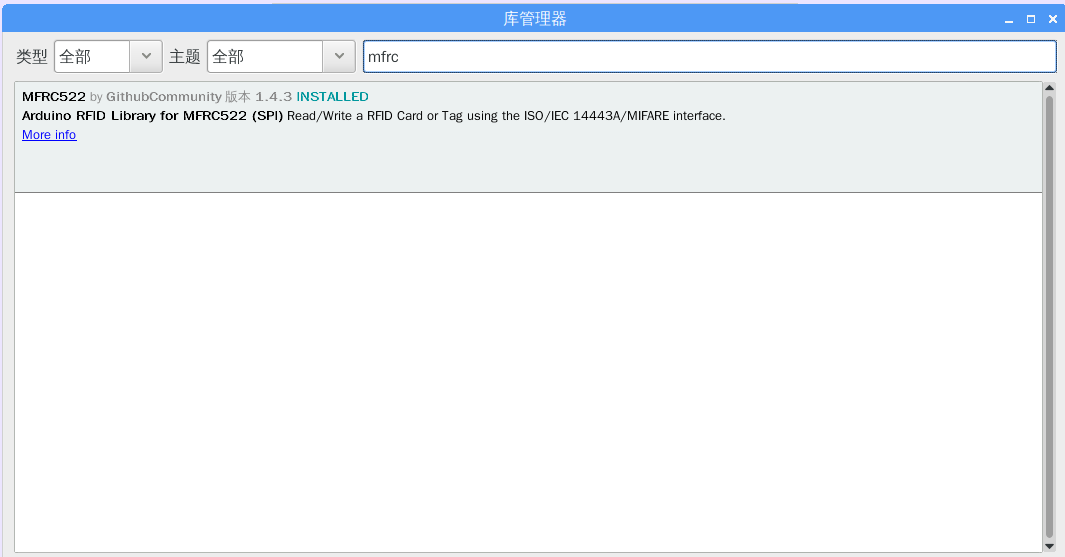
Install the MFRC522 library; I’ve already installed it here.
Once installed, click 文件 (File) -> 示例 (Examples) -> MFRC522 -> ReadNUID:
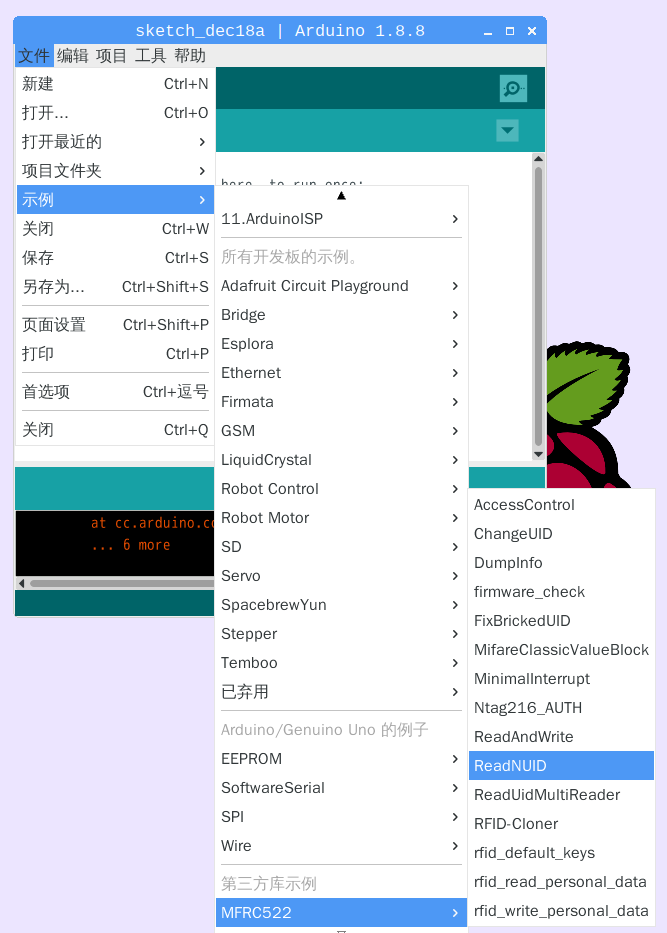
Once it’s open, upload it, i.e. flash the program. After it says the upload succeeded,
open the serial monitor: 工具 (Tools) -> 串口监视器 (Serial Monitor):
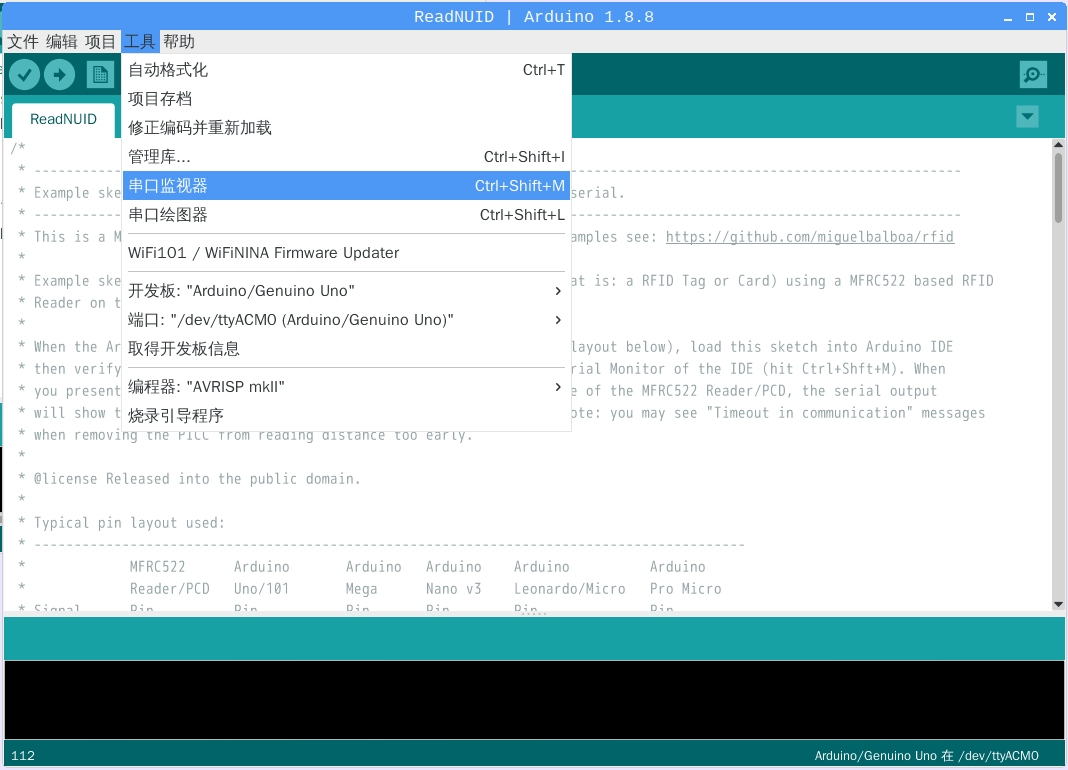
Hold the campus card you want to record close to the RC522 module, and the serial monitor will show what’s printed over serial, including the card’s UID:
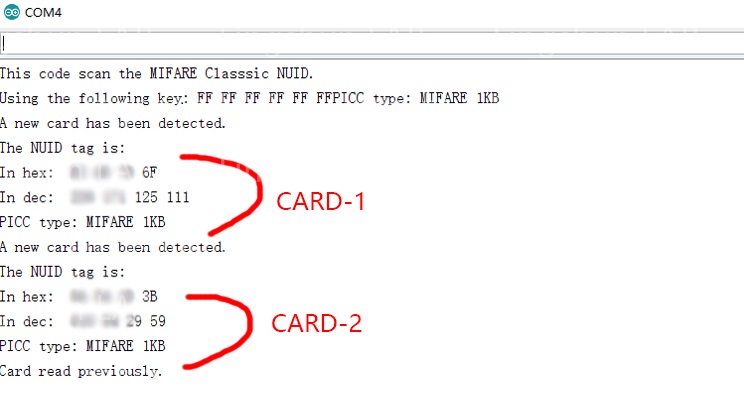
We don’t record the hex (hexadecimal) value; we record the dec (decimal) value, because decimal is what we’re most familiar with, and it’s easy to store in variables and easy to convert.
The final sample program:
#include <Servo.h>
#include <MFRC522.h>
#include <SPI.h>

#define SS_PIN 10
#define RST_PIN 9

MFRC522 rfid(SS_PIN, RST_PIN);

MFRC522::MIFARE_Key key;

byte nuidPICC[4];
byte keys[4][4]={{*,***,***,***},	//four people per dorm room, data stored in a 4*4 2D array
                 {***,***,***,***},	//I masked our uids with *
                 {**,***,***,***},	//fill in the decimal values you recorded.
                 {***,***,**,**}};

Servo myservo;				//create servo object myservo
int pos = 0;				//servo initial angle is 0
bool isMatch;				//whether the uid matches
int toneVal= 2000;			//buzzer tone value 2000

void setup() {				//initialization
    pinMode(4,OUTPUT);		//set pin 4 as output (buzzer)
    isMatch = false;		//initialize as not matched
    Serial.begin(9600);		//initialize serial baud rate to 9600
    SPI.begin();			//initialize SPI
    rfid.PCD_Init();		//initialize rfid
    myservo.attach(6);		//bind servo signal to pin 6
    myservo.write(0);		//initialize servo
    for (byte i = 0; i < 6; i++) {
      key.keyByte[i] = 0xFF;	//initialize key
    }
    Serial.println(F("Serial begun."));
}

void loop() {
    // read from serial; if the character 'o' is received, set isMatch to true and jump to Label
    if (Serial.available() > 0)
    {
        Serial.println(F("Got a message."));
        if('o' == Serial.read())
        {
            Serial.println(F("The door opened."));
            isMatch = true;
            goto Label;
        }
    }
    // look for a new card
    if ( ! rfid.PICC_IsNewCardPresent())
        return;

    // check whether the NUID has been read
    if ( ! rfid.PICC_ReadCardSerial())
        return;

    MFRC522::PICC_Type piccType = rfid.PICC_GetType(rfid.uid.sak);
    // check whether the card is a MIFARE type
    if (piccType != MFRC522::PICC_TYPE_MIFARE_MINI &&
        piccType != MFRC522::PICC_TYPE_MIFARE_1K &&
        piccType != MFRC522::PICC_TYPE_MIFARE_4K) {
        return;
    }
    // store the NUID in the nuidPICC array
    for (byte i = 0; i < 4; i++) {
        nuidPICC[i] = rfid.uid.uidByte[i];
    }
	// walk the 2D array; if the data matches, isMatch is true, otherwise false
    for(byte i = 0; i < 4; i++){
        if(isMatch) break;
        for(byte j = 0; j < 4; j++){
            if(rfid.uid.uidByte[j] == keys[i][j]) isMatch = true;
            else {isMatch = false;break;}
        }
    }
    // Label
    Label:
    // Halt PICC
    rfid.PICC_HaltA();
    // Stop encryption on PCD
    rfid.PCD_StopCrypto1();
    // if matched
    if(isMatch){
        // buzzer beeps; 4 is the pin, toneVal is defined above as 2000, change as needed.
        tone(4, toneVal);
        // servo rotates 100 degrees from its initial position; the delay is for debouncing.
        for(pos = 0; pos < 100; pos ++){
            myservo.write(pos);
            delay(10);
        }
        // the door is open now, stop the buzzer
        noTone(4);
        // keep the door open for 2.5 seconds
        delay(2500);
        // servo returns to its initial position
        for(pos = 100; pos >=0; pos--){
            myservo.write(pos);
            delay(10);
        }
        // reset the flag
        isMatch = false;
    }
    // reset the flag
    isMatch = false;
}
Upload (flash) it, then once it succeeds, swipe a card and test whether it controls the buzzer and rotates the servo. If it works, on to the next part.
Opening the door from multiple devices with Raspberry Pi + Python’s serial and socket libraries#
This part involves Python, serial ports, sockets, Windows batch files, Java and Android Studio, Swift and Xcode, HTML+JS+PHP, Wox plugins and more.
How do you control the Arduino with a Python script on the Raspberry Pi?#
I’ll just post the code.
Code path: under /home/pi
arduino.py:
import serial    #import serial module
ser = serial.Serial('/dev/ttyACM0', 9600,timeout=0.3);   #open named port at 9600,0.3s timeot

#try and exceptstructure are exception handler

try:
    for i in range(1,4):
        ser.write("o"); #writ a string to port
        response = ser.readall(); #read a string from port
        print (response);
except:
    ser.close();
Here, /dev/ttyACM0 is the Arduino’s serial device path, and 9600 is the baud rate.
In my testing, sending serial messages has some latency, so I use a for loop to send the door-open signal o several times.
Run python /home/pi/arduino.py in the Raspberry Pi terminal and the door opens.
How do you let other devices open the door too?#
Python has the os library, whose system function can run system commands. We use Python to create a multithreaded socket server that receives messages from clients; as soon as it receives a specific command, it runs system("python /home/pi/arduino.py&"). That way the door can be opened over a socket. Once the socket is in place, any device that can send a socket message can open the door.
The Socket Sever code:
Code path: under /home/pi
server.py:
#coding=utf-8
import socket
import threading,getopt,sys,string
import os

opts, args = getopt.getopt(sys.argv[1:], "hp:l:",["help","port=","list="])
#set the default max connections and port number; the defaults are used when no arguments are passed on the command line
list=10
host='192.168.1.101'
port=6666
def usage():
    print """
    -h --help             print the help
    -l --list             Maximum number of connections
    -p --port             To monitor the port number
    """
for op, value in opts:
    if op in ("-l","--list"):
        list = string.atol(value)
    elif op in ("-p","--port"):
        port = string.atol(value)
    elif op in ("-h"):
        usage()
        sys.exit()

def jonnyS(client, address):
    try:
    #set the timeout
        client.settimeout(500)
    #size of data to receive
        buf = client.recv(2048)
    #echo the received message back to the client as-is
        client.send(buf)
	if buf == 'open the door':
		os.system('python /home/pi/arduino.py&')
    #show exit after timeout
    except socket.timeout:
        print 'time out'
    #close the connection to the client
    client.close()

def main():
    #create the socket object by calling the socket constructor
    #AF_INET is the ip address family, SOCK_STREAM is a stream socket
    sock = socket.socket(socket.AF_INET, socket.SOCK_STREAM)
    #bind the socket to the given address; the first argument is the ip address, the second is the port number
    sock.bind((host, port))
    #set the max number of connections
    sock.listen(list)
    while True:
    #the server socket waits for a client to request a connection via the socket's accept method
        client,address = sock.accept()
	thread = threading.Thread(target=jonnyS, args=(client, address))
        thread.start()

if __name__ == '__main__':
    main()
Here, change host to your own Raspberry Pi’s LAN IP and port to the port number you want to open. I’m using 192.168.1.101 and 6666 as the example. Run python /home/pi/server.py & in the terminal to start the service in the background.
But as soon as the Raspberry Pi reboots, the service stops, so we edit /etc/rc.local and add nohup python /home/pi/server.py & on the line above return 0.
From here on, any socket client on another device just needs to connect to this server and send the message open the door to open the door.
Windows:#
First write a socket client in Python:
Create a folder 开门 (“open door”) anywhere,
then create a file client.py in that folder:
import socket
import time

HOST = '192.168.1.101'
PORT = 6666
sock = socket.socket(socket.AF_INET, socket.SOCK_STREAM)
sock.connect((HOST, PORT))
sock.send(b'open the door')
print (sock.recv(1024).decode())
sock.close()
As we know, a .bat file is a batch file that can run system commands.
Create open.bat in that folder:
python client.pySave it, right-click open.bat, send a shortcut to the desktop, and rename it 开门 (“open door”). From then on, clicking 开门 on the desktop opens the door.
You can also do it with Wox + a Python plugin you write yourself; the principle is similar. Here’s its GitHub releases page: https://github.com/Wox-launcher/Wox/releases
Android:#
Create an empty project, with the default main activity MainActivity.java, default layout activity_main.xml, and manifest file AndroidManifest.xml.
① Add permissions in AndroidManifest.xml:
    <!--allow the app to change network state-->
    <uses-permission android:name="android.permission.CHANGE_NETWORK_STATE"/>

    <!--allow the app to change WIFI connection state-->
    <uses-permission android:name="android.permission.CHANGE_WIFI_STATE"/>

    <!--allow the app to access network information-->
    <uses-permission android:name="android.permission.ACCESS_NETWORK_STATE"/>

    <!--allow the app to access the WIFI adapter's network information-->
    <uses-permission android:name="android.permission.ACCESS_WIFI_STATE"/>

    <!--allow the app full network access-->
    <uses-permission android:name="android.permission.INTERNET"/>
② Edit the layout file activity_main.xml:
<LinearLayout xmlns:android="http://schemas.android.com/apk/res/android"
xmlns:tools="http://schemas.android.com/tools"
android:layout_width="match_parent"
android:layout_height="match_parent"
android:gravity="center"
tools:context=".MainActivity"
android:weightSum="1">
<Button
    android:layout_width="wrap_content"
    android:layout_height="wrap_content"
    android:id="@+id/open_button"
    android:text="开门"
    android:onClick="onClick"
    android:gravity="center"
    android:layout_gravity="center"
    />
</LinearLayout>
③ Import packages and add code in MainActivity.java:
Imports:
import android.support.v7.app.AppCompatActivity;
import android.os.Bundle;
import android.view.View;
import android.widget.Button;
import java.io.BufferedReader;
import java.io.IOException;
import java.io.InputStream;
import java.io.InputStreamReader;
import java.io.OutputStream;
import java.net.Socket;
import java.net.UnknownHostException;
Code:
public class MainActivity extends AppCompatActivity {
    public Button openButton;
    @Override
    protected void onCreate(Bundle savedInstanceState) {
        super.onCreate(savedInstanceState);
        setContentView(R.layout.activity_main);
        openButton = findViewById(R.id.open_button);
    }
    public void onClick(View view){
        new Thread(){
            @Override
            public void run() {
                super.run();
                try {
                    //1. create a socket to the given server address and the port the server listens on
                    Socket socket = new Socket("192.168.1.101", 6666);//192.168.1.101 is my host's IP address, the port is 6666.
                    //2. get the client socket's output stream to send data to the server
                    OutputStream os = socket.getOutputStream();
                    //write the data to send to the server
                    os.write("open the door".getBytes());
                    os.flush();
                    socket.shutdownOutput();
                    //get the socket's input stream, which holds the data returned by the server
                    InputStream is = socket.getInputStream();
                    //parse the data returned by the server
                    InputStreamReader reader = new InputStreamReader(is);
                    BufferedReader bufReader = new BufferedReader(reader);
                    String s = null;
                    final StringBuffer sb = new StringBuffer();
                    while((s = bufReader.readLine()) != null){
                        sb.append(s);
                    }
                    runOnUiThread(new Runnable() {
                        @Override
                        public void run() {
                            //tv.setText(sb.toString());
                        }
                    });
                    //3. close IO resources (note: in real development this belongs in finally)
                    bufReader.close();
                    reader.close();
                    is.close();
                    os.close();
                    socket.close();
                } catch (UnknownHostException e) {
                    e.printStackTrace();
                } catch (IOException e) {
                    e.printStackTrace();
                }
            }
        }.start();
    }
}
Then connect your phone over USB, enter developer mode, allow USB debugging, and install the apk on your phone. Once the phone is on the dorm WiFi, you can open the door with the Android app.
Mac and Linux:#
This one’s simpler. Say your home directory is /user/bob; create a file named client.py in that directory, with the same content as before:
import socket
import time

HOST = '192.168.1.101'
PORT = 6666
sock = socket.socket(socket.AF_INET, socket.SOCK_STREAM)
sock.connect((HOST, PORT))
sock.send(b'open the door')
print (sock.recv(1024).decode())
sock.close()
You can edit ~/.bashrc:
sudo nano ~/.bashrcAdd the line alias km='python /user/bob/client.py&', save, and activate it:
source ~/.bashrcFrom then on you can open the door with the terminal command km; it’s even more efficient paired with Alfred.
iOS:#
To be continued… 2018.12.23 1:12
Comments